

Online Store
(i) Web Storefront Design
STOREBERRY has prepared a variety of simple yet stylish UI templates for you. With absolutely no coding skills required, you can go to STOREBERRY Admin Panel 「Online Store」 「My Template」 and pick the desired style and theme for your website, then upload your brand logo and related information to complete the interface design of your online store!
Want to make further modifications? You can simply tap 「Edit」 on the selected UI template to edit the layout, color and others to create a unique and outstanding online store.
*All STOREBERRY designs adopt responsive web design (RWD) which can automatically optimize the website layout, regardless of whether you are using mobile phone, tablet, or desktop computer to browse our website.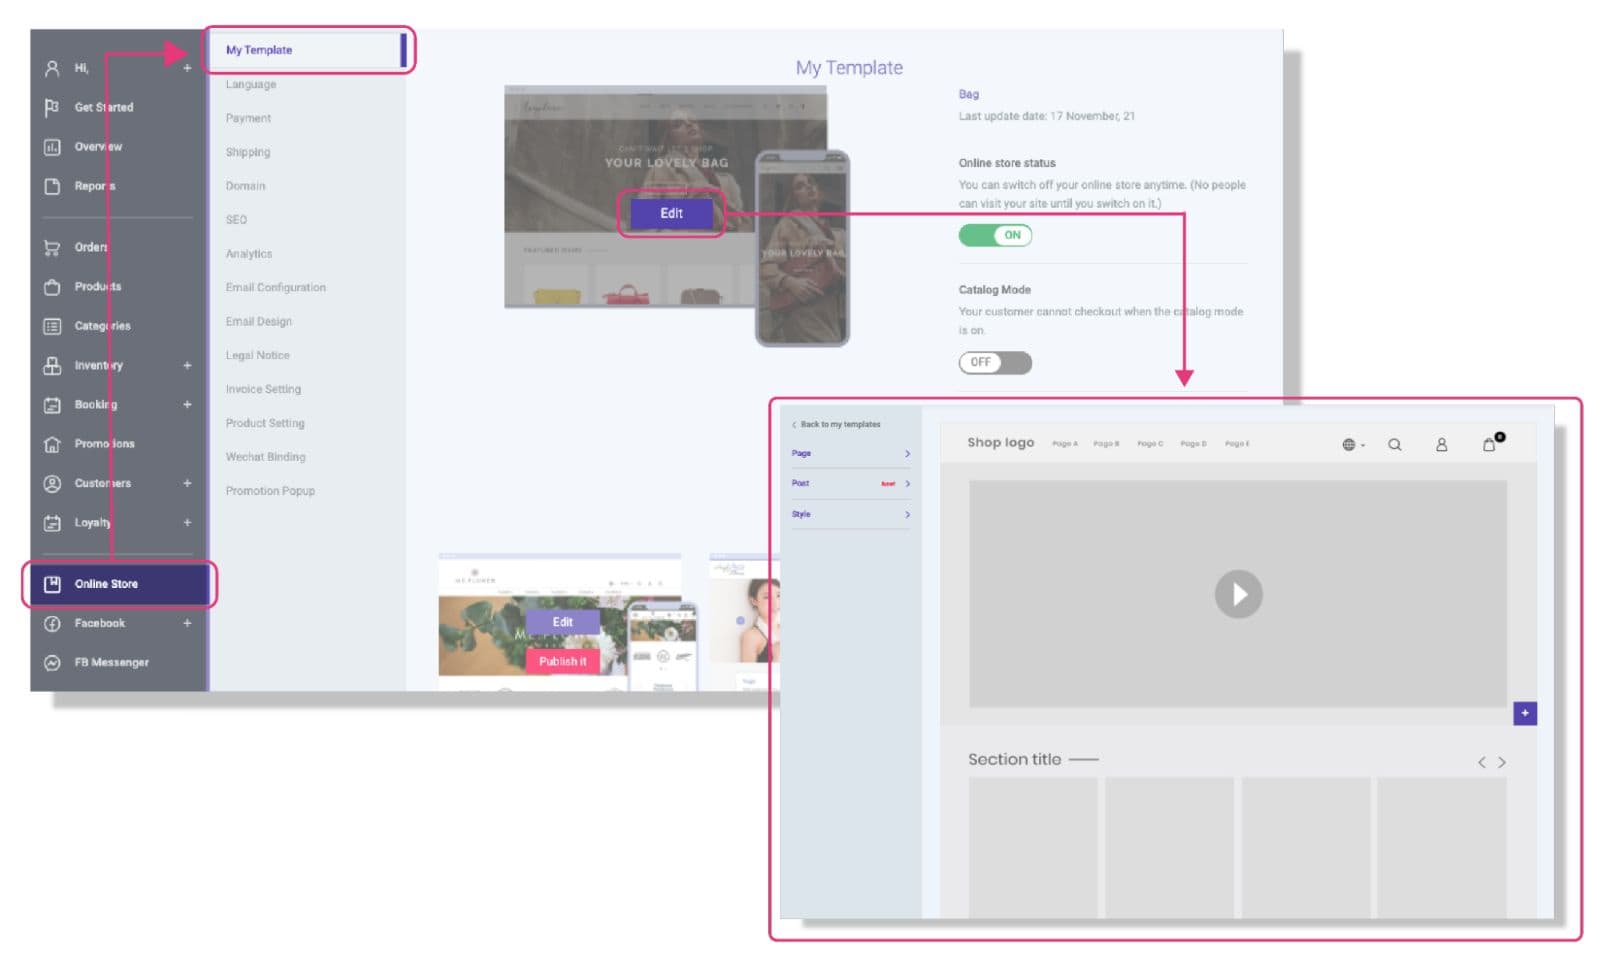
STOREBERRY Storefront Design Tips:
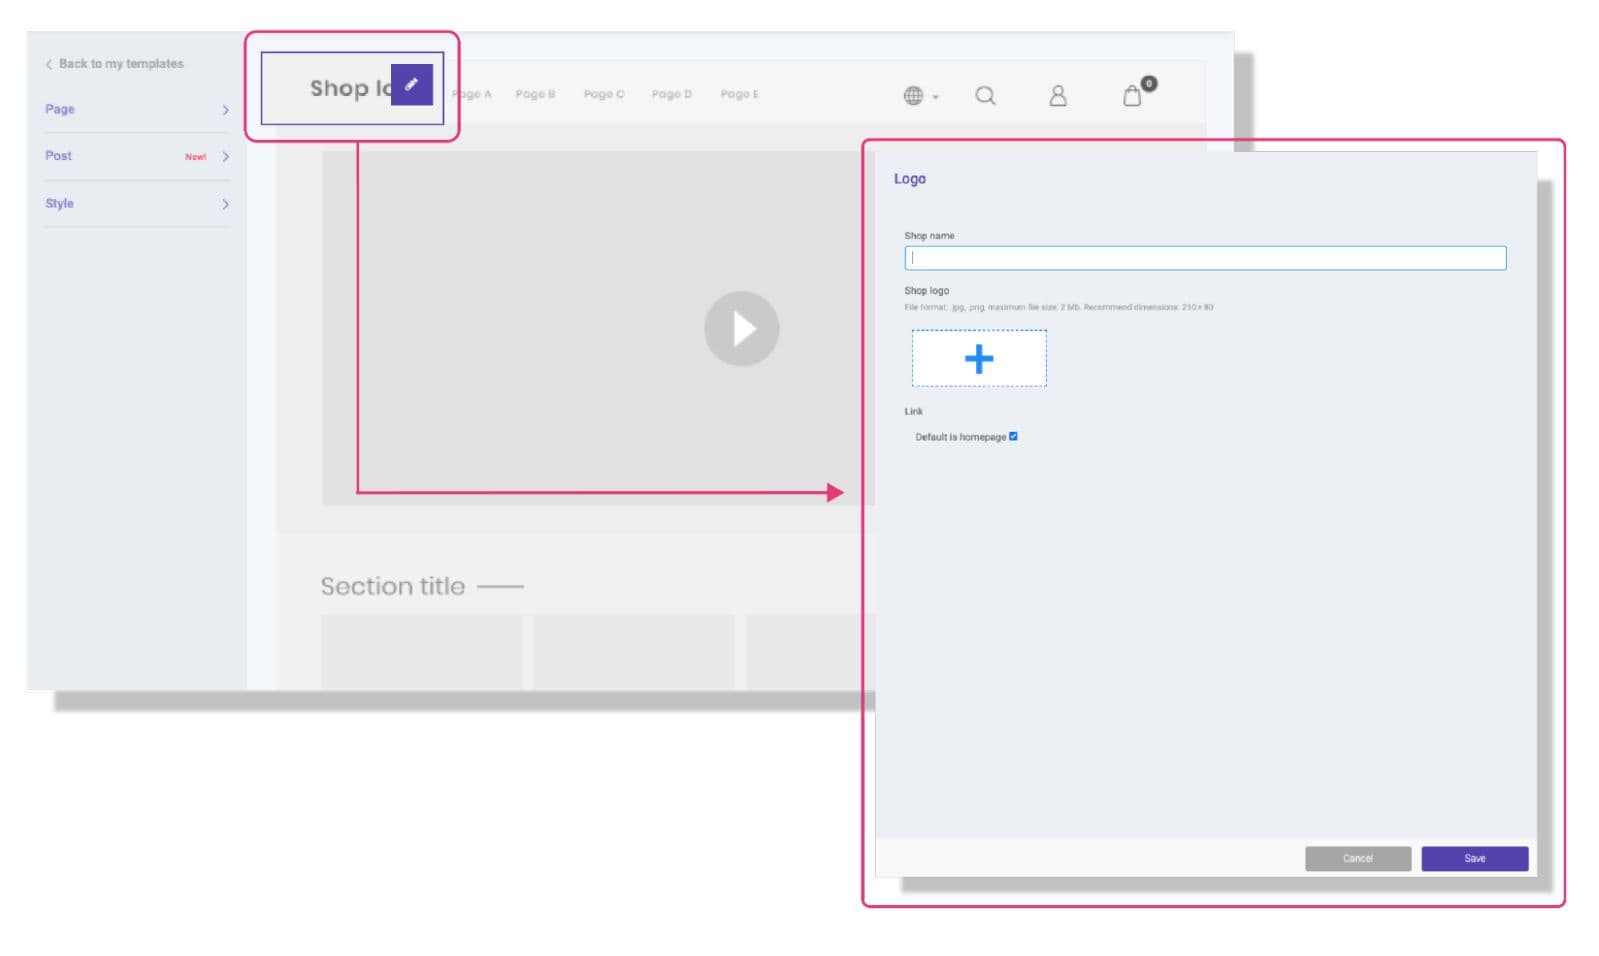
1)How do I update the store name and logo?
1. Go to STOREBERRY Admin Panel 「Online Store」 「My Template」 「Edit (Template)」
2. Go to “Shop logo” and tap the small 「Edit」 icon on the right hand side and update the store name and logo.
3. Click 「Save」 to confirm the updates.
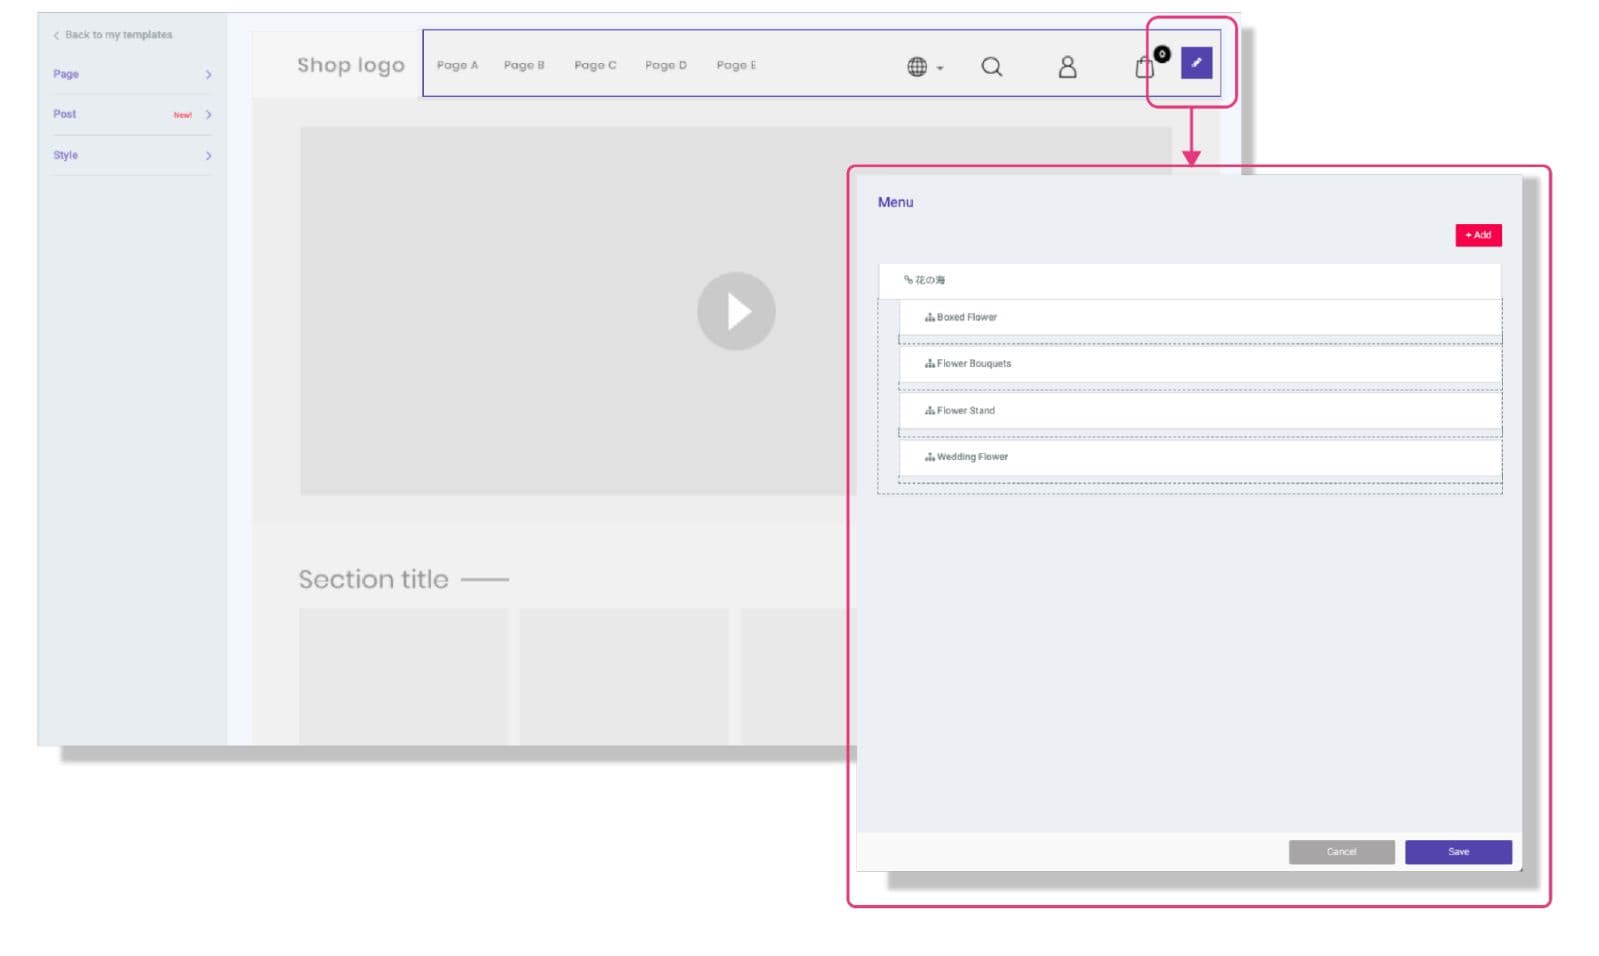
2)How do I edit the top menu bar?
After establishing your product categories, you can feel free to edit the top menu bar of your website.
1. Enter the interface setting at STOREBERRY Admin Panel 「Online Store」 「My Template」 「Edit (Template)」
2. Tap the small 「Edit」 icon next to the top menu bar.
3. Click 「+Add」 to add new product categories, pages and links and adjust the order of items by drag and drop.
Tap 「Save」 to confirm the updates.
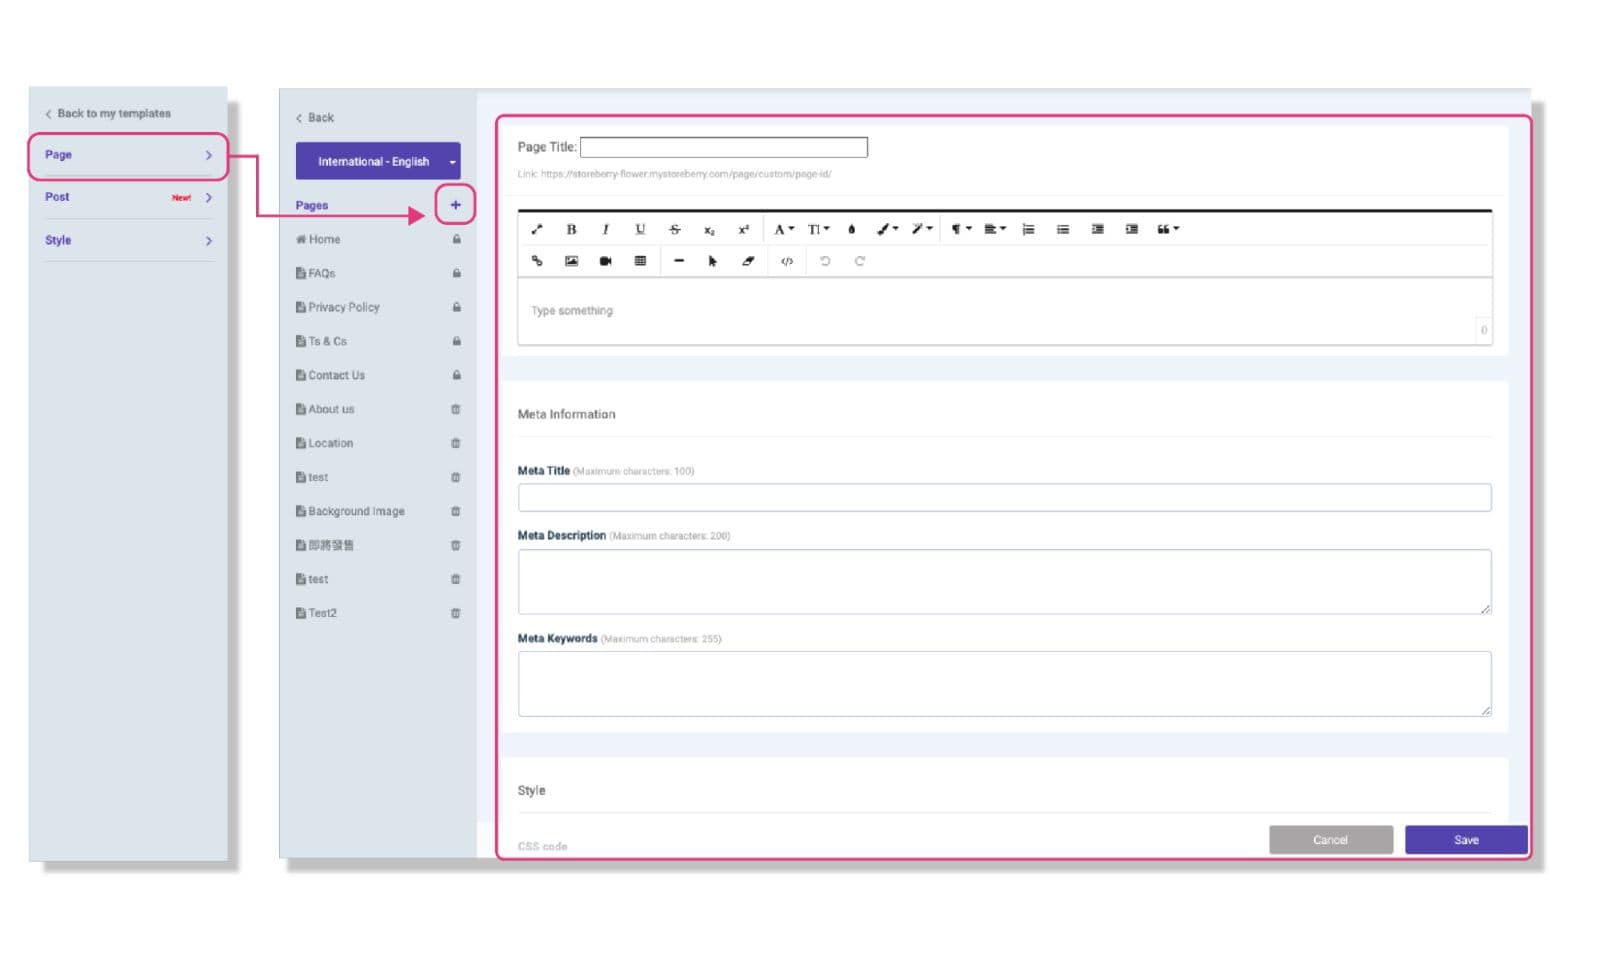
3)How do I create new website pages?
1. Go to STOREBERRY Admin Panel 「Online Store」 「My Template」 「Edit (Template)」 to get into the interface setting.
2. Choose 「Page」 on the left hand side and you will see the list of default website pages, including FAQ, Privacy Policy, Contact Us, etc.
3. To create a new page, you can click the “+” icon next to “Pages” to add a page and get the URL under the Page Title. Enter the following details and tap 「Save」 .
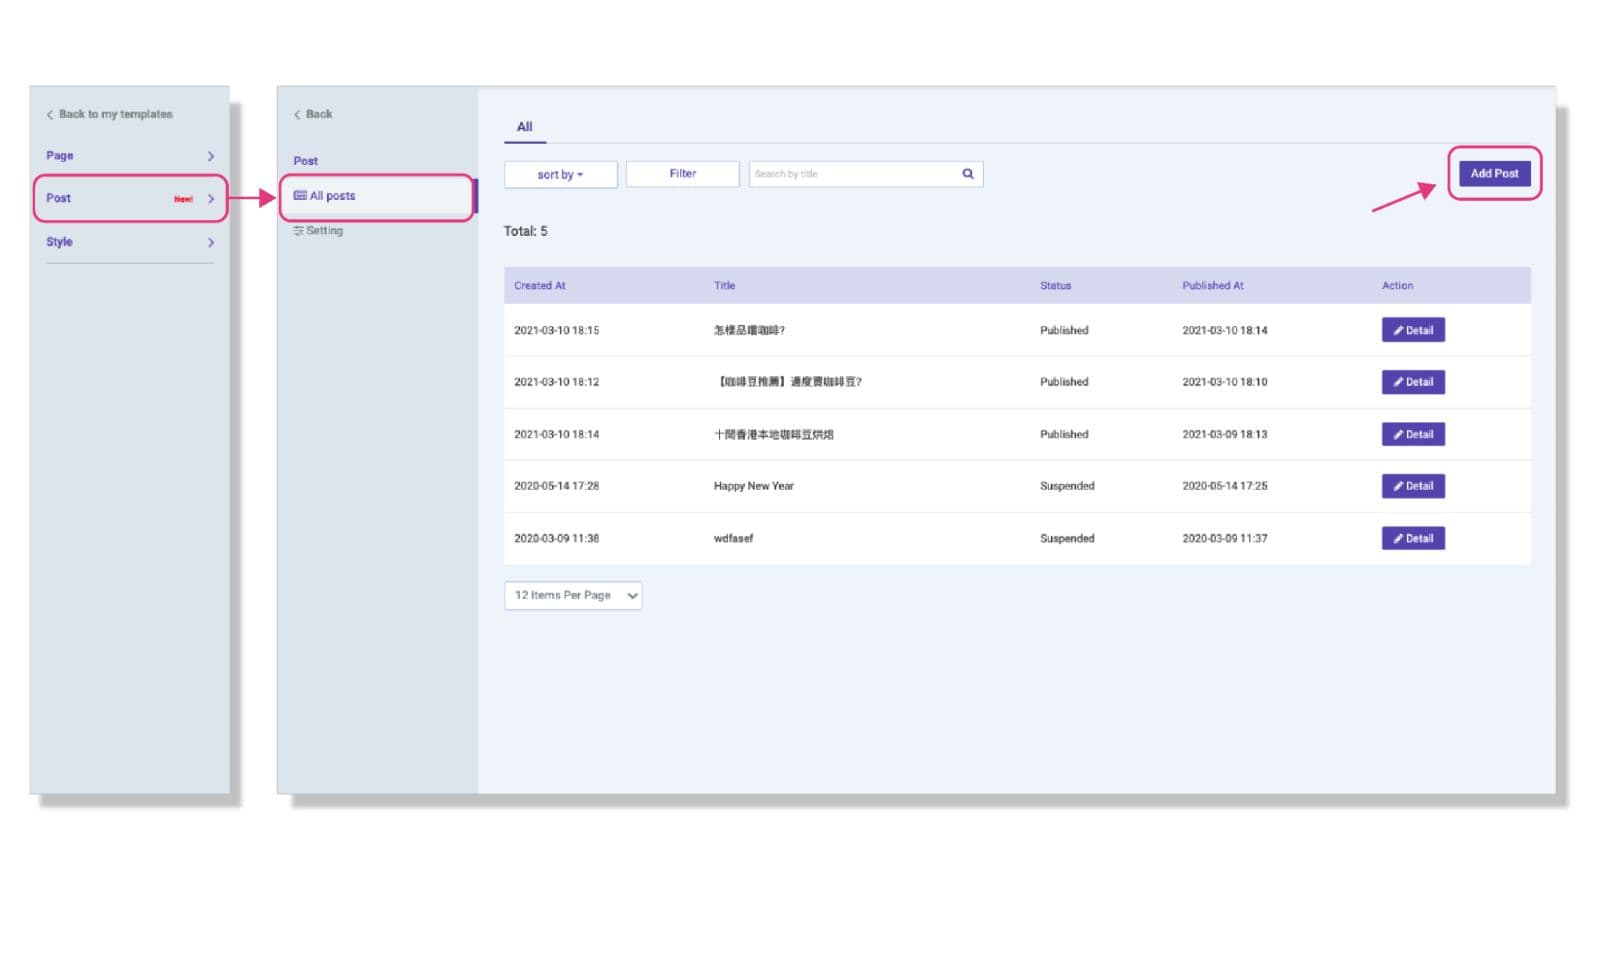
(ii) Blog Management
STOREBERRY provides blog function for all users. You can enter the web interface setting at STOREBERRY Admin Panel 「Online Store」 「My Template」 , click 「Edit」 and select 「Post」 「All Posts」 at the side toolbar to view all the published blog posts here. You can also click 「Add Post」 in the top right corner to start writing a blog post.
You can publish the updated information of your online store, such as the latest products, brand story, product usage methods, etc. through blogs, and regularly share brand news with customers.
Want to improve the search engine ranking of the online store? STOREBERRY's blog function supports both SEO settings and CSS code editing. Publishing the latest and highly relevant blog posts from time to time will definitely help raise your website's SEO score!
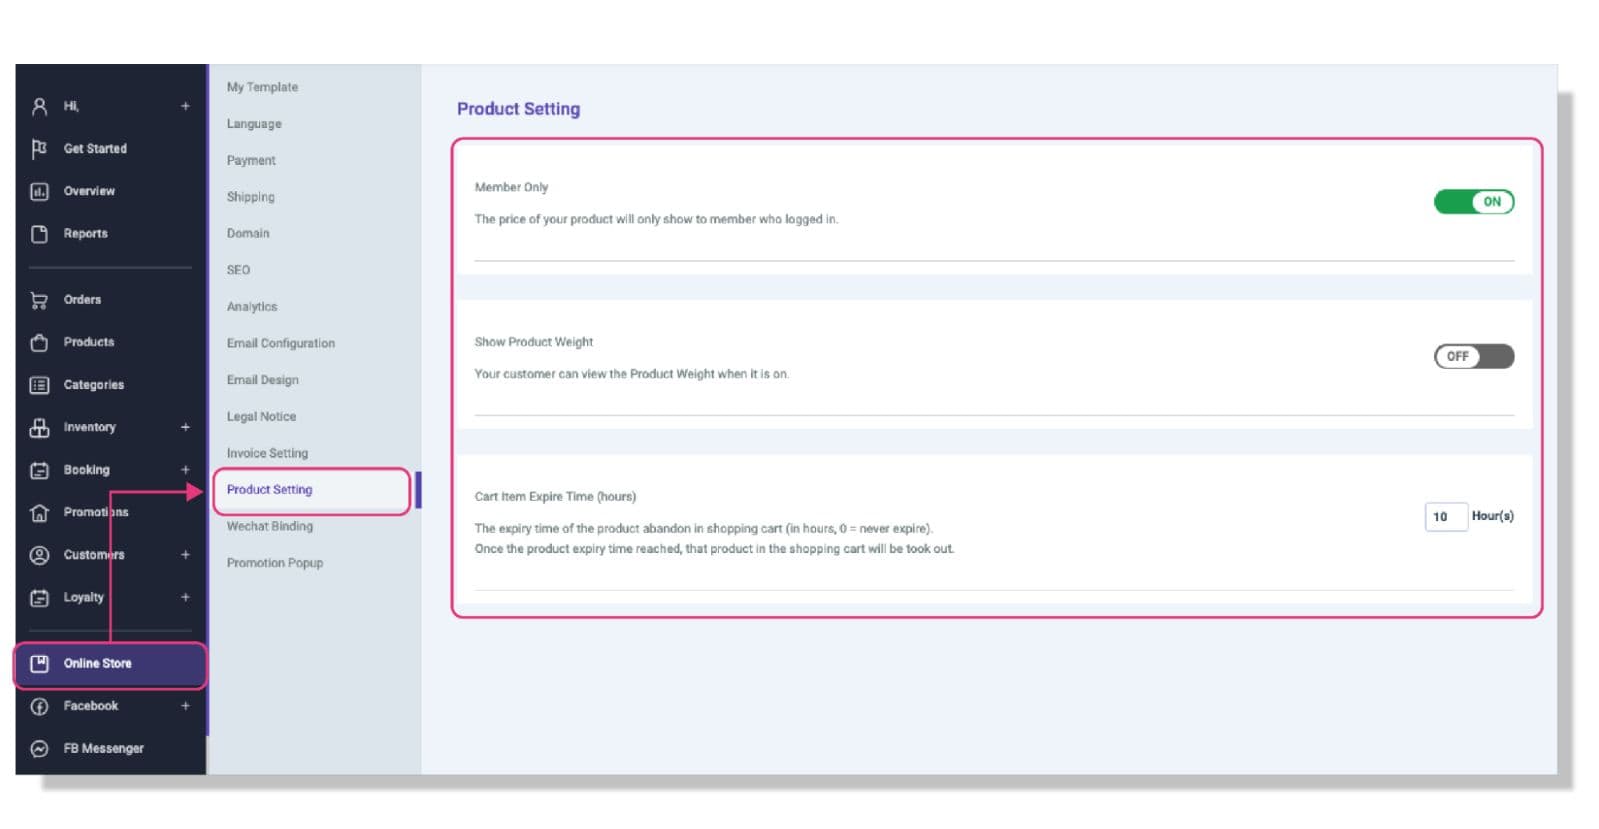
(iii) Product Settings
You can modify the basic settings of products and shopping carts in the STOREBERRY Admin Panel 「Online Store」 「Product Setting」 :
1) Member Only: Your product prices will only be displayed to the logged-in members after turning it on.
2)Show Product Weight: Your customers can check the weight of the product after turning it on.
3)Cart Item Expire Time (hours): Here you can set the time limit that the product stays in the customer's shopping cart. If you enter “10” hours, the products stored in the shopping cart by the customer will be removed 10 hours after being added to the shopping cart.
(iv) Invoice Settings
You can fill in the information of your online store in the STOREBERRY Admin Panel 「Online Store」 「Product Setting」 「Invoice Setting」 to set the invoice content.

# 2.2 Payment Gateway
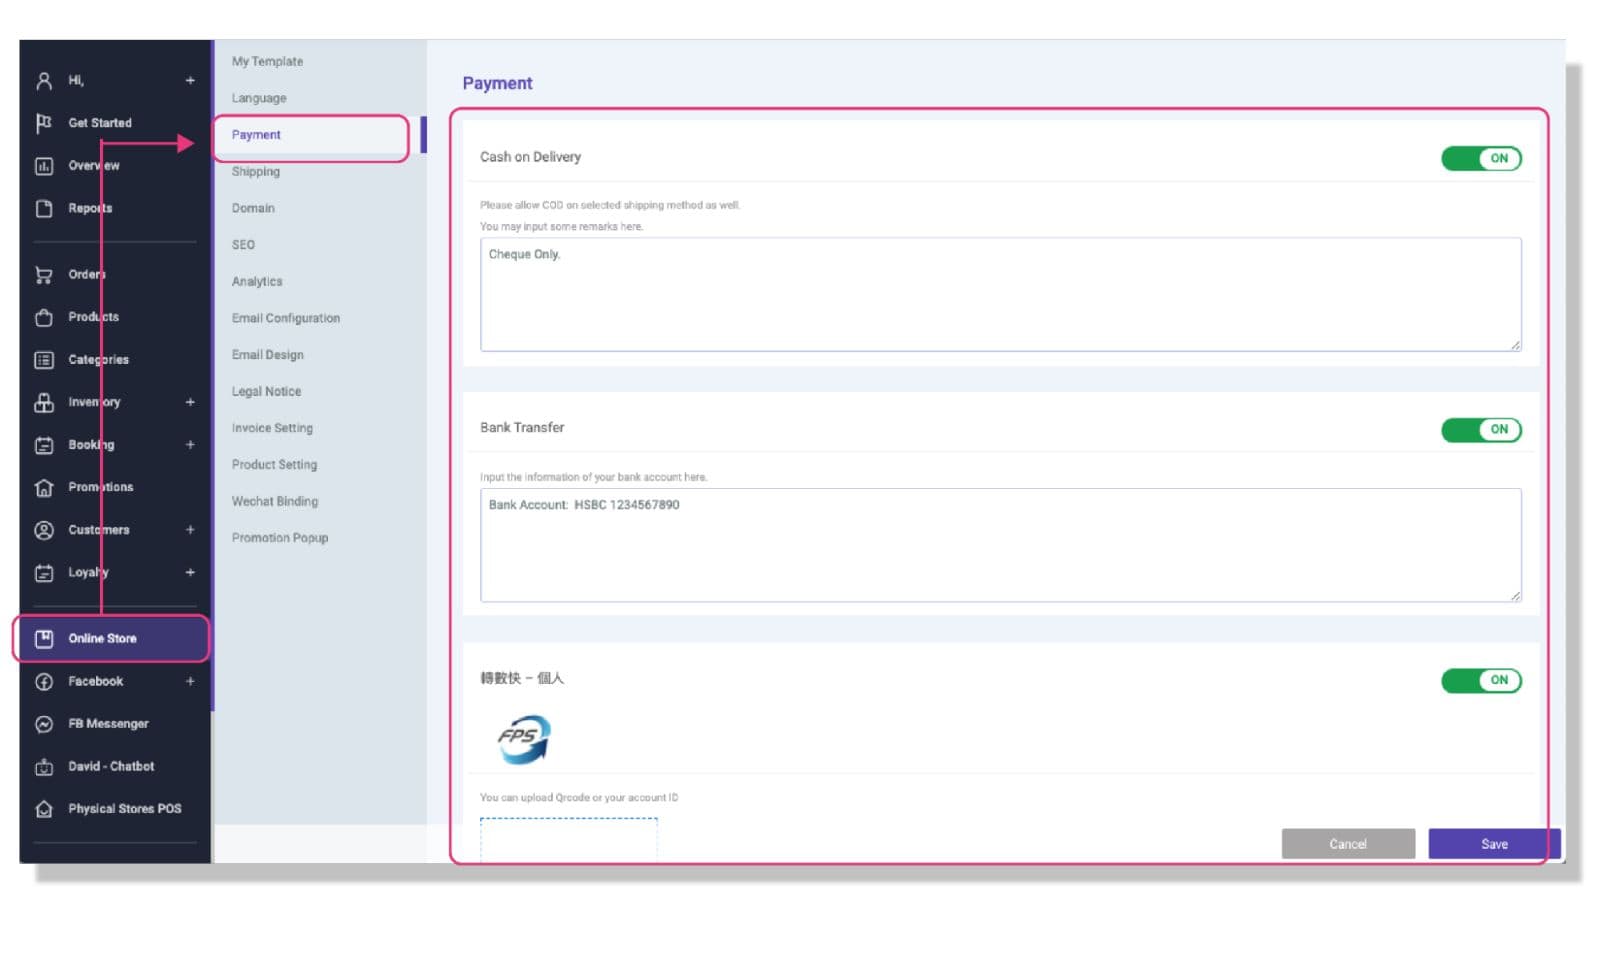
There is nothing more important than payment security. STOREBERRY works with multiple third-party payment service providers to offer safe and smart payment options* and ensure secure and smooth transactions between buyers and sellers.
Whether you prefer credit card payment, mobile payment, or other custom payment methods (E.g. bank transfer or cash on delivery), you can simply set up the payment options under STOREBERRY Admin Panel 「Online Store」 「Payment」 in a few steps.
For Payment Gateway Setup, please refer to the STOREBERRY Payment Gateway Integration Guide below.
*Online payment methods include: Visa, Mastercard, PayPal, FPS, Alipay Hong Kong, WeChat Pay HK, PayMe For Business, etc.
(i) Payment Method(PayPal|Stripe|PayMe for Business|QFPay)
PayPal
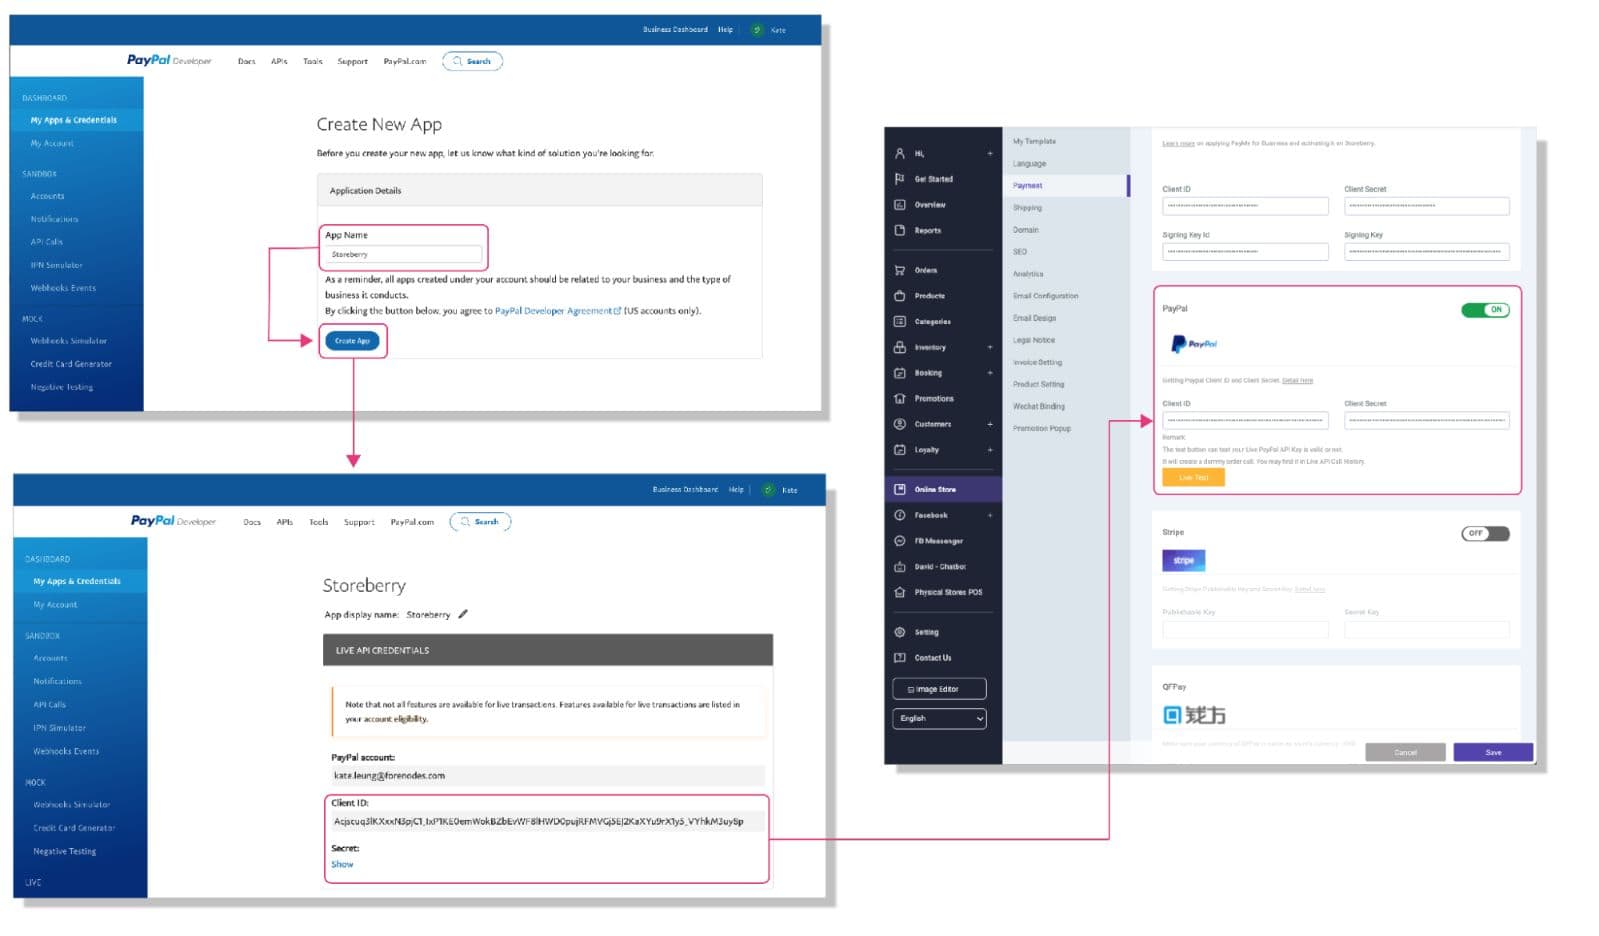
If you are using PayPal for the first time, please register a PayPal Business Account in PayPal Developers Website and follow the steps below to get your Paypal Client ID and Client Secret:
1)Log in to your PayPal Business Account, go to the top right corner and tap your account name > “Dashboard”. Click “My Apps & Credentials” on the side menu bar and select “Live”. Then scroll down and click “Create App”.
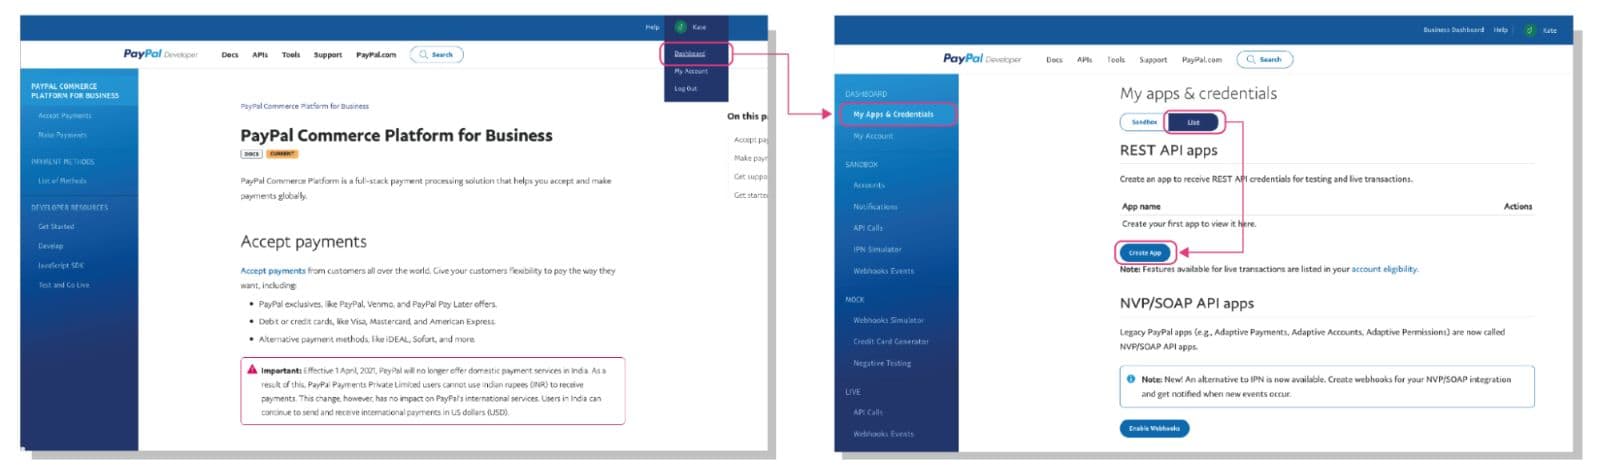
2)Click “Create App” after entering the “App Name”, then copy the Client ID and Secret. Go to STOREBERRY Admin Panel 「Online Store」 「Payment」 and paste on the PayPal column. Click “On” to connect to the payment gateway.
Stripe
If you are using Stripe for the first time, please register a Stripe Account in Stripe and follow the steps below to get your Stripe Publishable Key & Secret Key:
1)Open the email from Stripe and click “Verify email address” and enter Stripe’s website.

2)Go to the side menu bar and click your account name > “+New account”. Enter your store name and location on the pop up window, then click on the “Create Account” button.

3)Click「Activate your account」to update your account details.

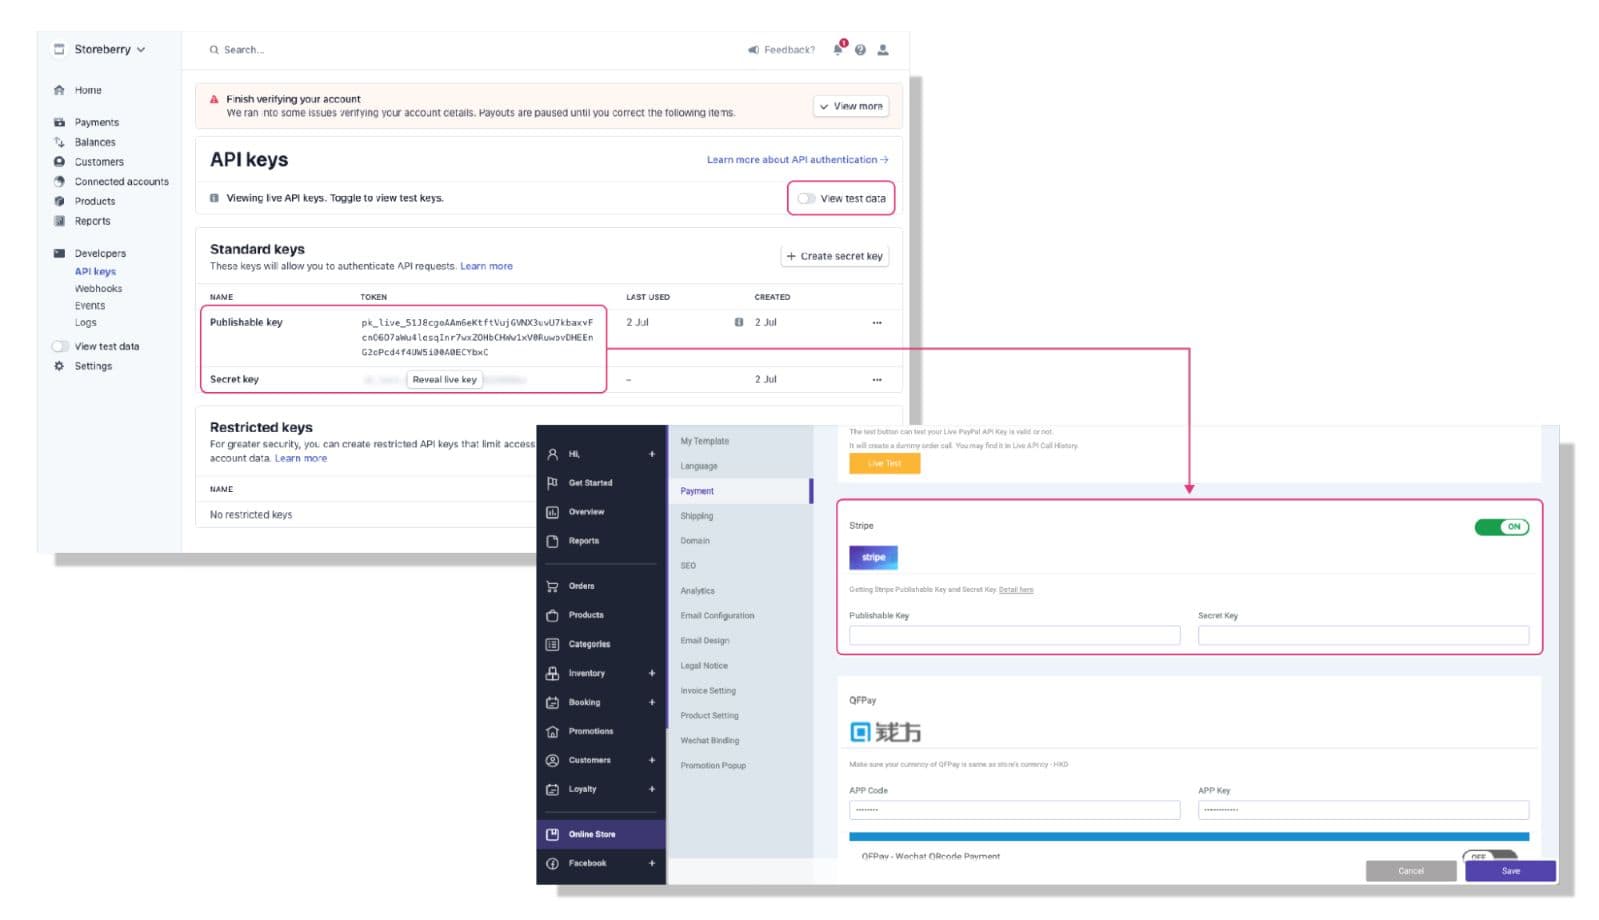
4)After registering, click “Developers” on the side menu bar and choose “API Keys”.

5)Please make sure the “View test data” mode has been turned off, then copy the Publishable Key and Secret Key on the website. Go to STOREBERRY Admin Panel 「Online Store」 「Payment」 and paste on the Stripe column. Click “On” to connect to the payment gateway.
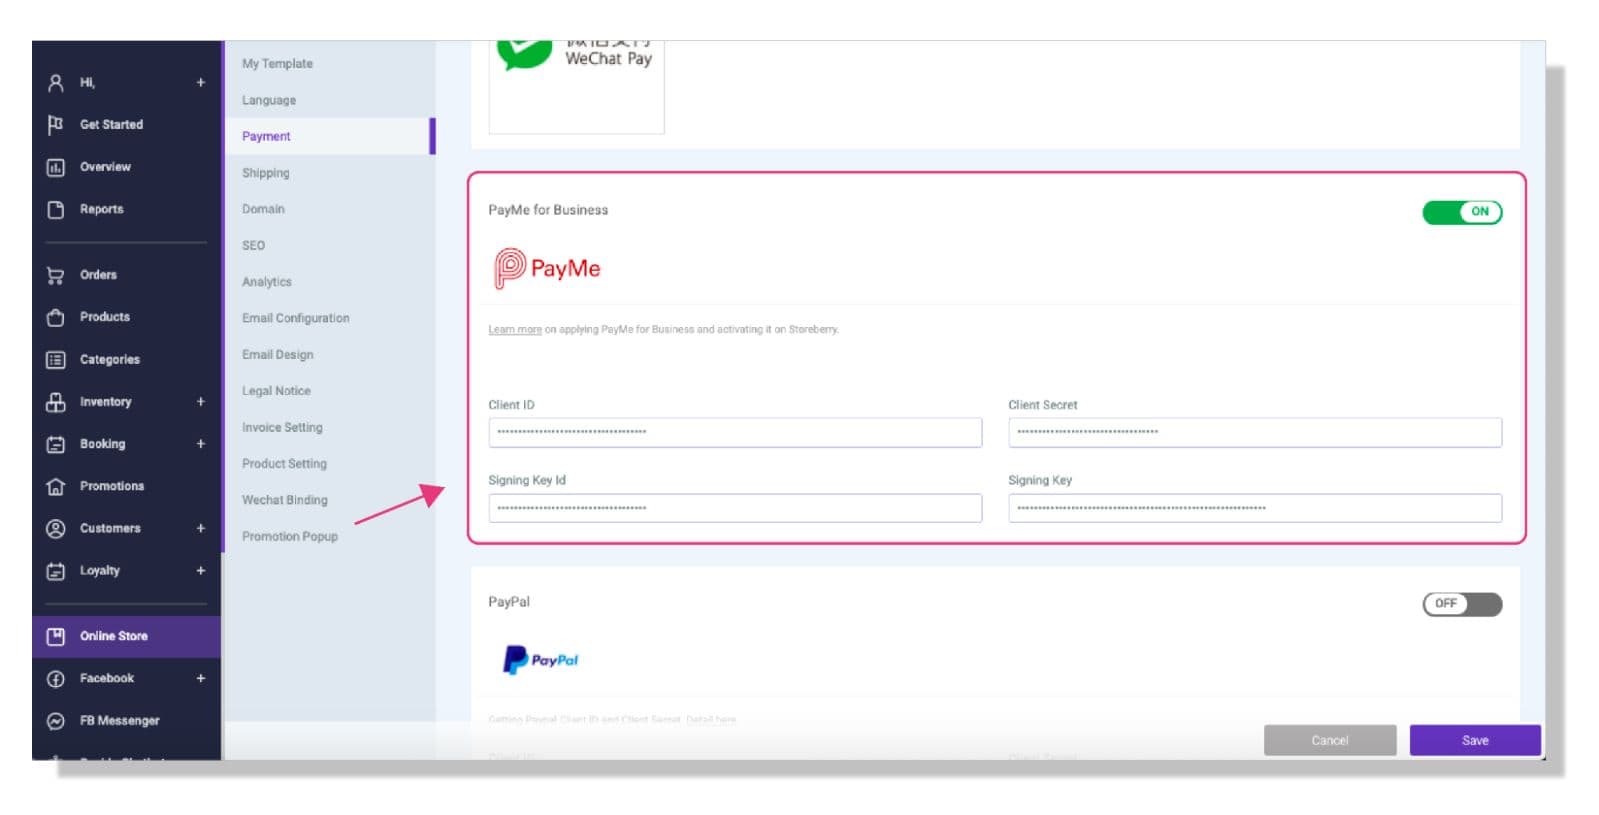
PayMe for Business
If you want to use PayMe for Business as a payment method, you can proceed with the account registration based on the following situations:
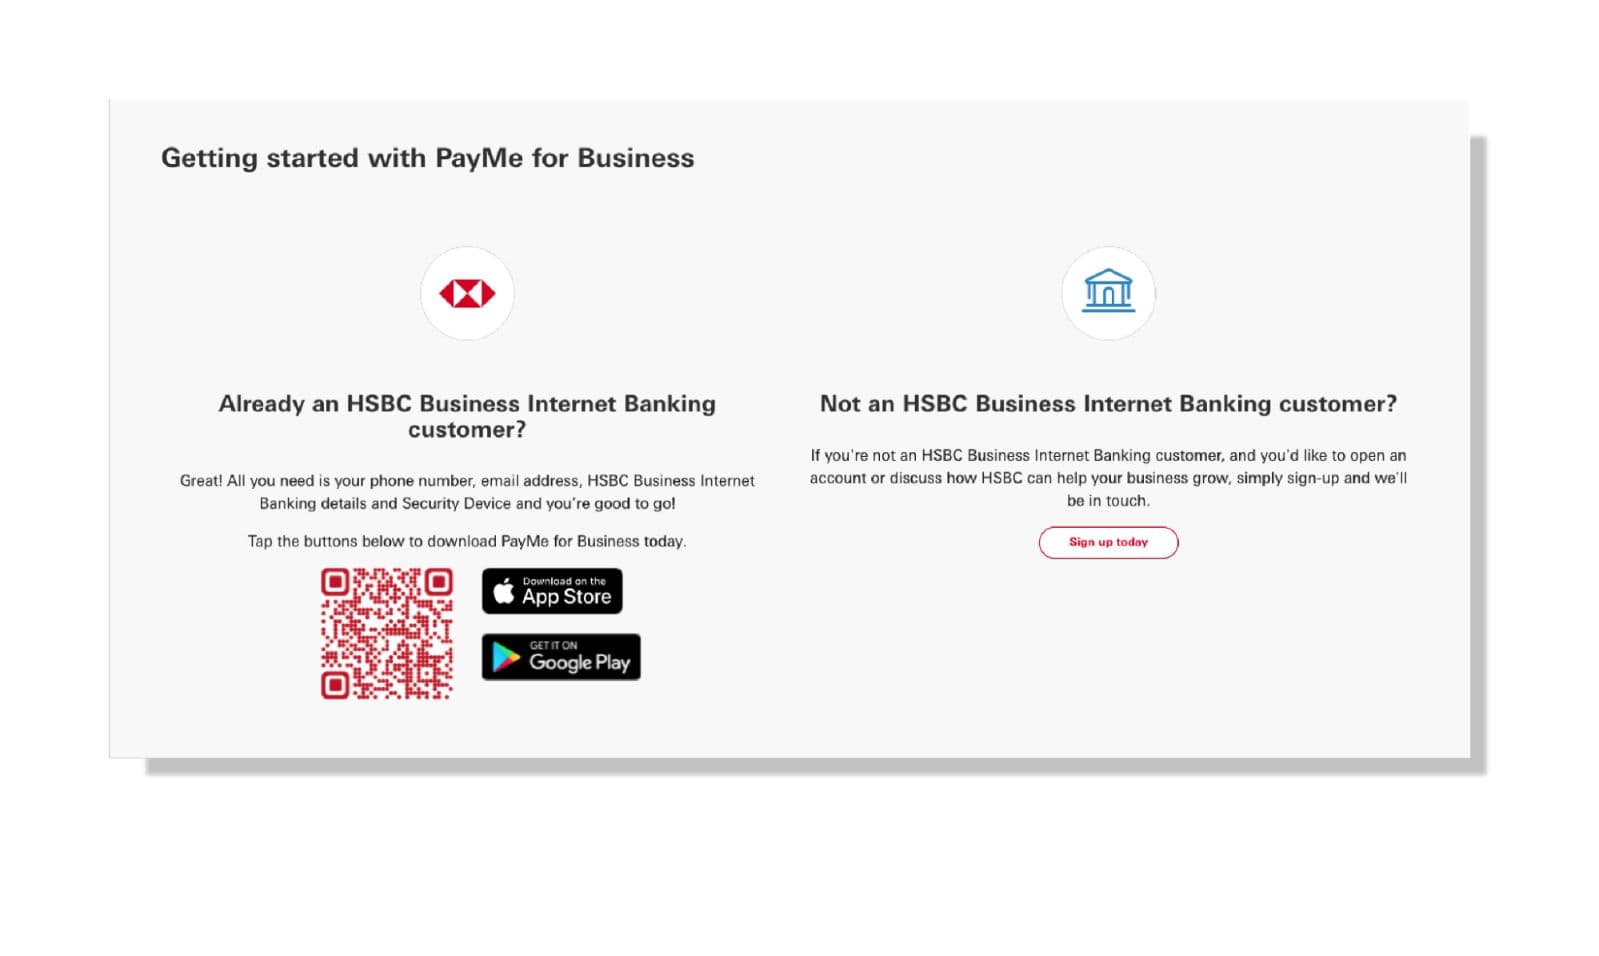
Situation(1)If you're an HSBC Business Integrated Account holder and enrolled on the HSBC Business Internet Banking services:
You can download the PayMe for Business app from the website(App Store | Google Play)and follow Step (2) below to complete the registration process.
Situation(2)If you’re an HSBC Business Integrated Account holder but haven’t signed up for HSBC Business Internet Banking yet:
Please go to website or call HSBC Hotline (2748-8288, and press 1#-5-1-4) to sign up for Internet Banking Services. The primary user will receive PIN by post and an authentication code by SMS separately in 5 working days, these information will be used for creating Business Internet Banking profile. Once your Business Internet Banking account is ready to use, you can download the PayMe for Business app from the website(App Store | Google Play)and follow Step (2) below to complete the registration process.
Situation(3)If you’re not an HSBC Business Integrated Account holder:
Firstly, please go to website to apply for HSBC Business Integrated Account. Once completed, you can go to website or call HSBC Hotline (2748-8288, and press 1#-5-1-4) to sign up for Internet Banking Services. The primary user will receive PIN by post and an authentication code by SMS separately in 5 working days, these information will be used for creating Business Internet Banking profile. Once your Business Internet Banking account is ready to use, you can download the PayMe for Business app from the website(App Store | Google Play)and follow Step (2) below to complete the registration process.
After successfully opening the bank account, you can register a PayMe for Business account and get your Client ID, Client Secret, Signing Key ID, Signing Key by following the steps below:
2) Open the PayMe for Business app, complete the registration process according to the PayMe for Business Starter Guide.
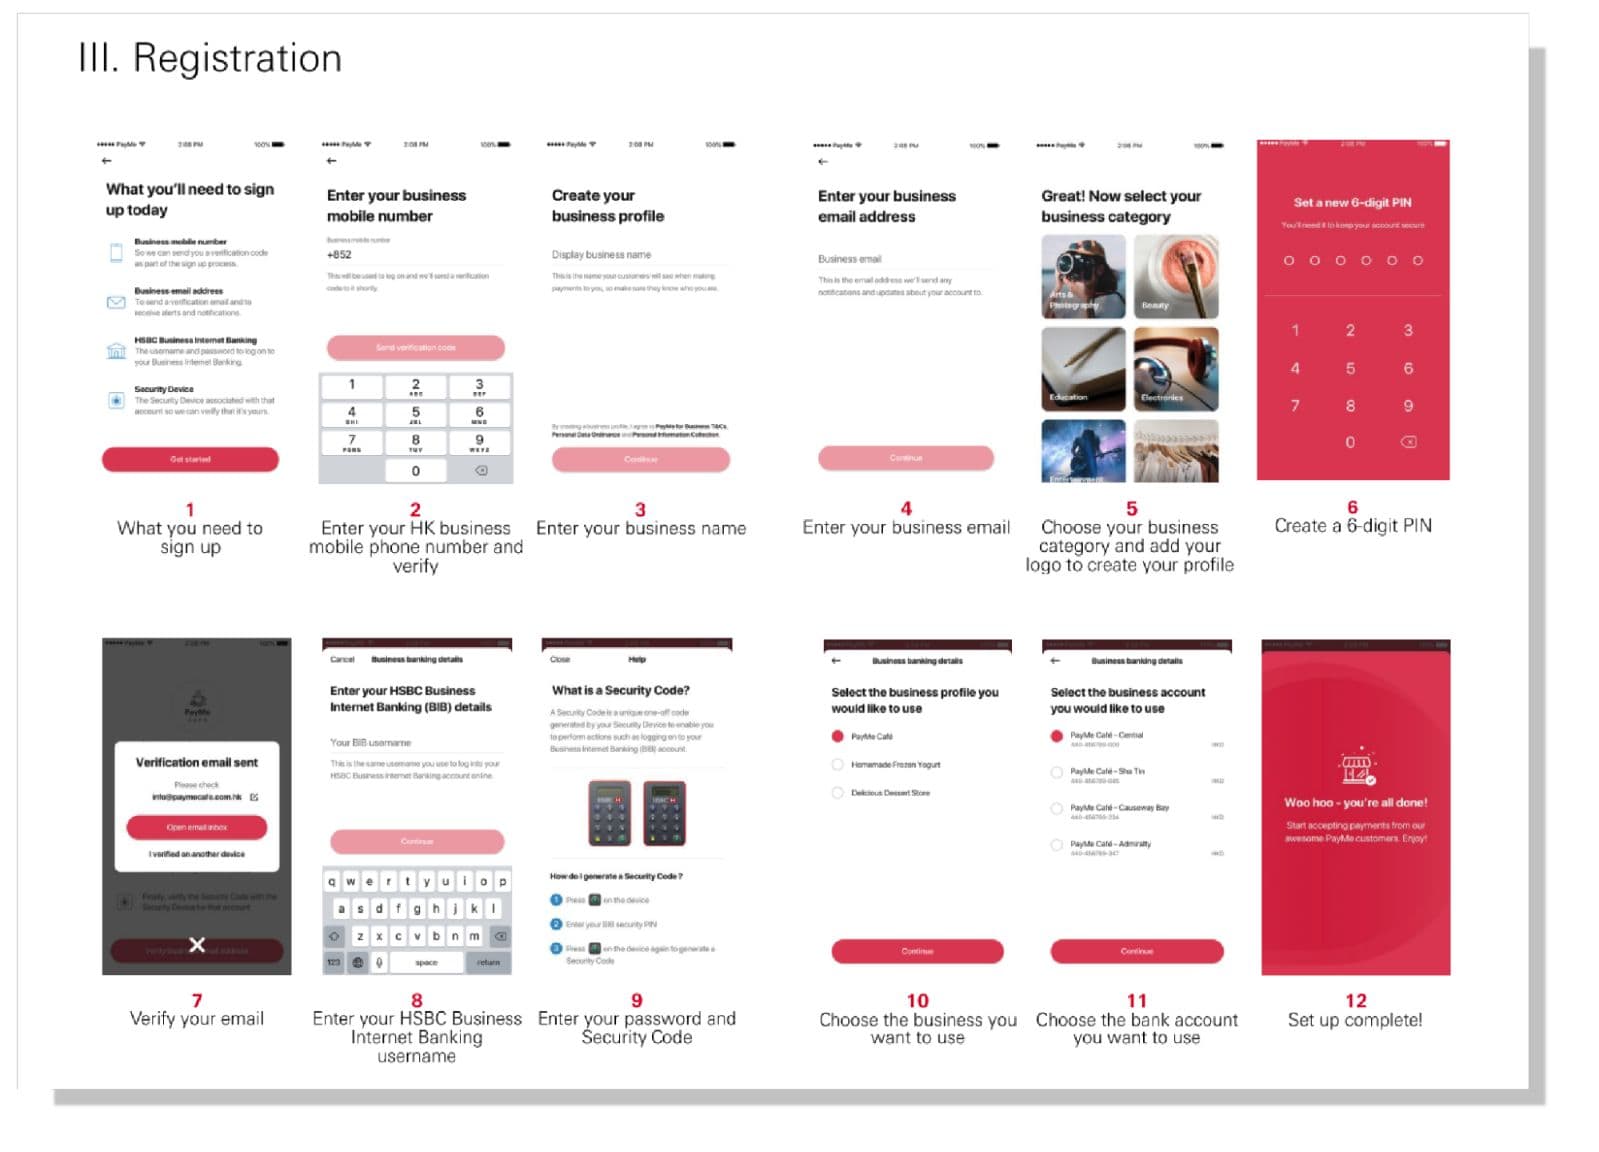
3)Please tap the Profile Icon to add your store profile picture after registration.
4)Go to the main page and tap “Help Centre” > “Need to get in touch?” > “Send us an enquiry”. Then enter the following message: “I am a STOREBERRY customer and interested in using PayMe to collect payments online. My STOREBERRY identification code is: (enter your STOREBERRY online store URL here, E.g. https://company-name.mystoreberry.com)”. And click “Confirm” for submission.

5)Once you have confirmed the terms, you will receive:
(i)an email attached with an encrypted file for your API credentials; and
(ii)a message with password for decrypting the PDF file on your PayMe for Business app.
After decrypting the file, you will get your Client ID, Client Secret, Signing Key ID and Signing Key for the payment gateway integration with your online store. Please copy those API credentials and paste on the "PayMe for Business" column under STOREBERRY Admin Panel 「Online Store」 「Payment」 . Click On to connect to the payment gateway.
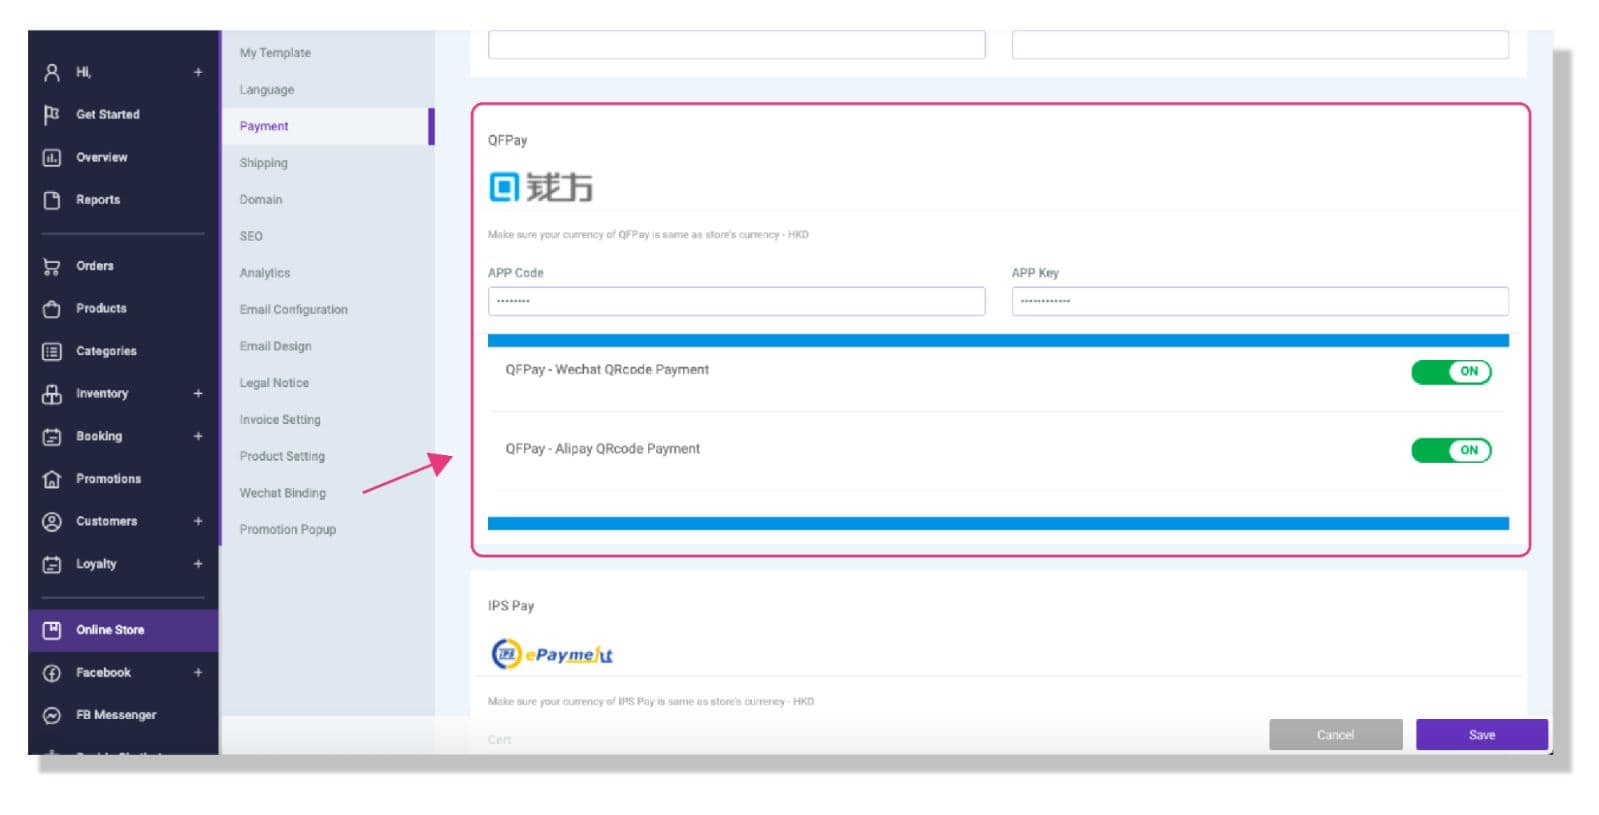
QFPay
1) If you are using QFPay for the first time, please leave your contact details on QFPay and submit with the following message: “I am a STOREBERRY customer and interested in using QFPay to collect payments online. My STOREBERRY identification code is: (enter your STOREBERRY online store URL here, E.g. https://company-name.mystoreberry.com)”
2)You will receive the App Code and App Key from the QFPay Team after submission. Please copy the API credentials and paste on the QFPay column under STOREBERRY Admin Panel 「Online Store」 「Payment」 . Select your accepted payment methods and click “On” to connect to the payment gateway.
# 2.3 Shipping Settings
A smooth and efficient delivery process can bring customers an enjoyable shopping experience and greatly enhance customer satisfaction! STOREBERRY is well aware of the needs of merchants and customers for logistics services. In order to provide you with more diversified logistics service options, STOREBERRY has not only pre-built a list of SF Express outlets for you to choose from, but also cooperates with ShipAny Smart Logistics Gateway to provide more convenient channels for you to directly connect multiple local logistics service providers.
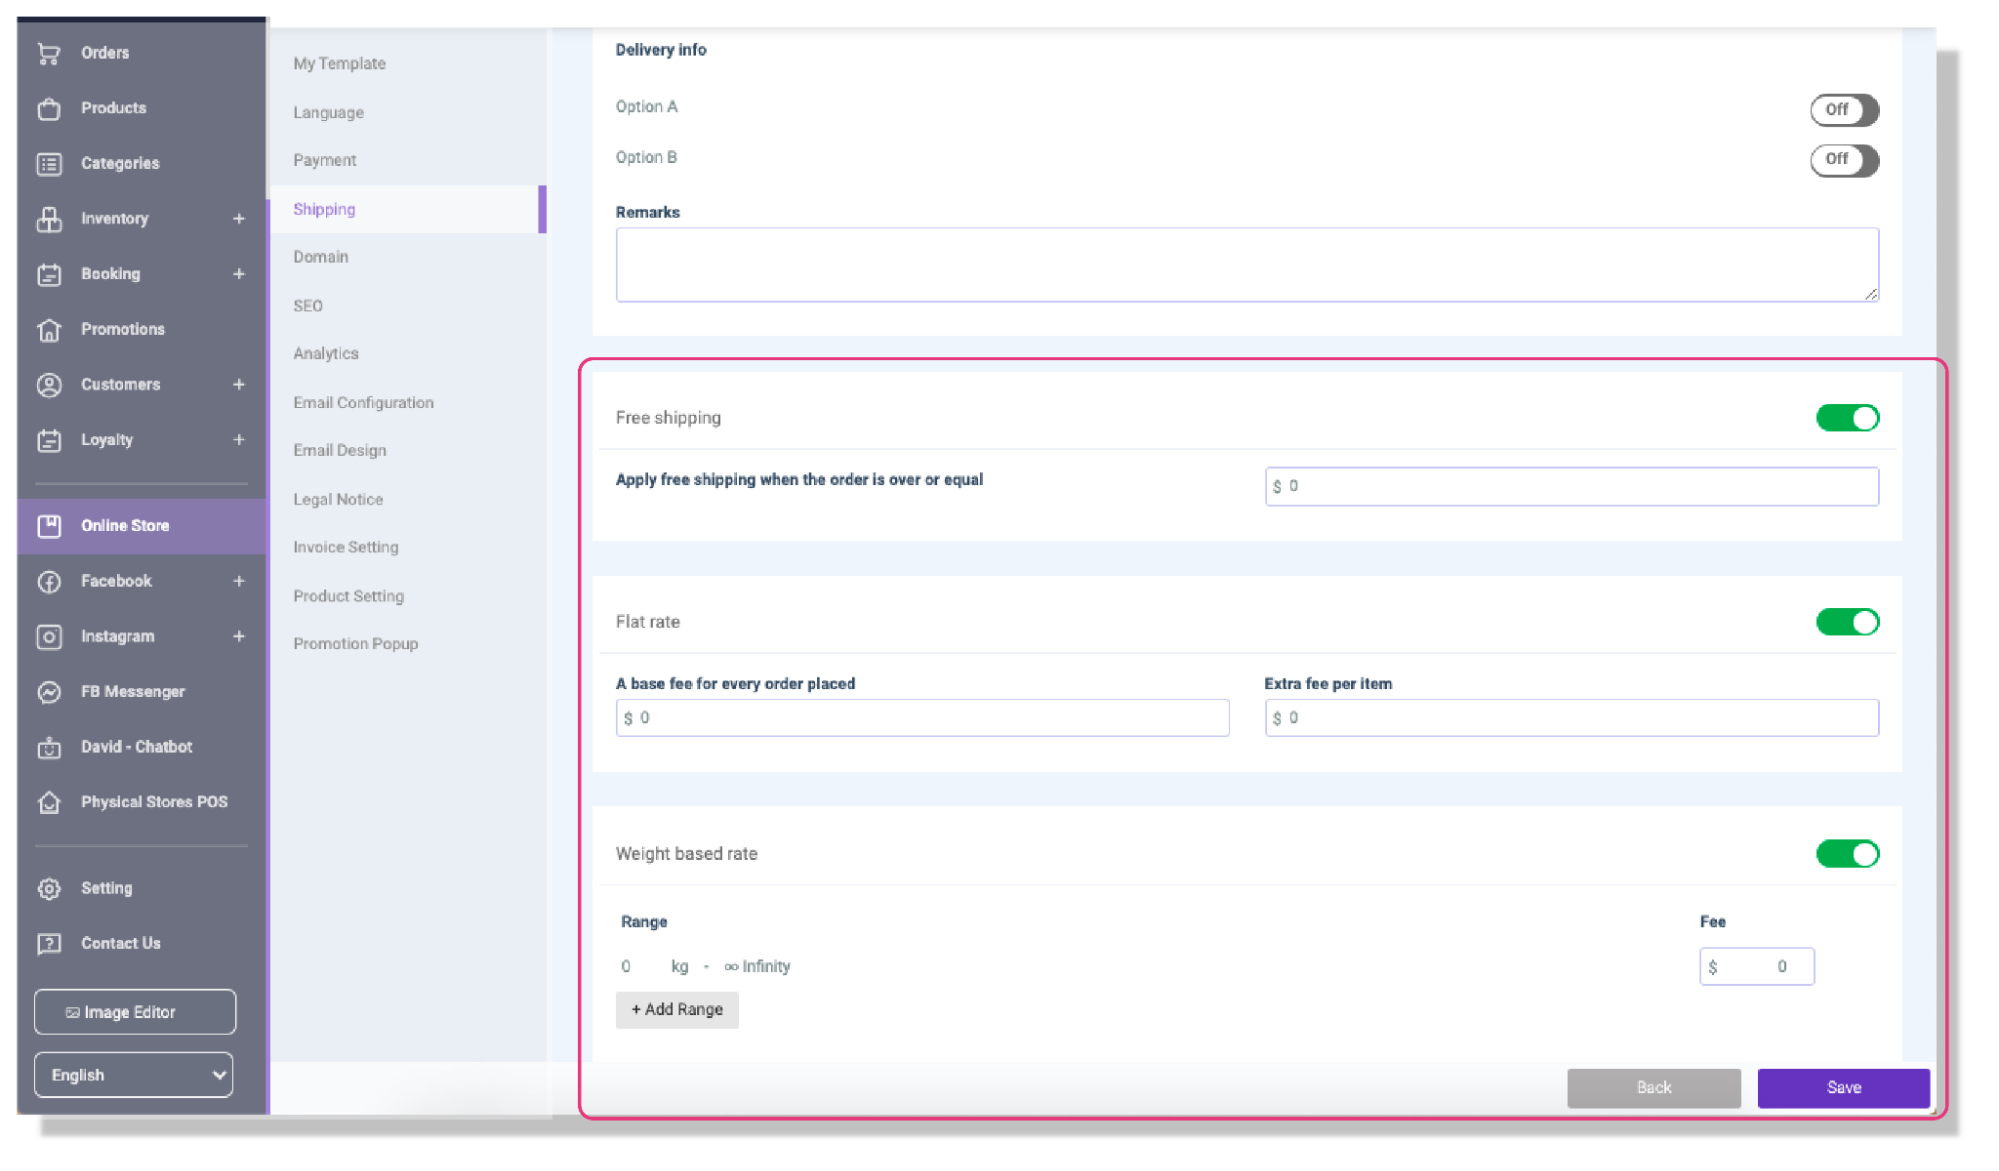
In STOREBERRY, you can set flexible local and international shipping methods according to different delivery countries, such as fixed delivery fee calculated by order or incremented by the number of items, charging delivery fee based on the total weight of the order, and setting free shipping conditions (E.g. spending a certain amount, purchasing a specified product, etc.) to attract customers to purchase additional products!
(i) Add Delivery Method
Local Shipping Settings
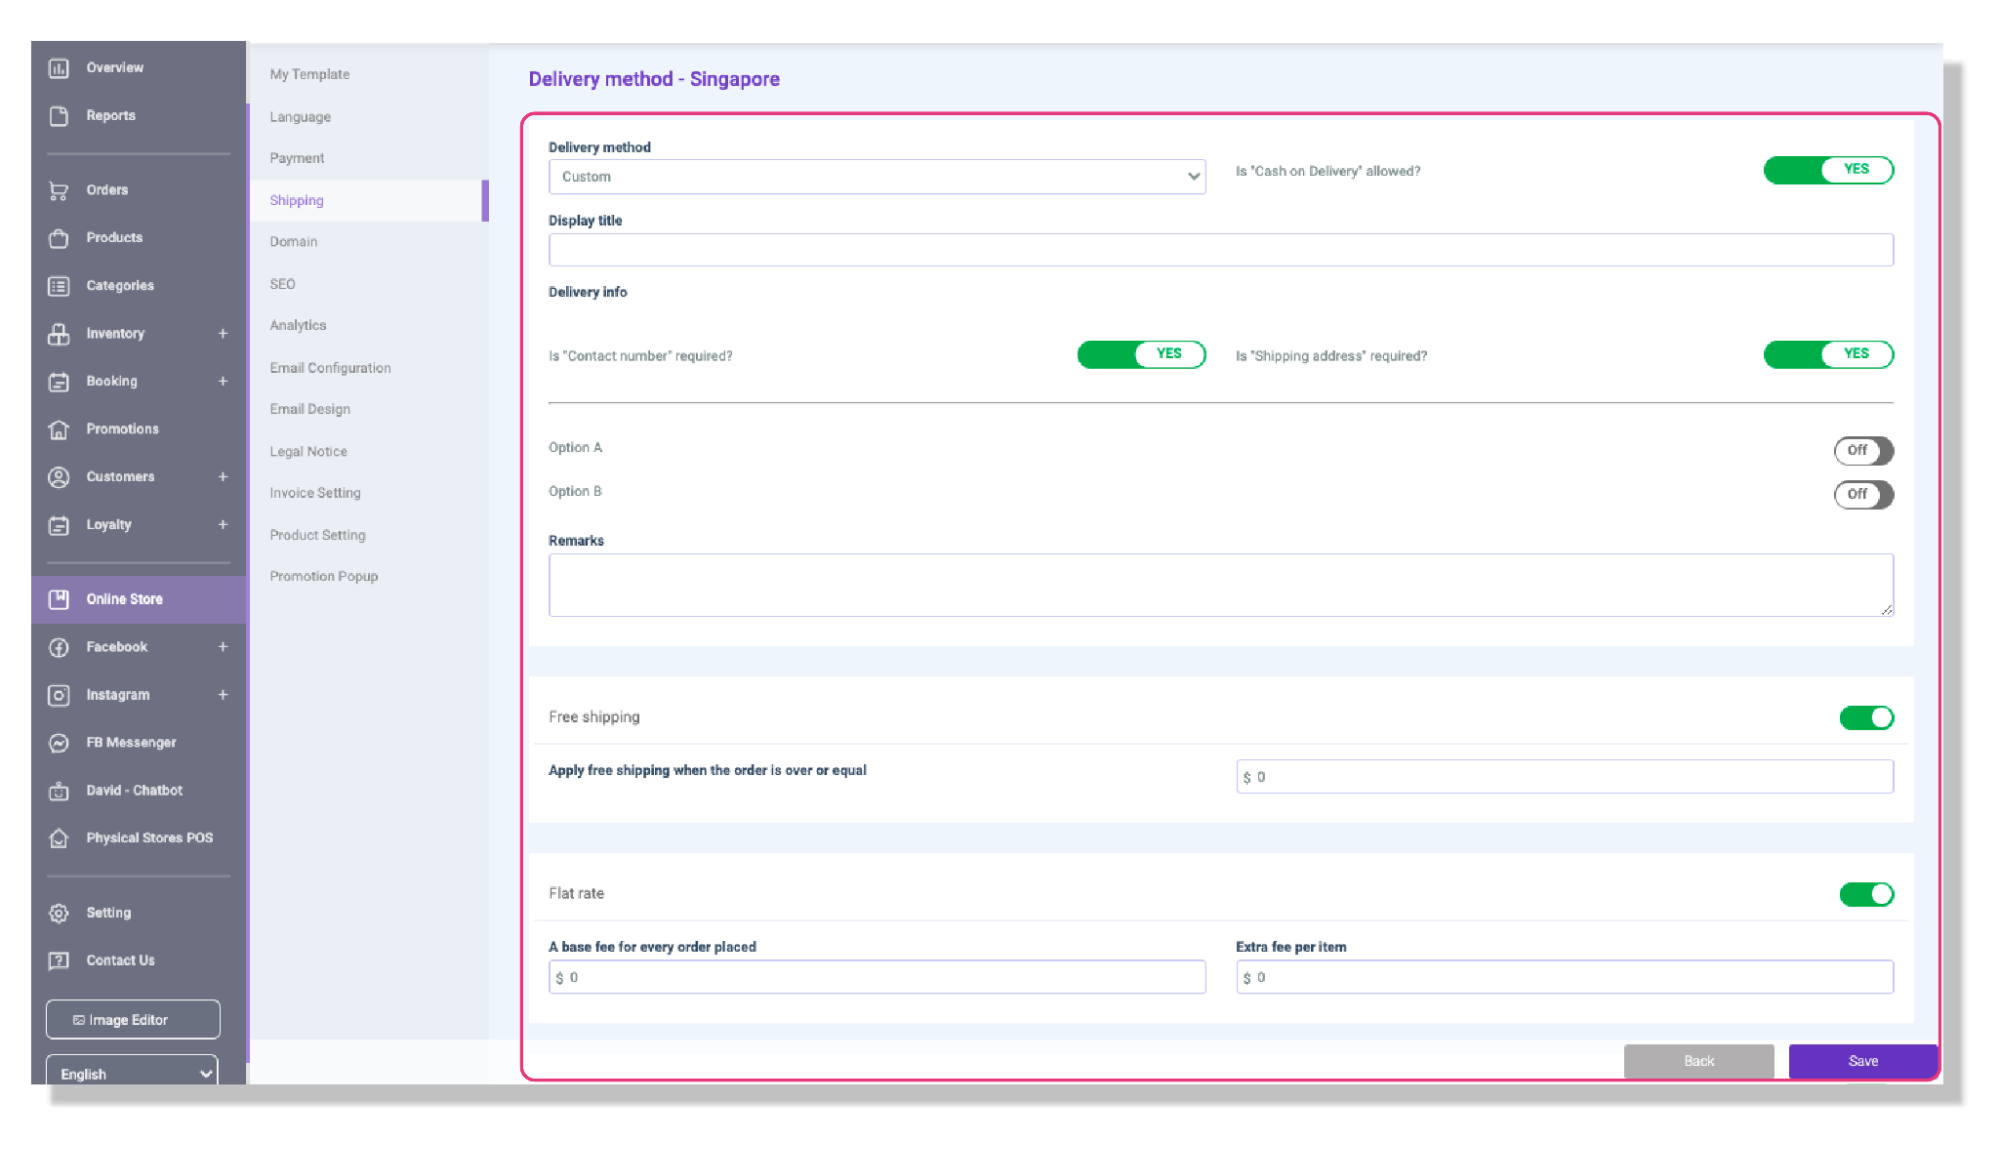
1)You can click +Add Delivery Method in STOREBERRY Admin Panel [Online Store] [Shipping] to add more shipping methods for customers to choose.
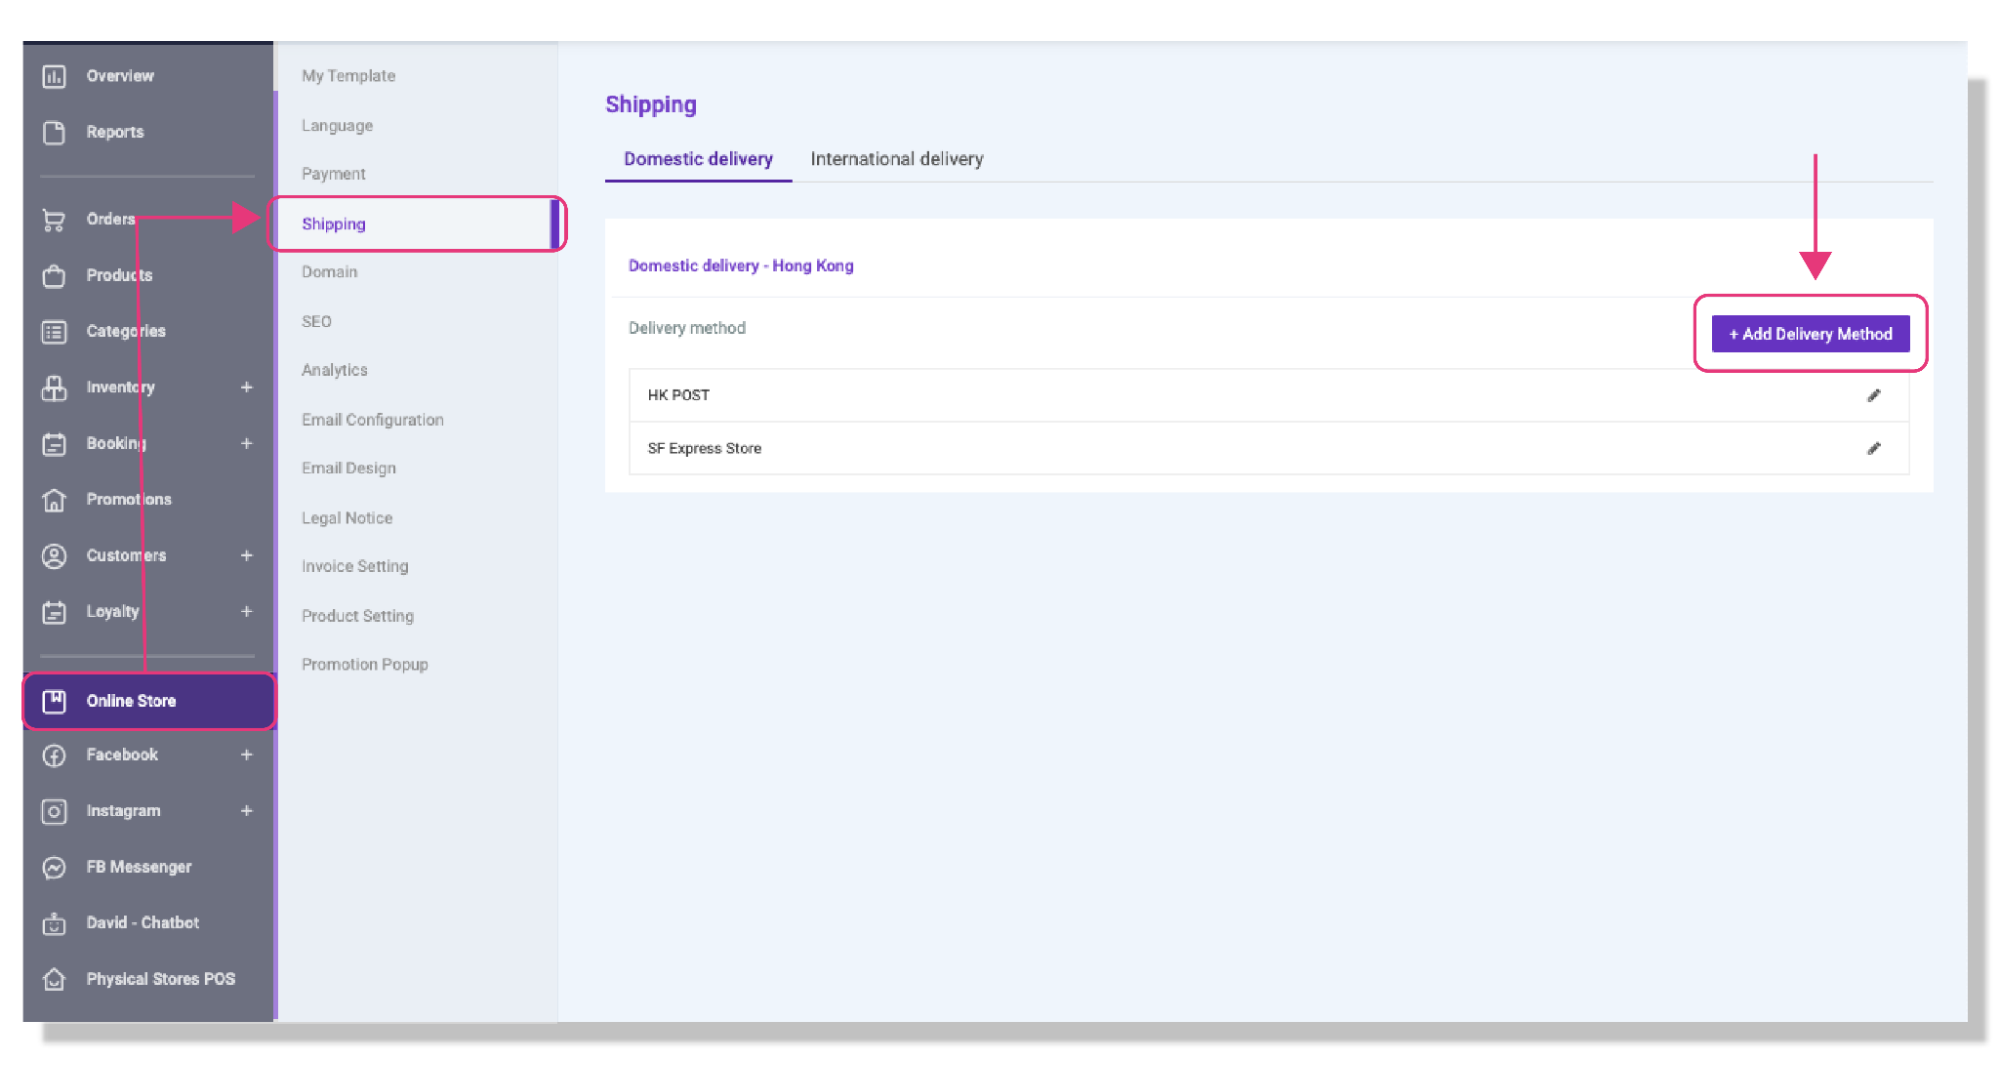
2) Click 「Delivery Method」 to expand the options for shipping methods. STOREBERRY has a pre-built SF outlet address list for you to choose from. Here you can choose various SF Network, such as SF Business Station Locations, SF Store Locations, SF Service Partner Location (Convenience stores and Shell Stations) and SF Locker Locations, etc.
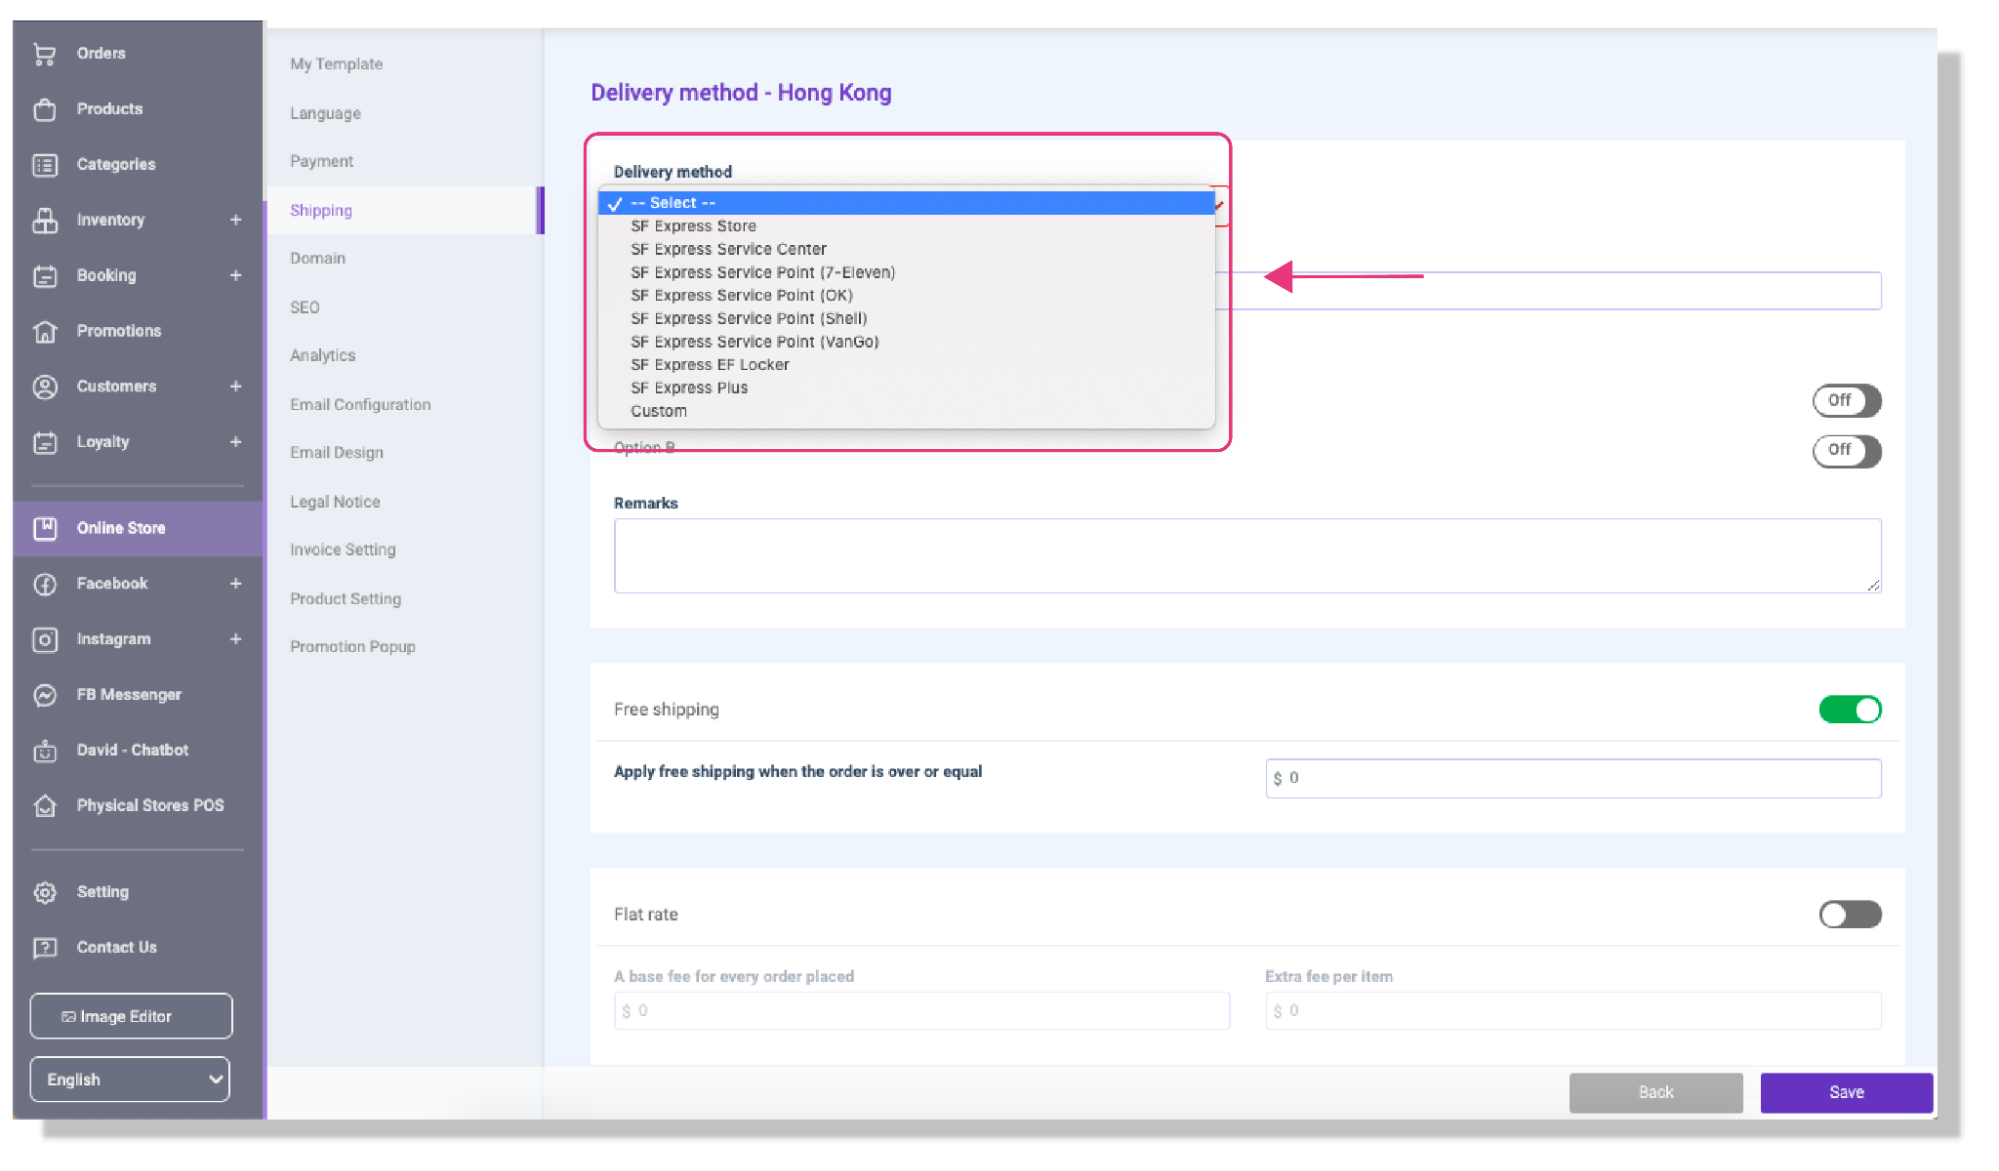
You can also choose 「Custom」 to set up other logistics service providers by yourself, and then set the content of the delivery information that customers need to fill in.

3)Then set the personalized logistics service settings one by one as needed, such as free shipping amount requirements, fixed delivery fee per orders or items, or billing by weight. Finally, click 「Save」 to complete the setting.
International Shipping Settings
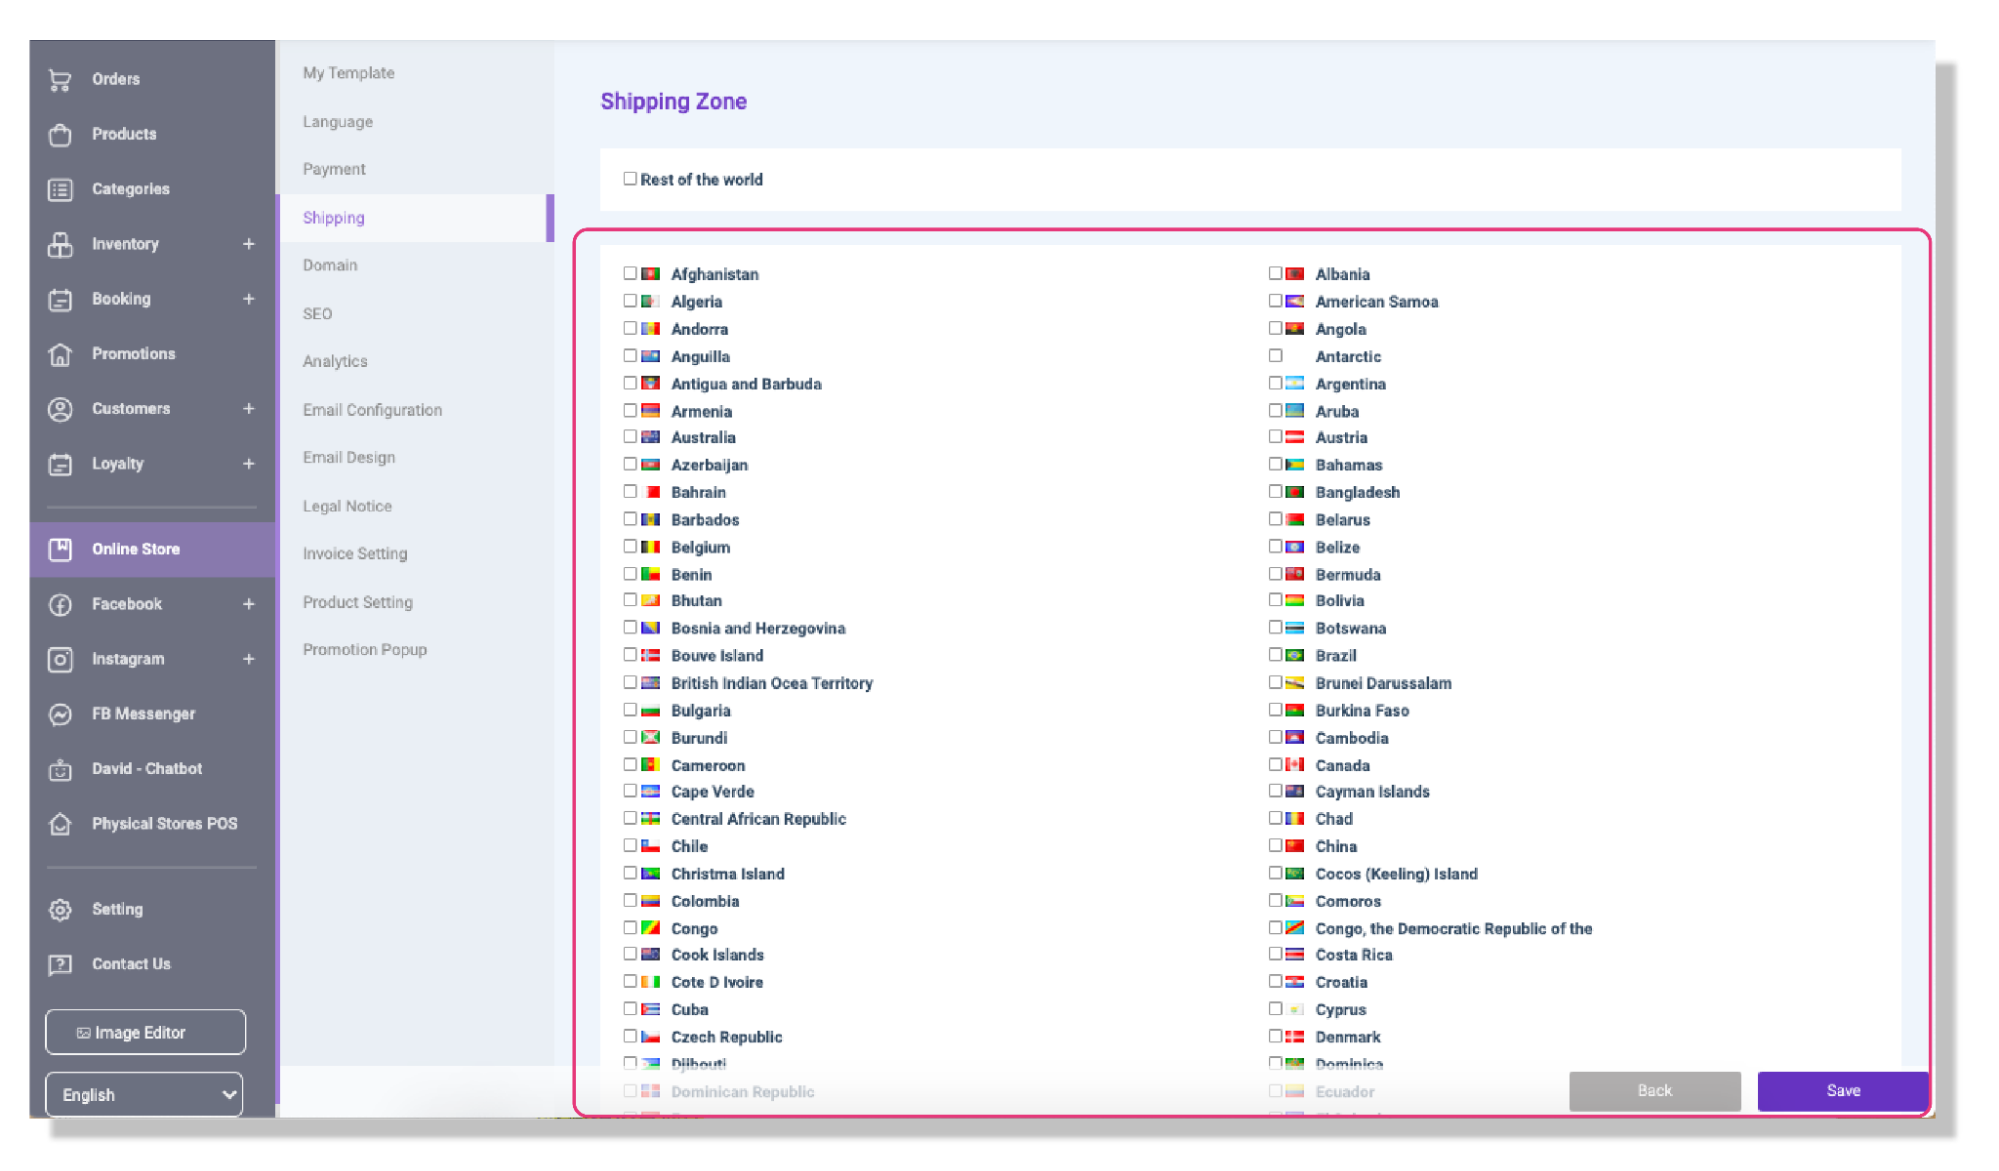
1)You can select 「International Delivery」 at the top of the STOREBERRY Admin Panel 「Online Store」 「Shipping」 page, and then click 「+Add Shipping Zone」 .
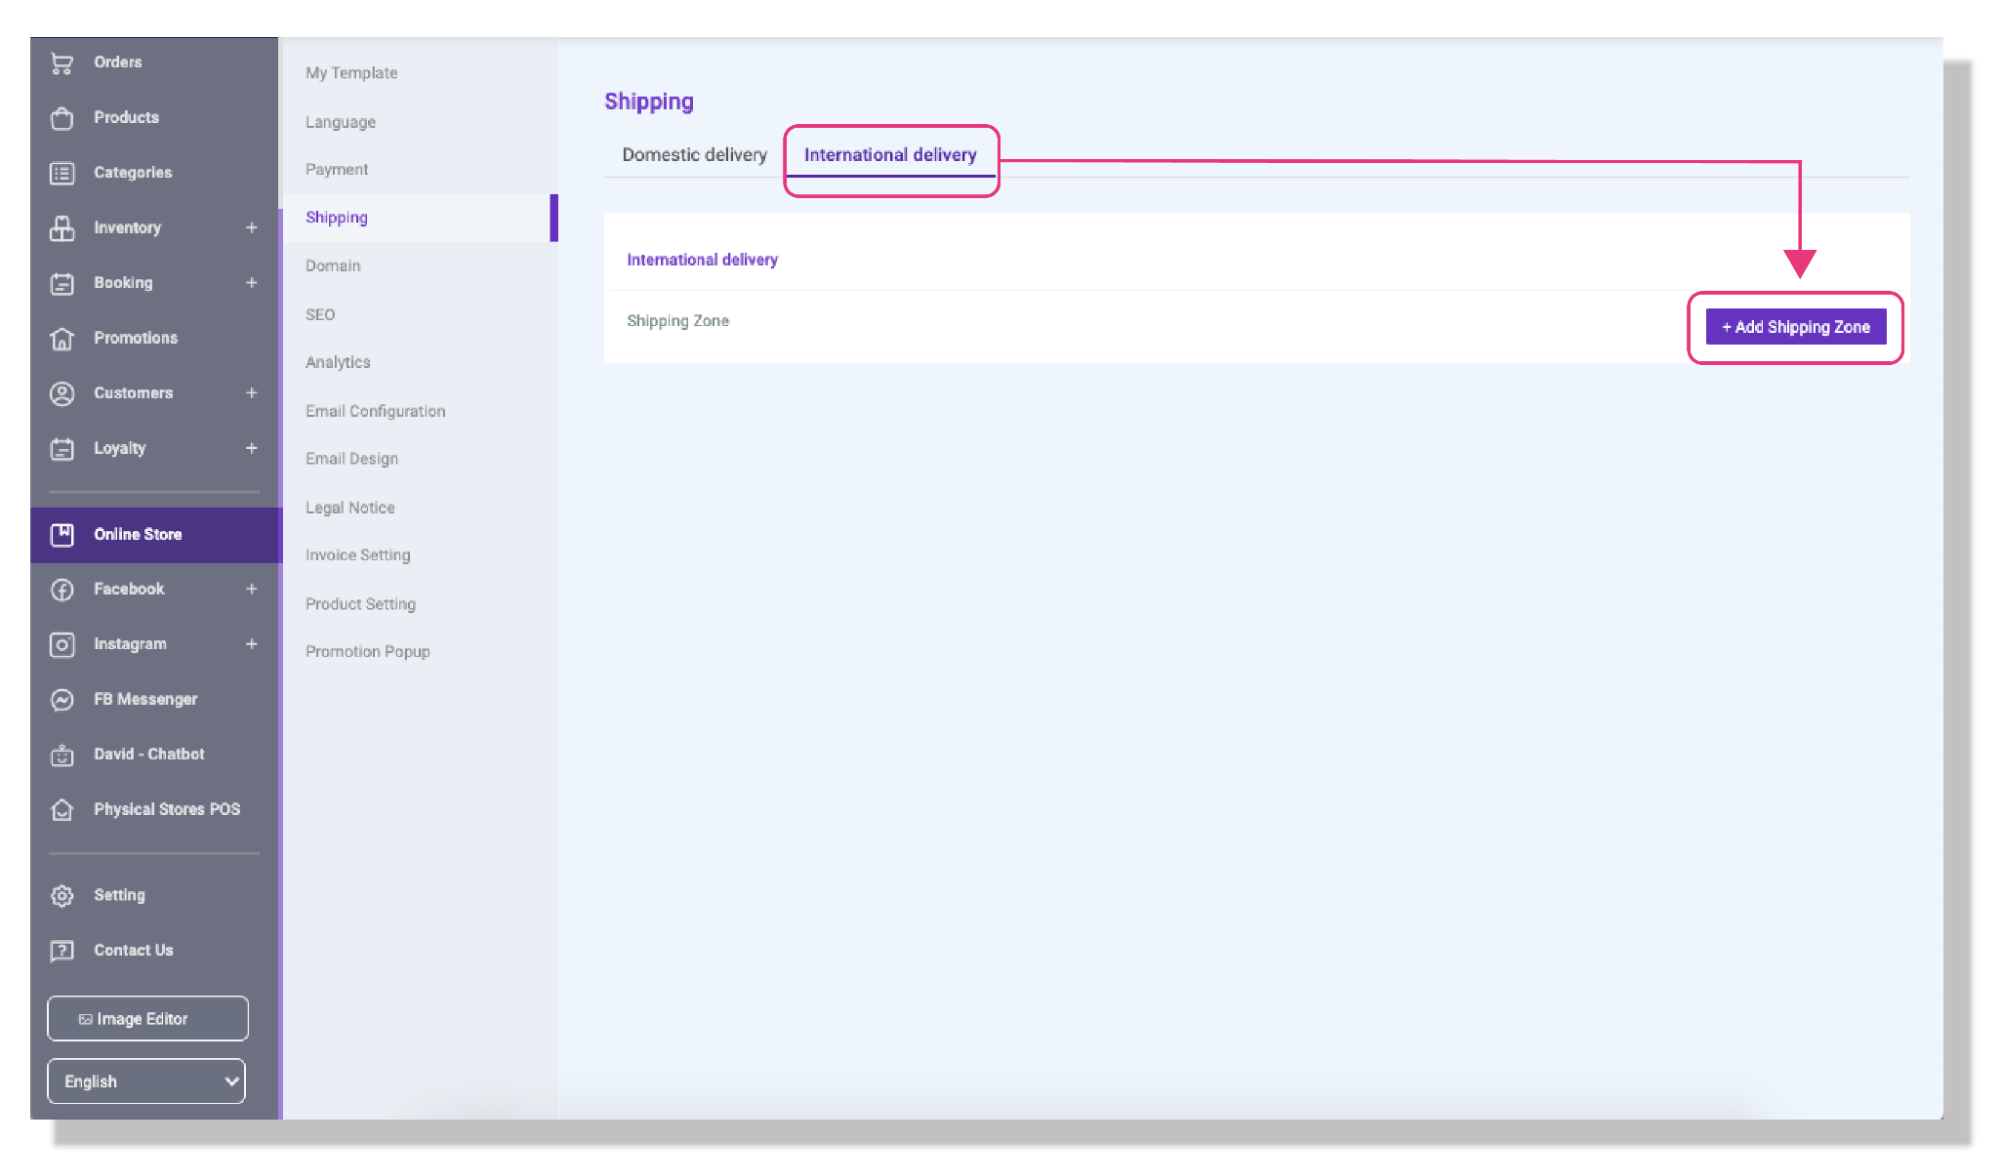
2)Select the applicable shipping country here and click 「Save」 .
3)Then customize the personalized logistics service settings according to the needs, such as the name of the logistics service provider, the content of the delivery information that the customer needs to fill in, the free shipping condition, the fixed delivery fee per order or item or billing by weight, etc. Finally, click 「Save」 to complete the setting.
(ii) Set Up Shipping Plugins
ShipAny Smart Logistics Gateway
If you are using ShipAny for the first time, please register a ShipAny Account in ShipAny and follow the steps below to get your API Key:
*For instructions on using ShipAny Smart Logistics Gateway to dispatch orders, please click here.
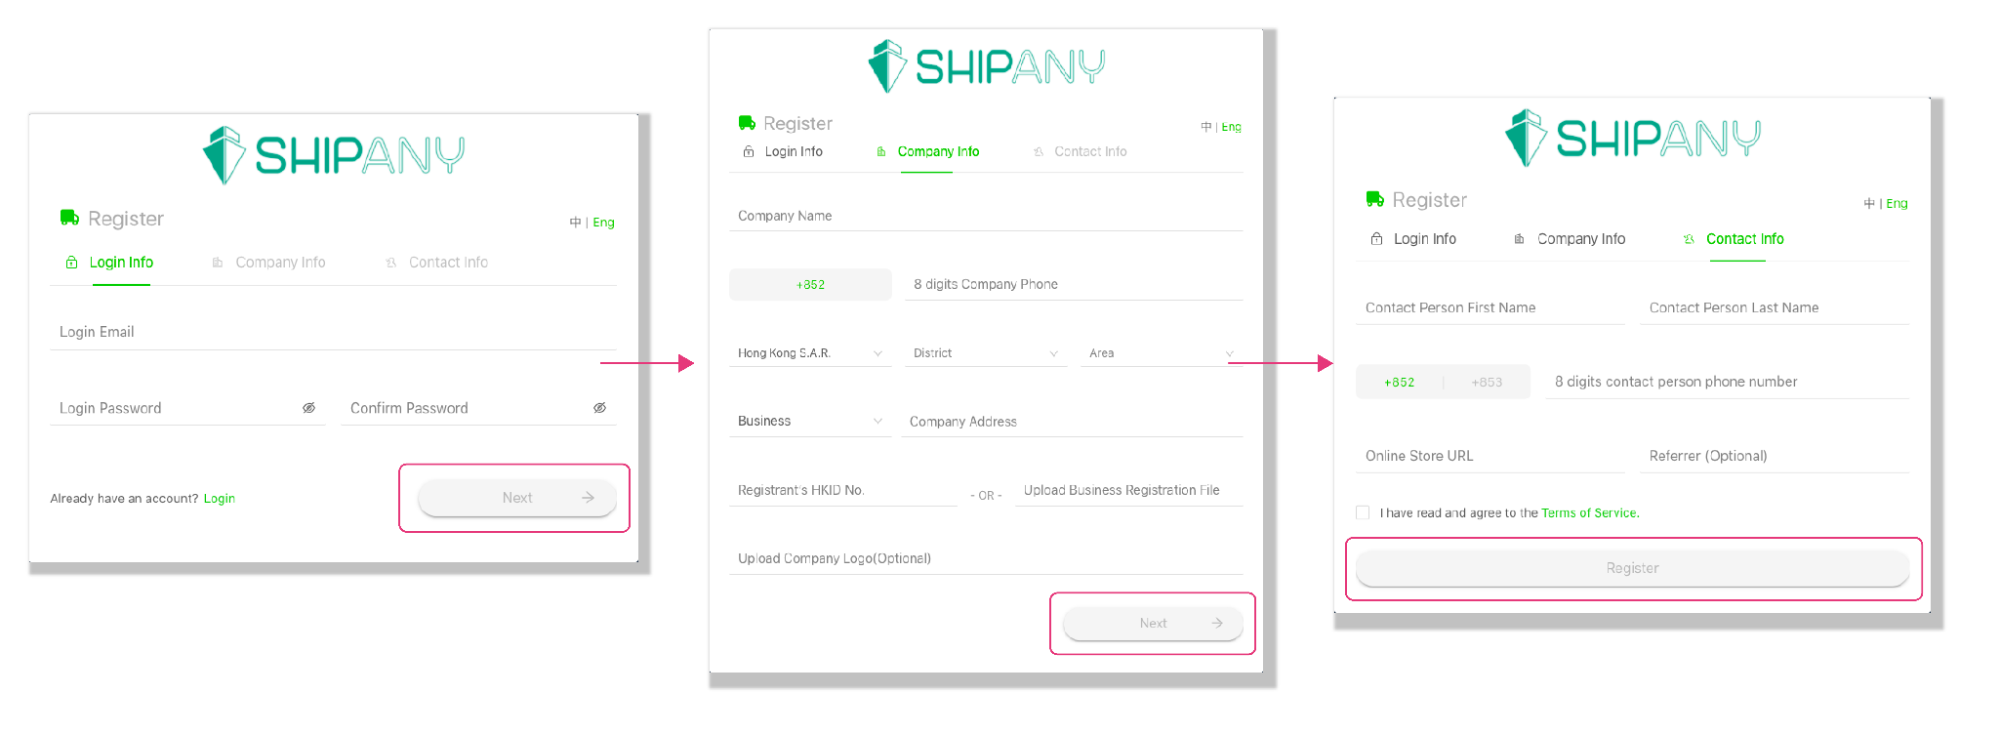
Register A ShipAny Account:
1)First enter your email address and password, click "Next" to continue the registration process.
2)Enter your company name, phone number and address one by one, and upload your business registration certificate and company logo, then click "Next" to continue. If you do not have a business registration certificate, you can choose to use your personal ID number instead.
3)Enter the contact information including name and phone number, and tick to agree after reading the terms and conditions, then click "Register".
4)Finally, please go to your email inbox to check and copy the registration verification code sent to you by ShipAny, and then return to the website to enter the verification code to register successfully.
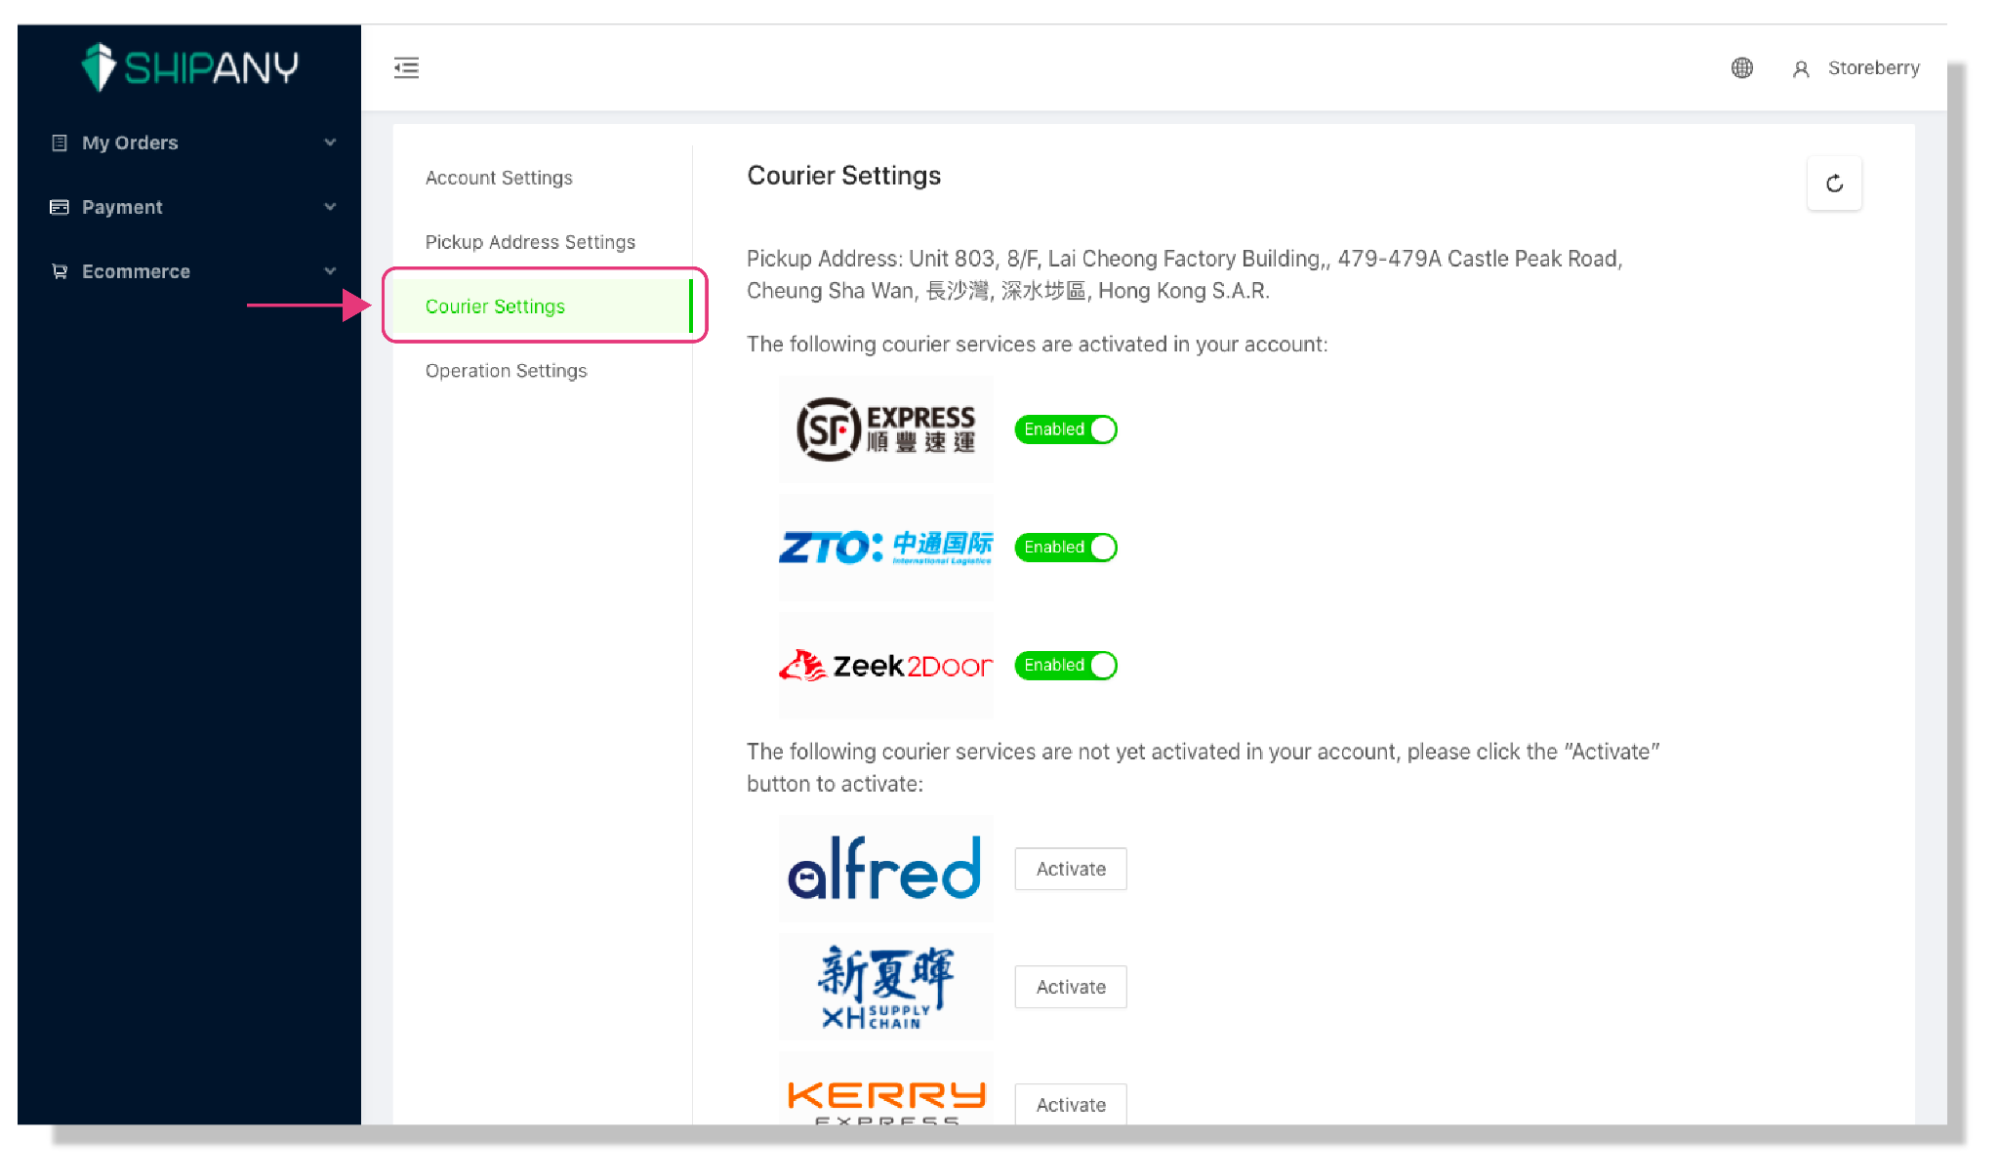
Activate Your Desired Logistics Service Provider:
1)Log in to your ShipAny account, click your company name at the top right of the page, then click "Settings" in the options.
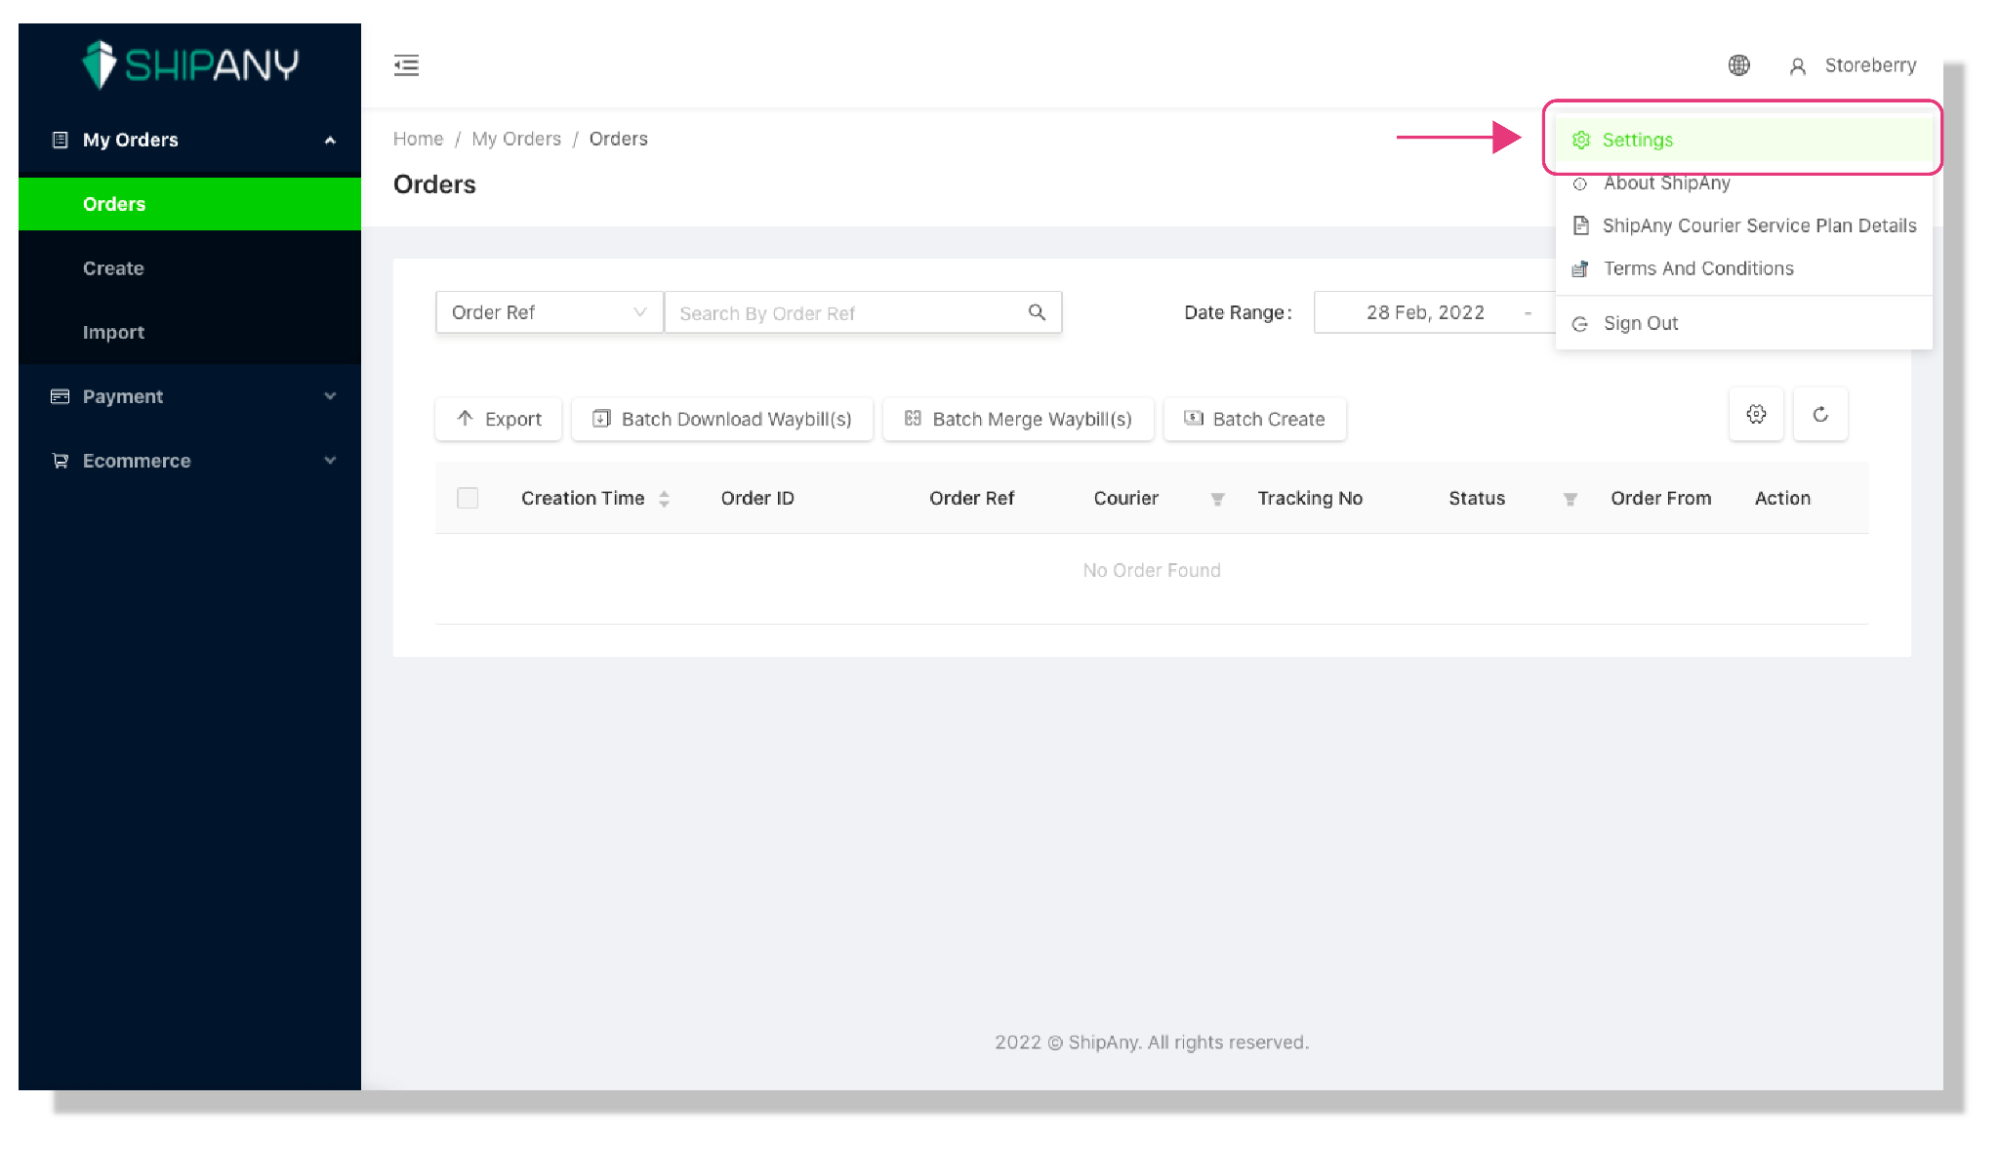
2)Go to "Courier Settings" to activate and enable your desired logistics service provider.
Get Your API Key:
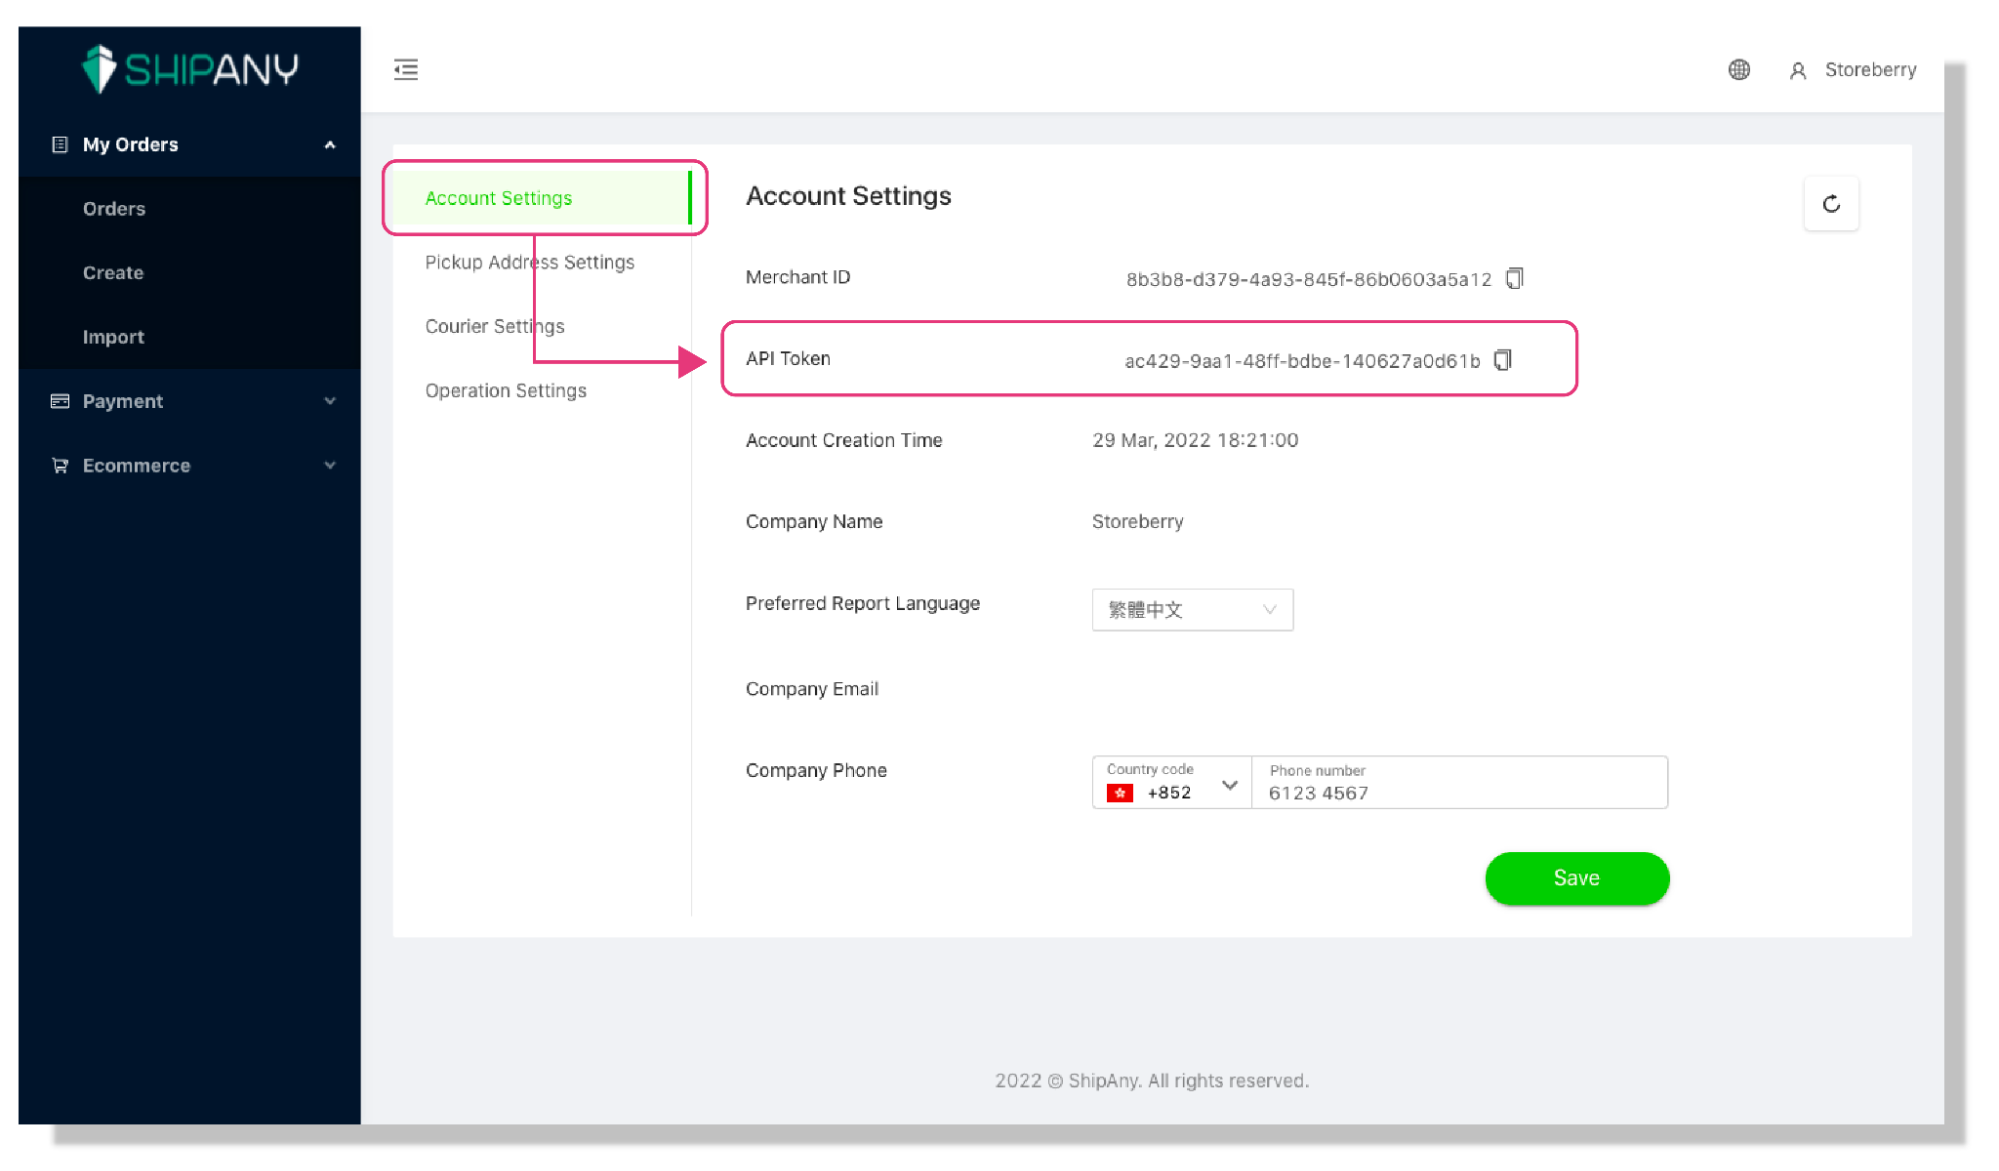
1)Log in to your ShipAny account, click your company name at the top right of the page, then click "Settings" in the options.
2)Go to "Account Settings" and copy your API key.
Connect Your ShipAny Account To The STOREBERRY Platform:
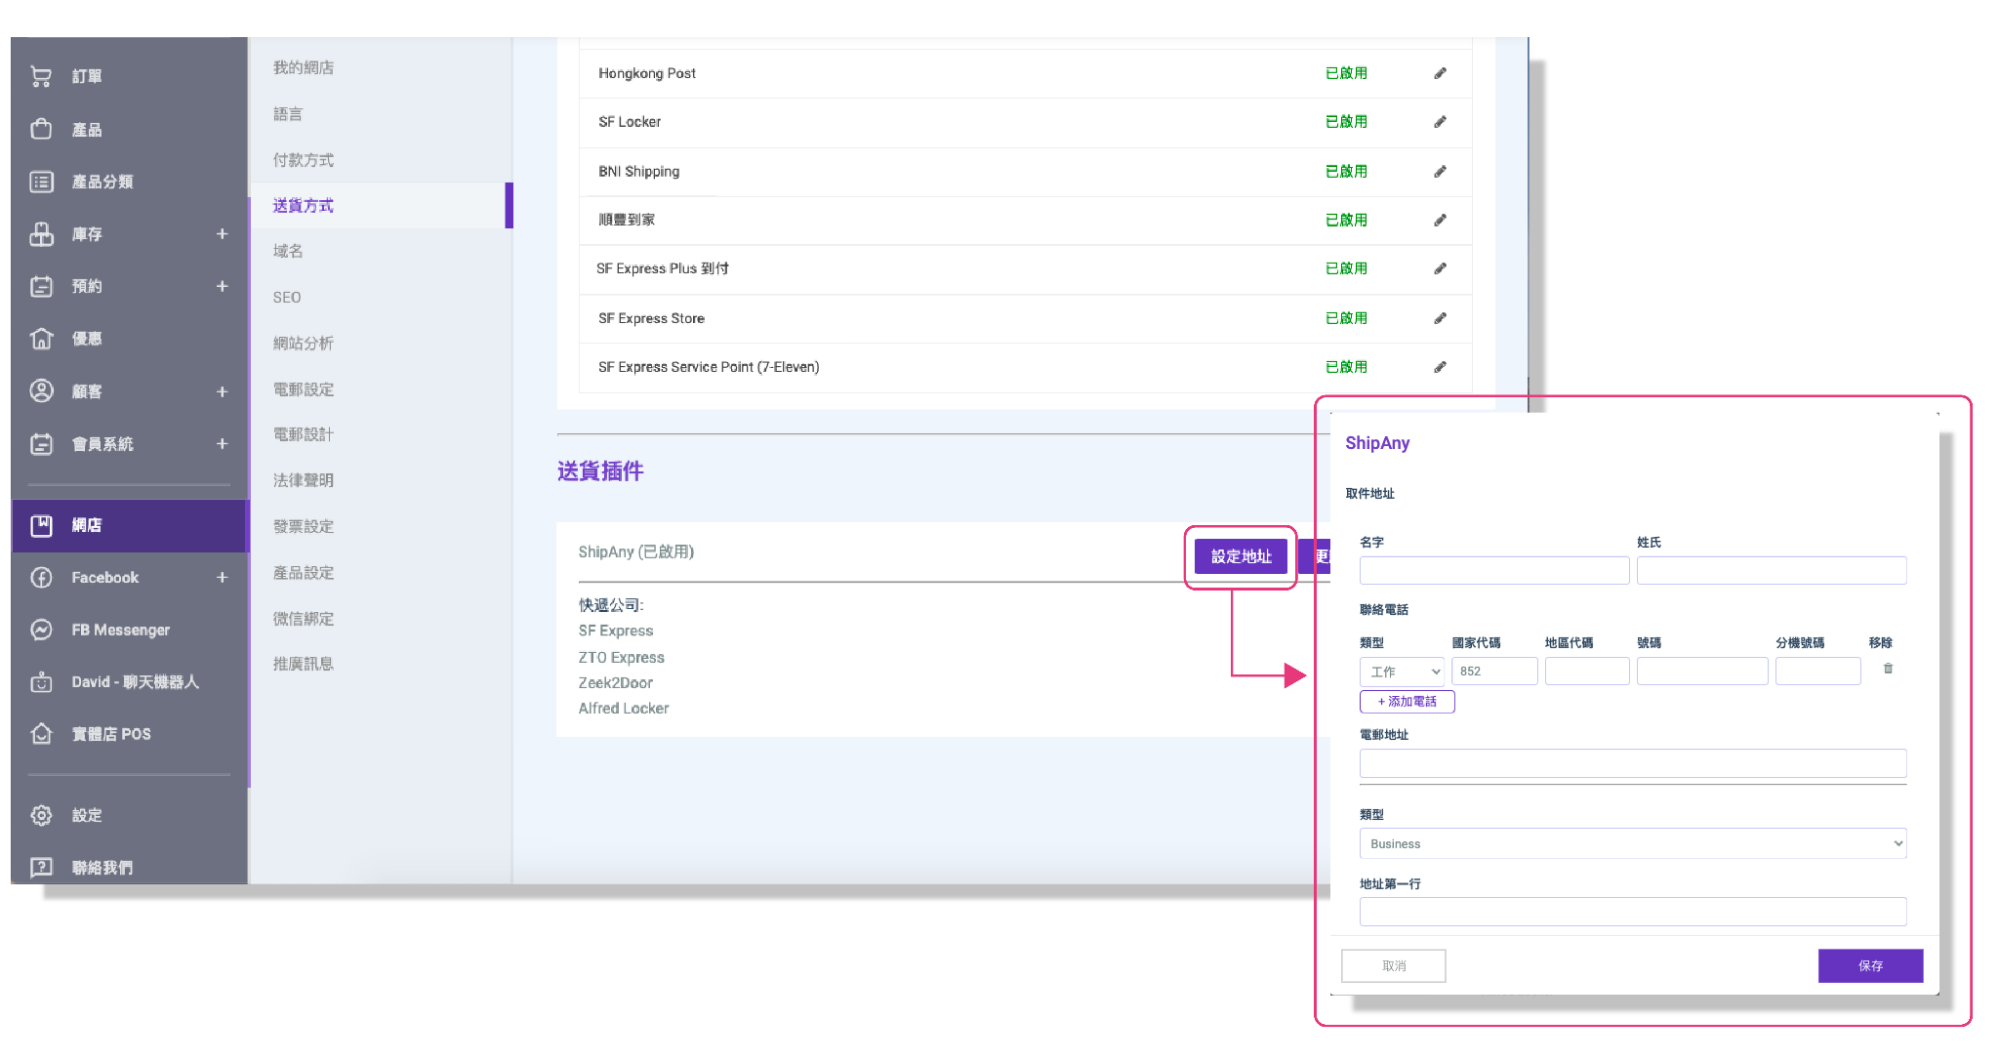
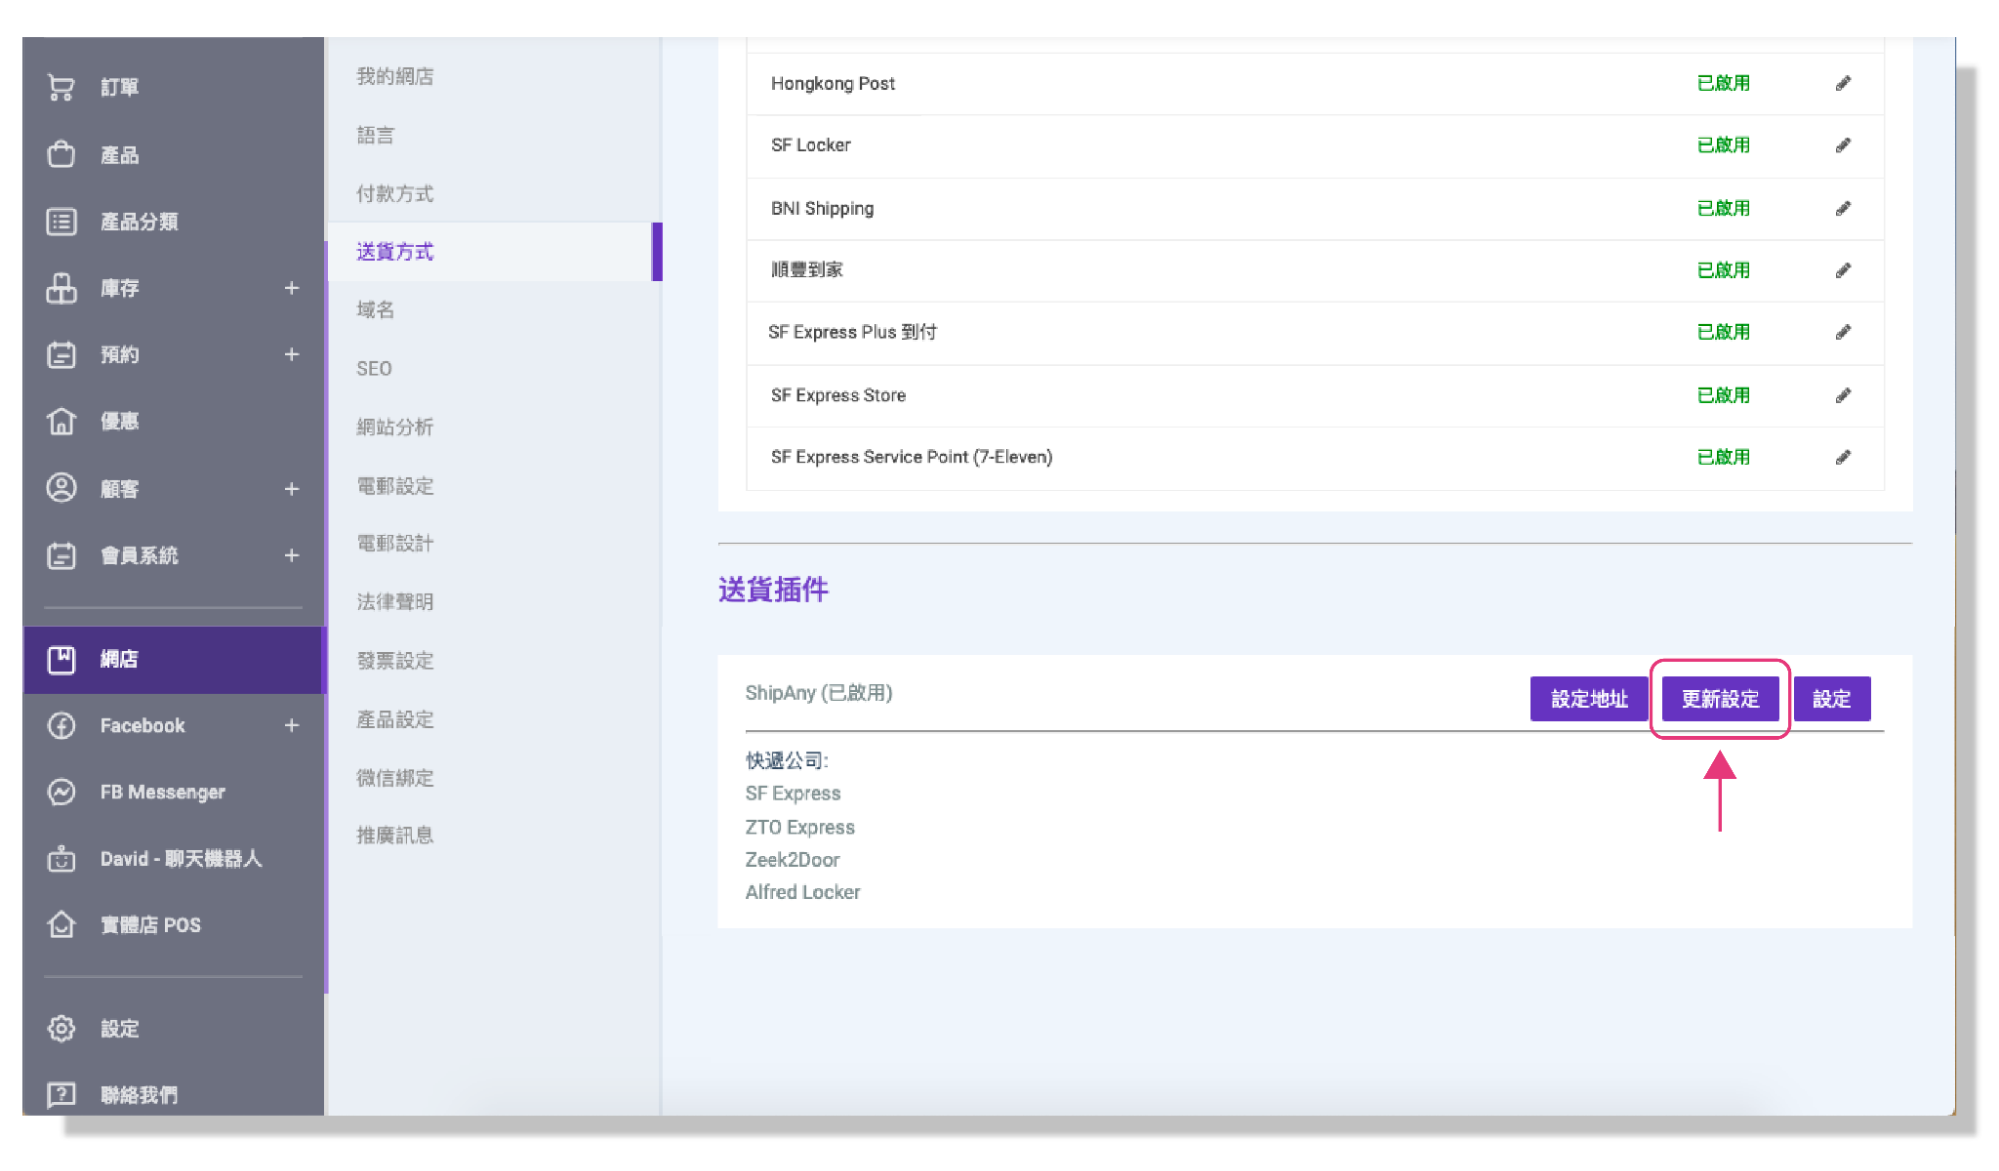
1)You can go to the STOREBERRY Admin Panel 「Online Store」 「Shipping」 in the delivery plugin area at the bottom of the page, and click 「Config」 in the "ShipAny" column.
2)Select 「Production」 mode and paste your API key, then click 「Enable」 and 「Save」 .
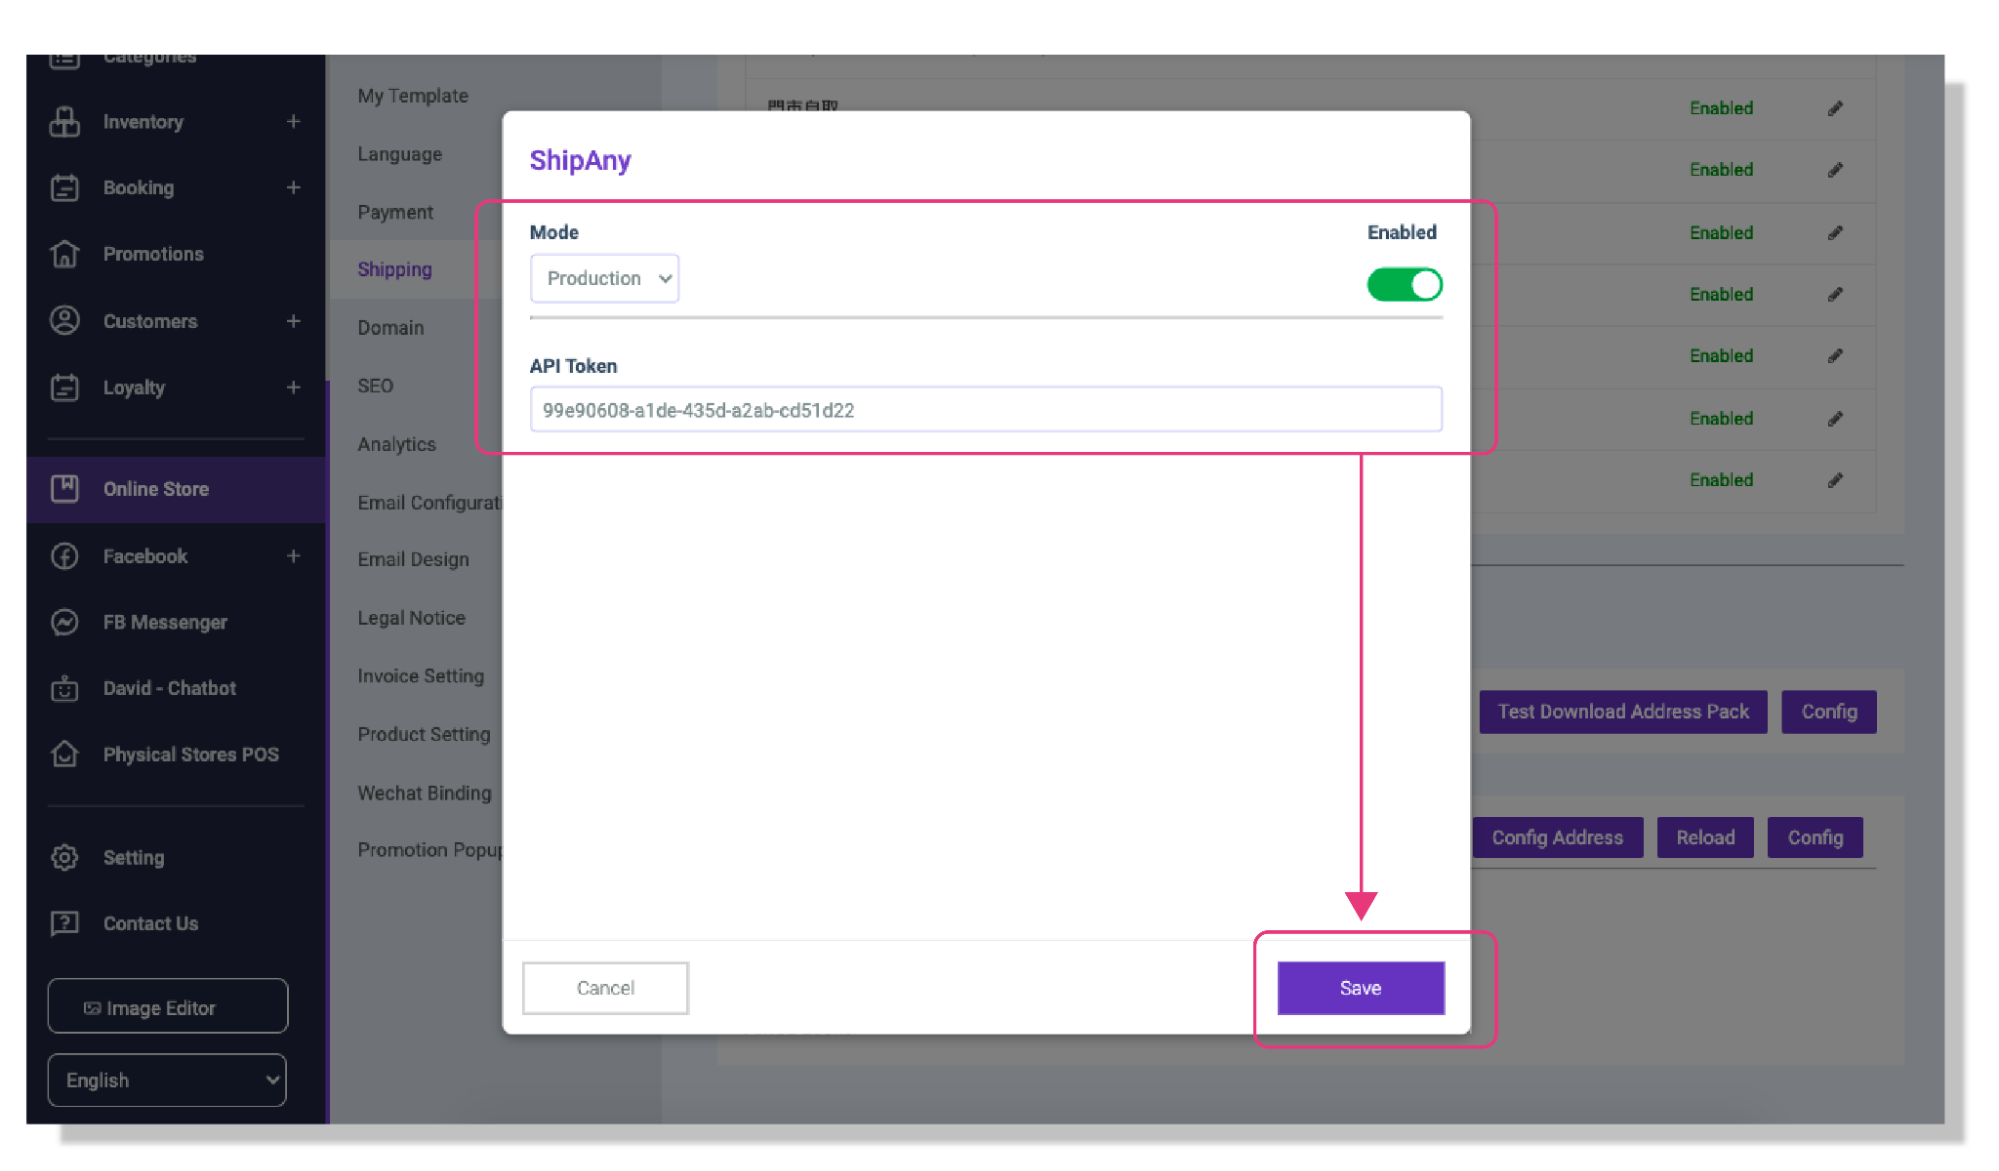
3)Finally, click 「Config Address」 to enter your pickup address and information, and then click 「Save」 to complete the setting. After completing the settings, you can add shipping methods attached to ShipAny here according to the steps of “Local Shipping Settings” for customers to choose from.
4)If you want to activate more logistics service providers after connecting the API key, you can go to ShipAny to activate and enable the logistics service providers you need. Then go back to the STOREBERRY Admin Panel 「Online Store」 「Shipping」 at the bottom of the page and Click 「Reload」 in the "ShipAny" column.
# 2.4 Domain & SEO Settings
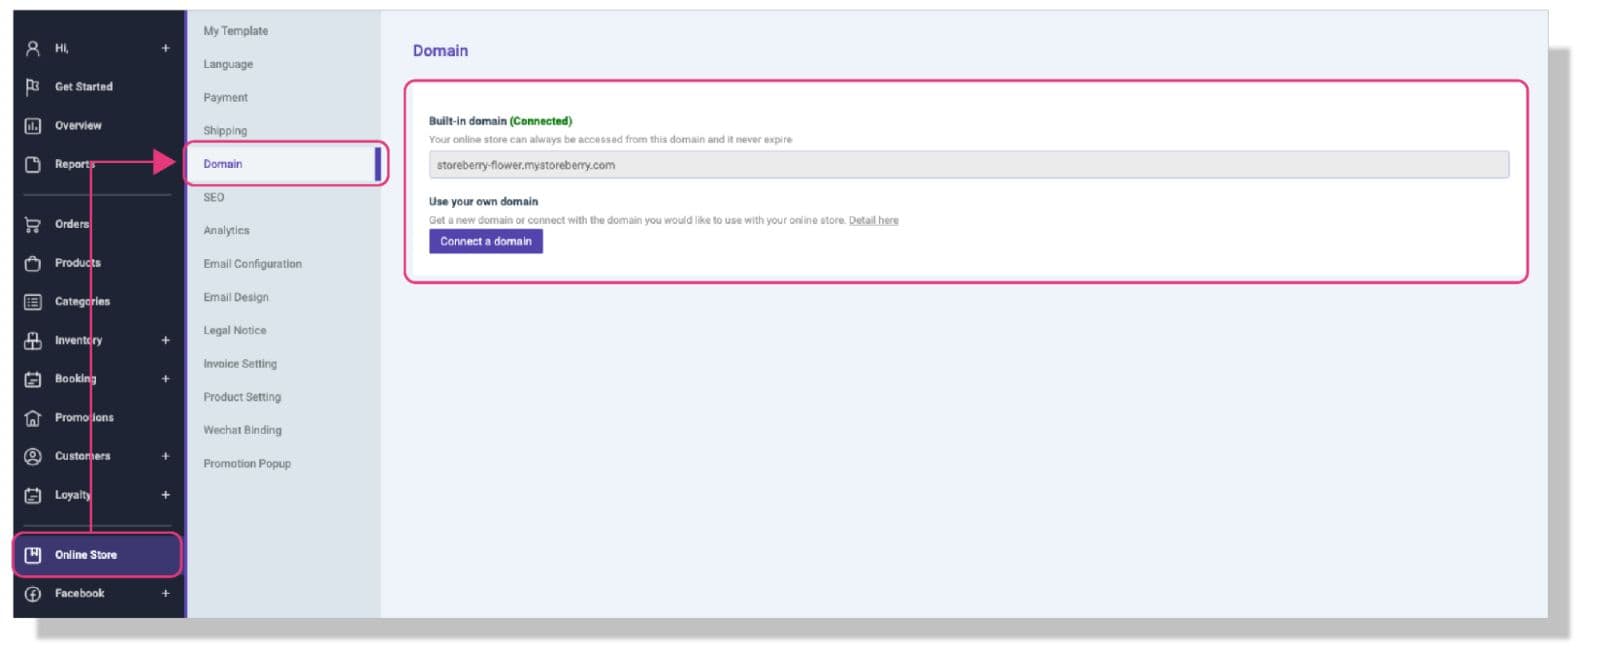
STOREBERRY provides a free built-in domain for all users. To shorten the timeline for launching an online store, the built-in domain will be automatically connected to your online store.
If you prefer to use your own domain name, you can go to STOREBERRY Admin Panel 「Online Store」 「Domain」 and click 「Connect a domain」 under the 「Use your own domain」 column to set up your existing domain.
(i) Use Own Domain
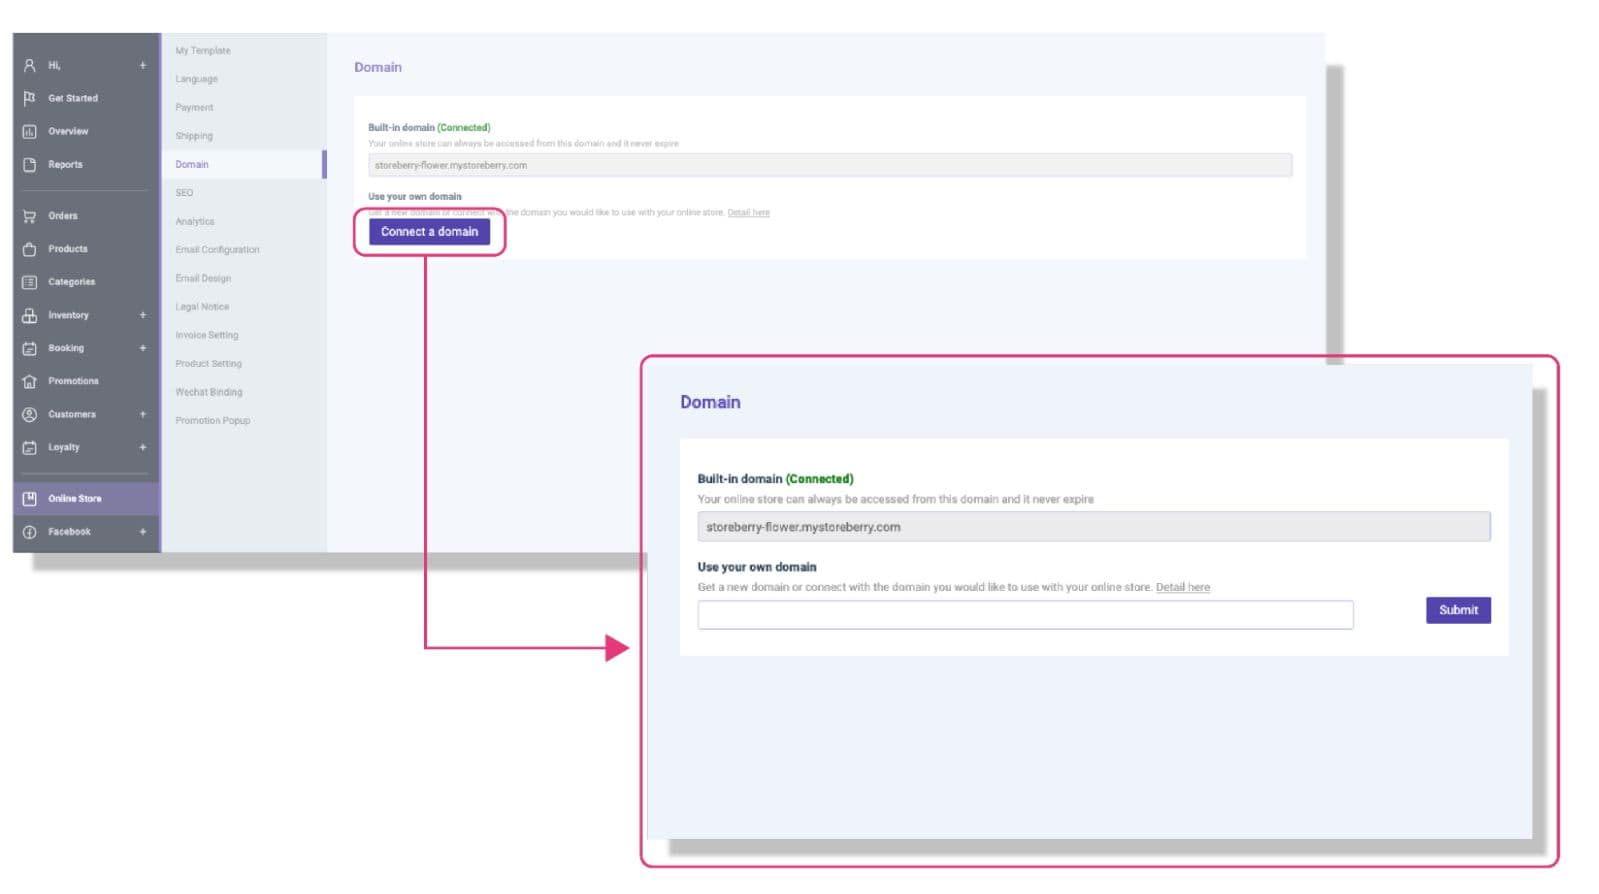
If you are using an existing domain, you can change its setting to point it to your STOREBERRY store. Please follow the steps below to connect your existing domain to STOREBERRY:
1)First, enter your existing domain in the box under the “Use your own domain" column, then click “Submit”.
2)Go to your domain provider and log in your account you have with your domain provider. Click “DNS” and edit the following DNS settings:
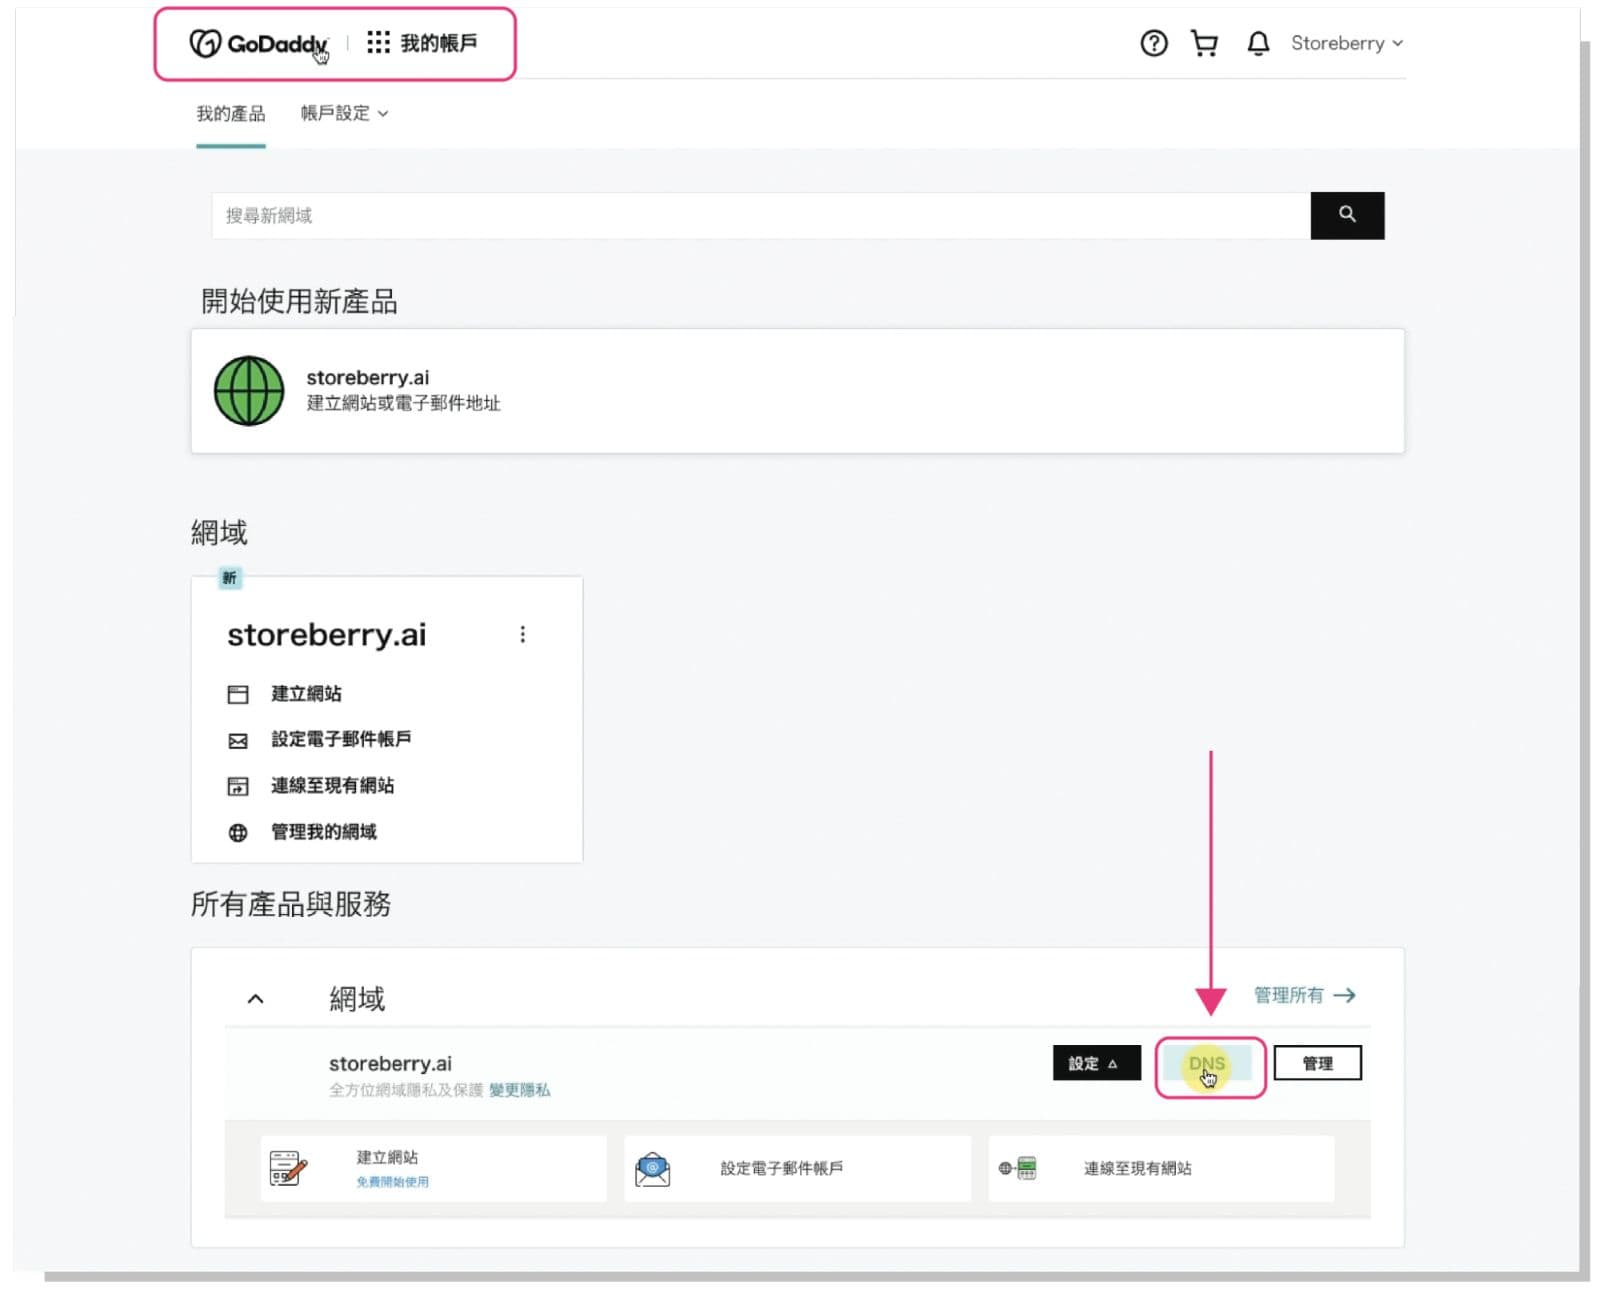
3) Delete all A & CNAME records and follow the below steps.
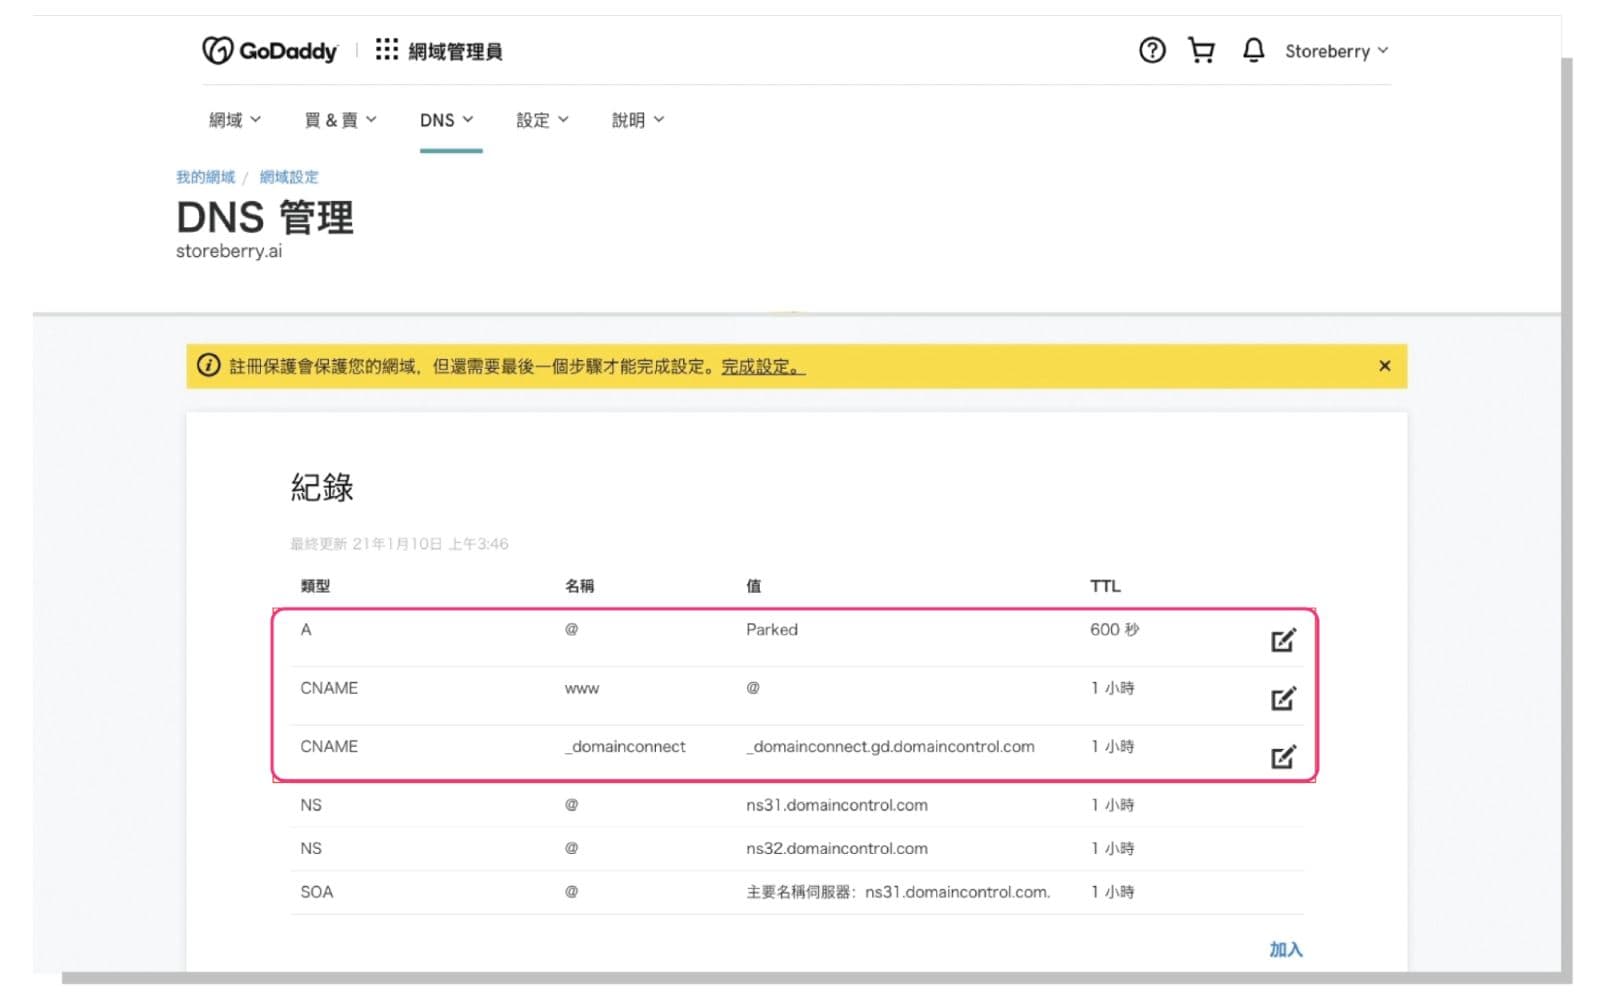
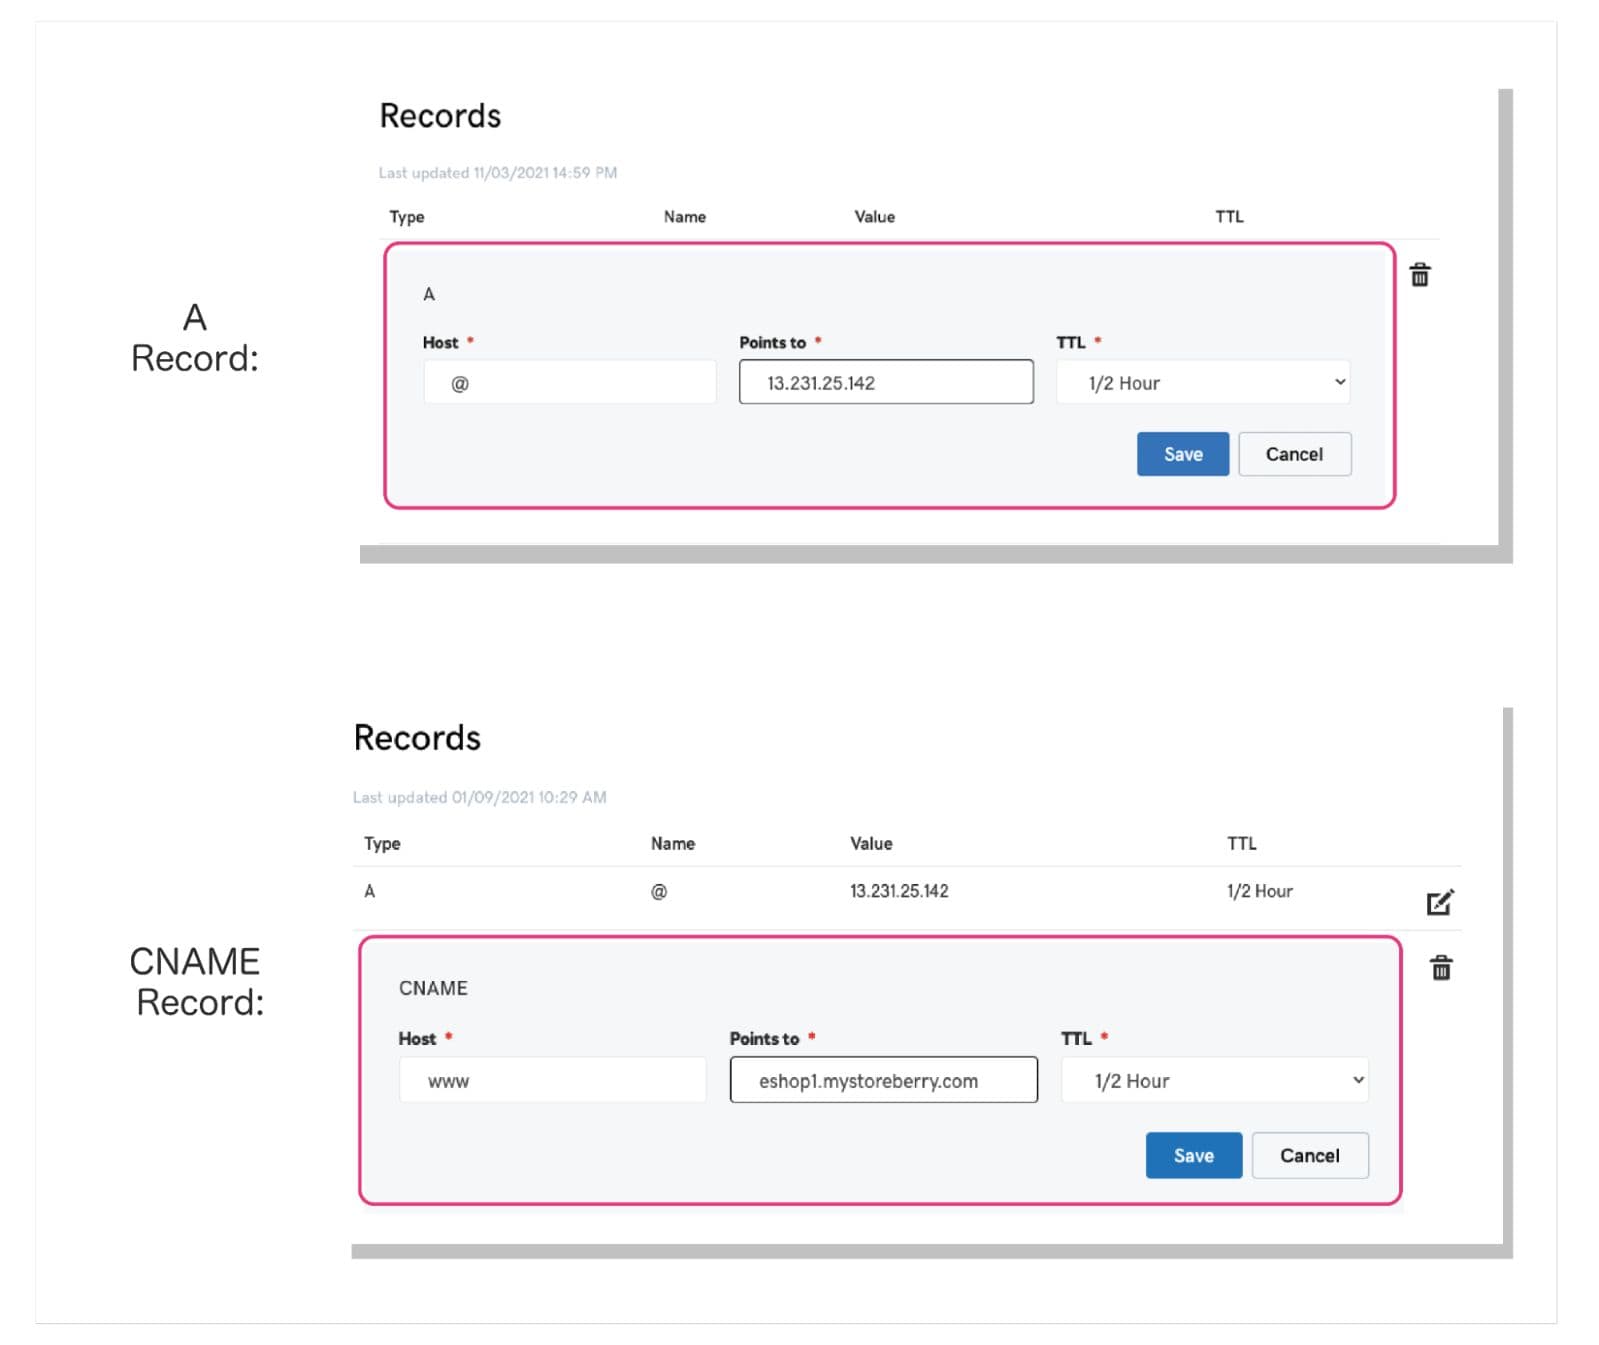
4)Update your A and CNAME records and click “Save”:
A record:
Map your A record to STOREBERRY’s IP address: @ | 13.231.25.142 | 1/2hour (*Please ensure that you've mapped with one IP address only)
CNAME record:
Map your CNAME record to STOREBERRY’s IP address:
www | eshop1.mystoreberry.com | 1/2 hour
5) After mapping, it may take around 15 mins for your existing domain to point to your STOREBERRY online store. Please reach out to your domain provider if you face any problems setting up.
How do I connect a subdomain to STOREBERRY?
-
1) Go to your domain provider and log in your account. Click 「DNS」 and edit the following DNS settings.
-
2) Find your CNAME record in your DNS setting, change your subdomain CNAME record to map to eshop1.mystoreberry.com. Then click 「Save」 to update your CNAME record.
E.g. If you want your subdomain “shop.simple-fashion.com” to point to your STOREBERRY online store, you can change your store’s CNAME record to map to: “eshop1.mystoreberry.com”
-
3) Go to STOREBERRY Admin Panel 「Online Store」 「Domain」 and click “Connect a domain” under the “Use your own domain" column, enter your subdomain (eg. shop.simple-fashion.com) in the box and click 「Submit」
-
4) After mapping, it may take around 48 hours for your subdomain to point to your STOREBERRY store. Please reach out to your domain provider if you face any problems setting up.
Note on adding your custom domain to STOREBERRY:
After you've added your domain to STOREBERRY, you need to choose your primary domain -- the domain name that customers will see in the address bar while they browse your online store.
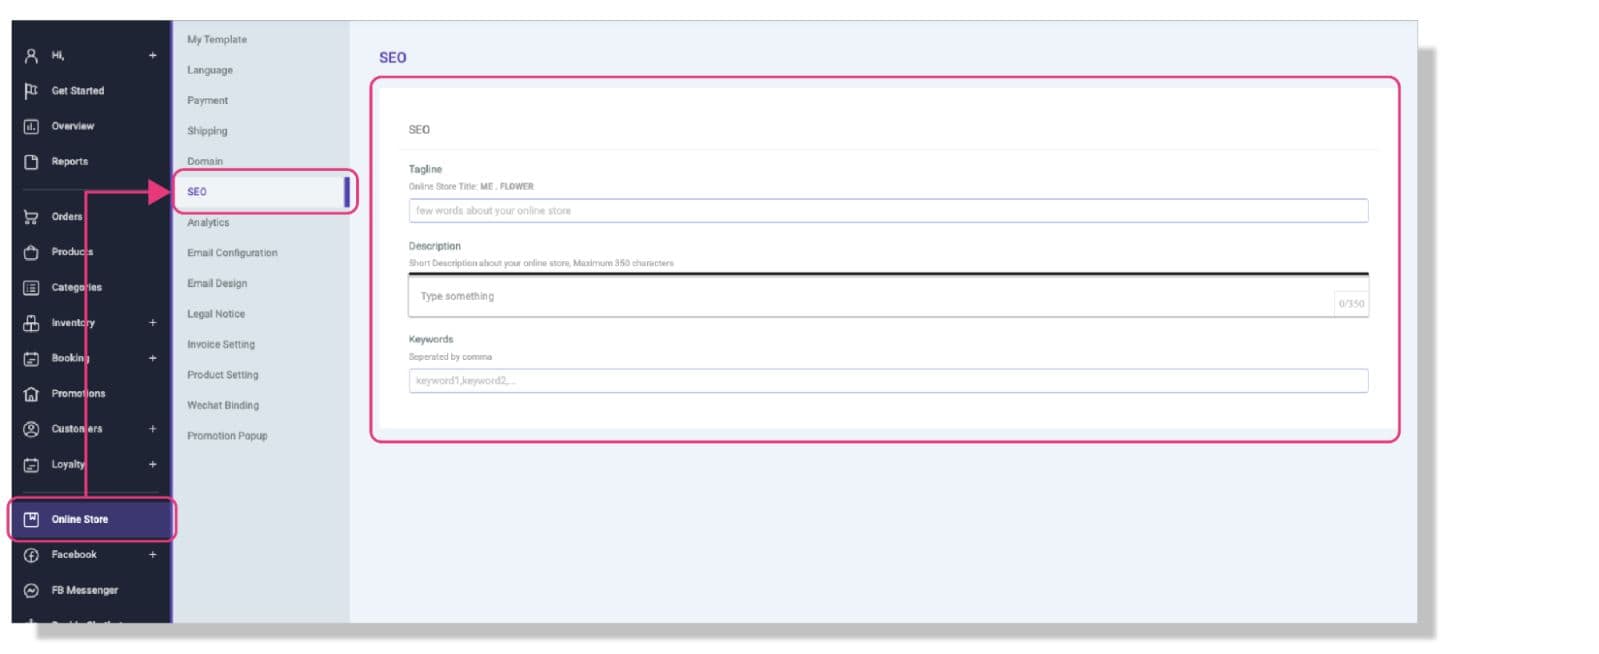
(ii) SEO Settings
While creating an online store at STOREBERRY, you can set up the website analysis and SEO tools to boost your marketing efficiency!
Want to create a successful online store? Improving the SEO of your online store is definitely one of the powerful keys! What you need is to fill in the following details under the STOREBERRY Admin Panel 「Online Store」 「SEO」 , and you can simply complete the SEO settings of your online store in one step!
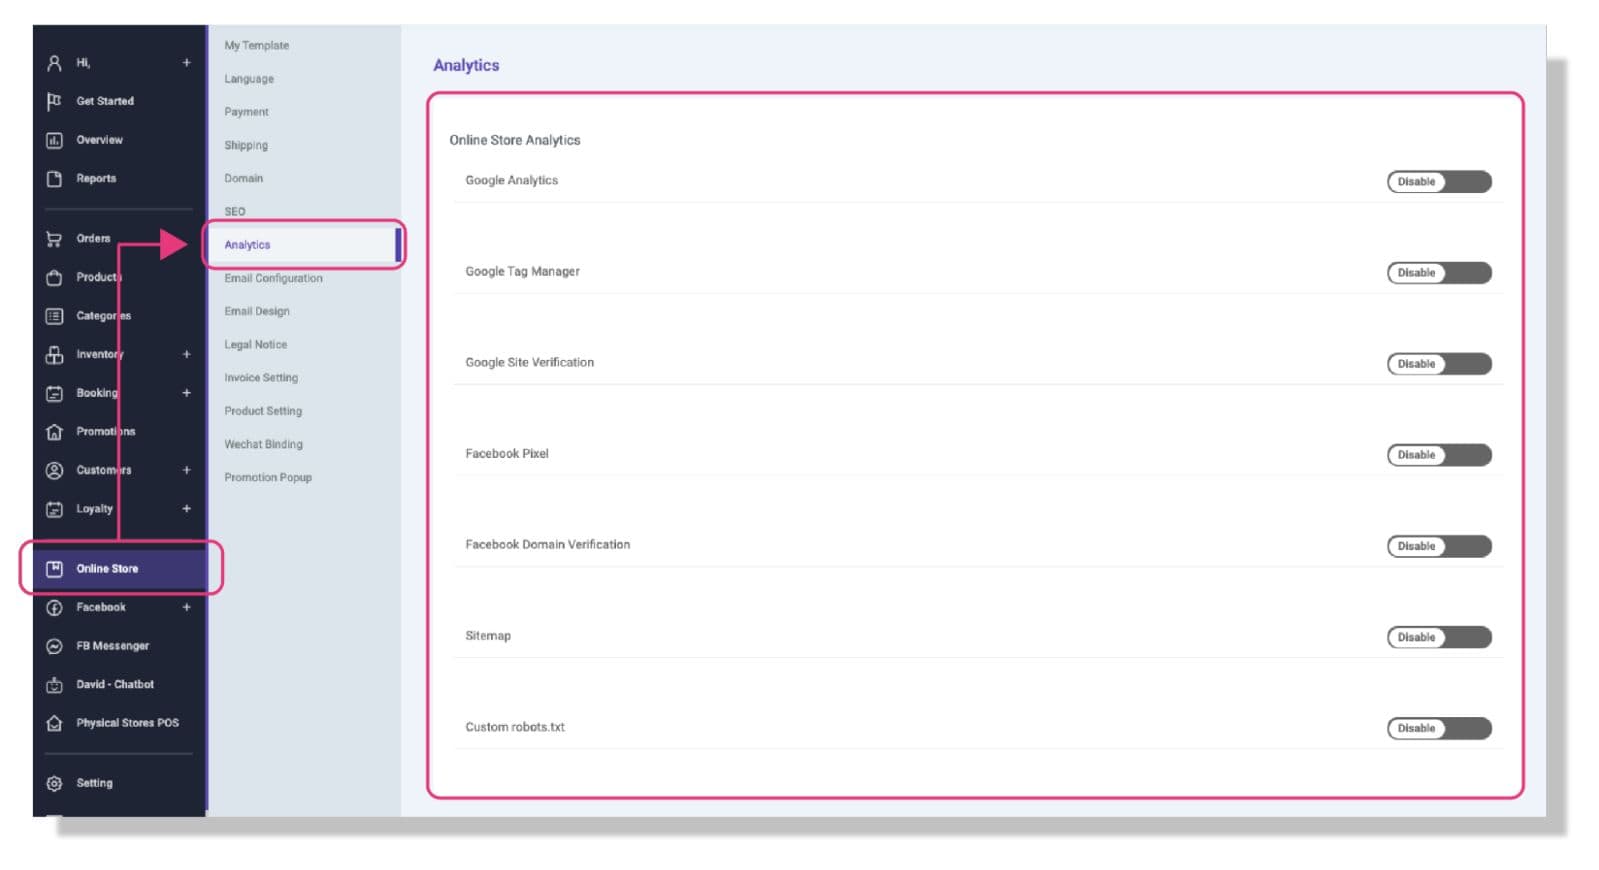
(iii) Data Tracking and SEO Tools
STOREBERRY supports a series of website analysis and SEO tools, such as Google Tag Manager (GTM), Google Analytics and Facebook Pixel, etc. to help you master the data of ads recorded by conversion tracking and website content.
You can go to STOREBERRY Admin Panel 「Online Store」 「Analytics」 to fill in the tracking ID, and connect to the tracking tools you want to use at once!
Google Analytics
If this is your first time to set up Google Analytics, please log in to your Google account on the Google Analytics page , and then follow the steps below to get your Google Analytics tracking ID:
1)Register a GA account: Fill in the information according to the instructions on the Google Analytics page, including account name and resource name.
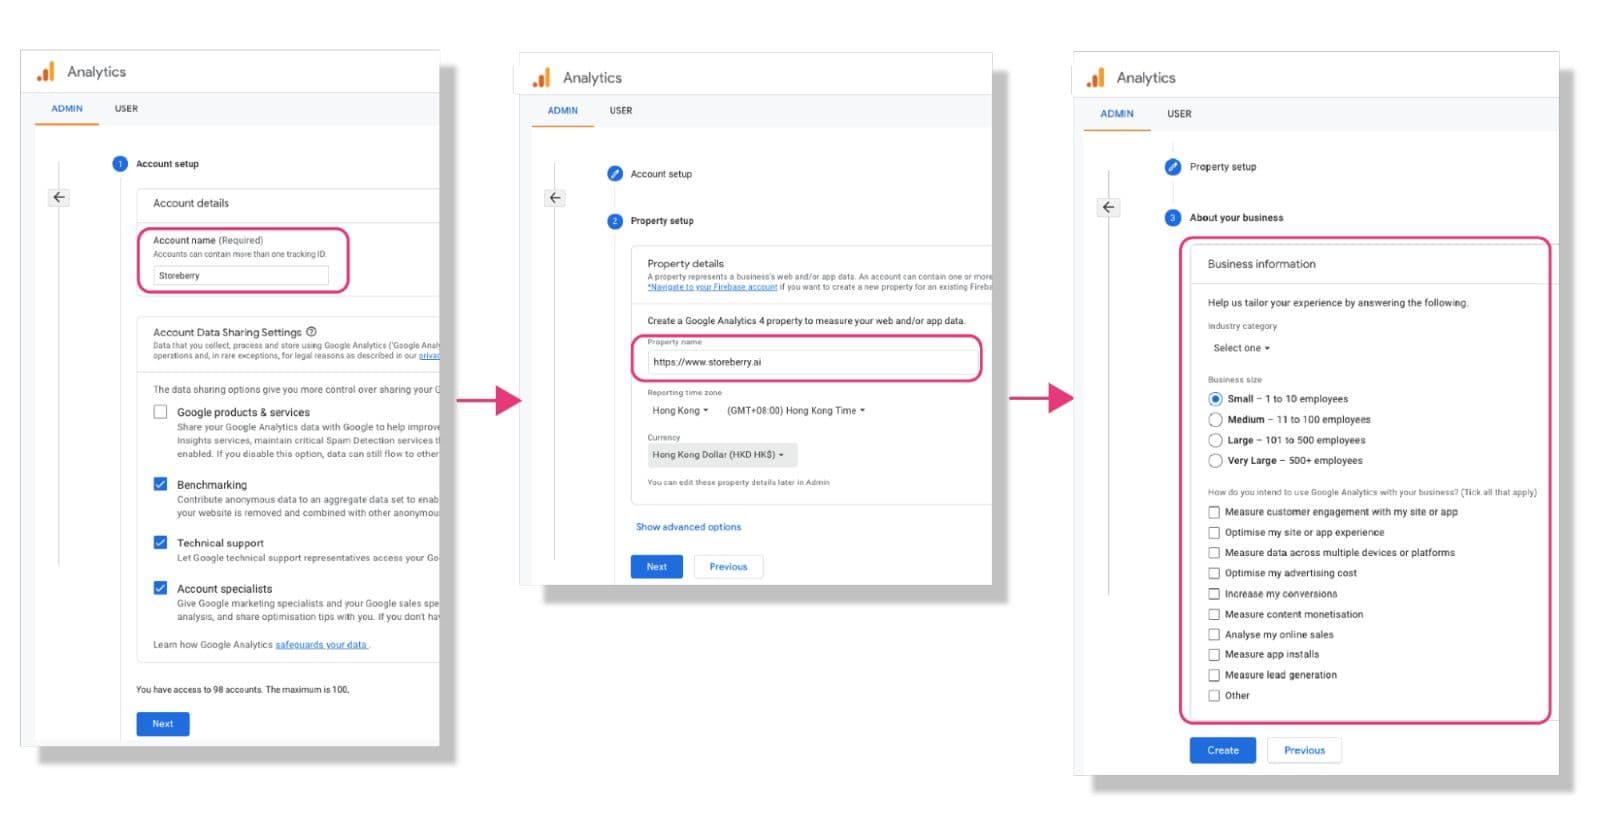
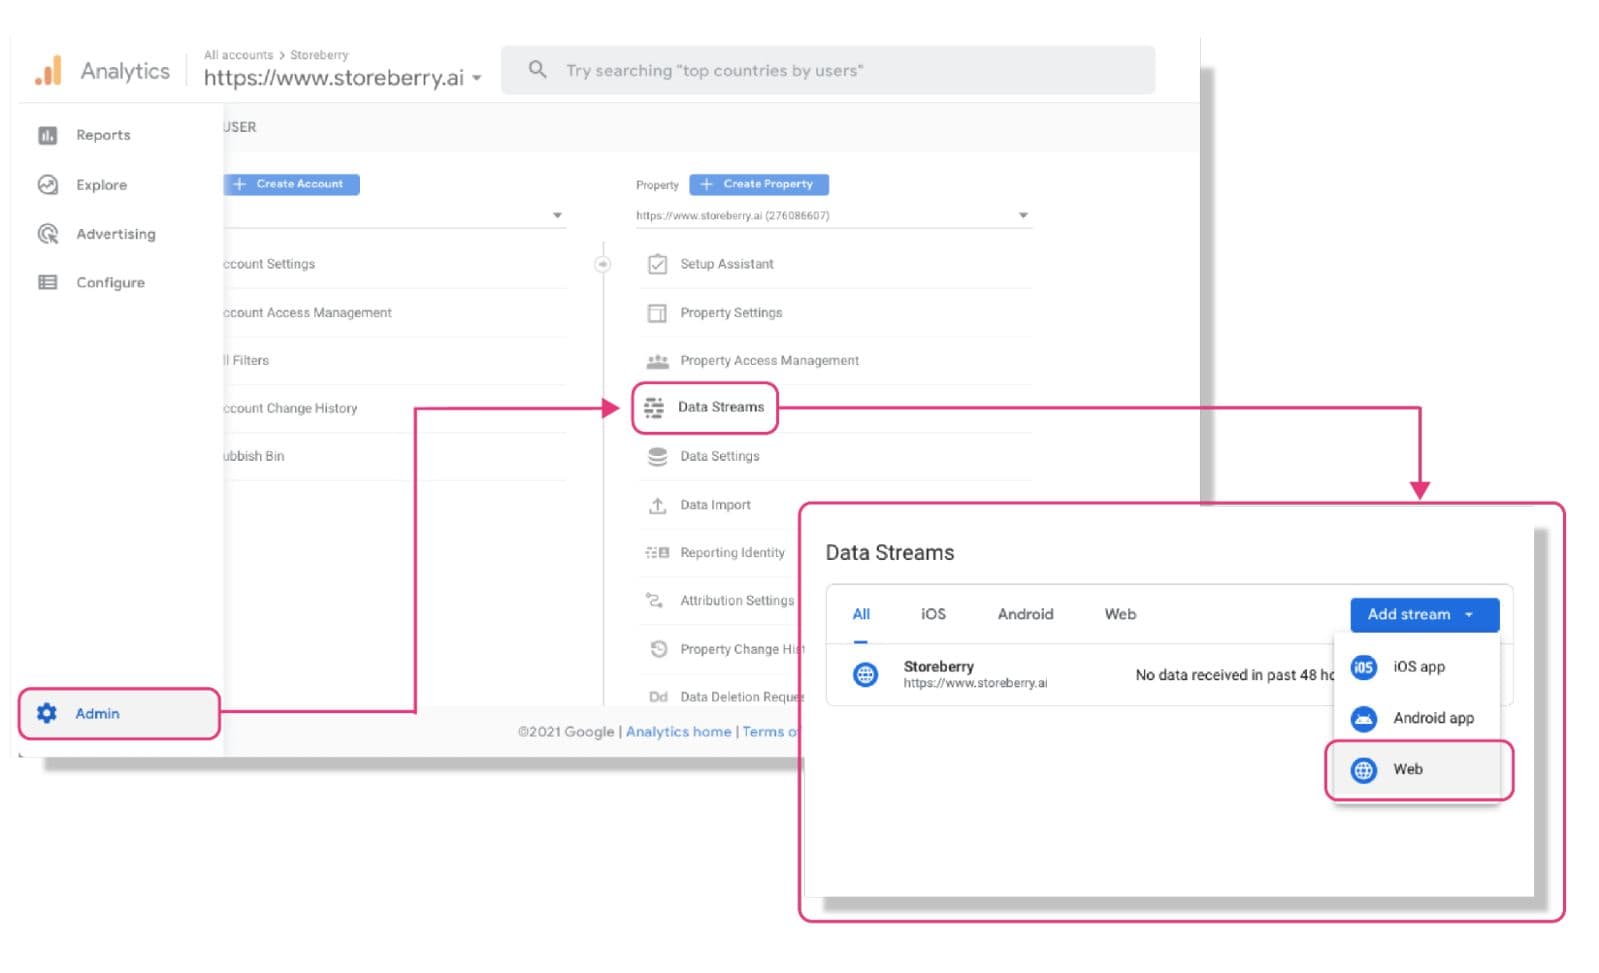
2)After registering, please Click “Admin” from the bottom of the side toolbar, and select “Data Stream” > “Add Stream” > “Web” in the upper right corner of the page to set up data streaming.
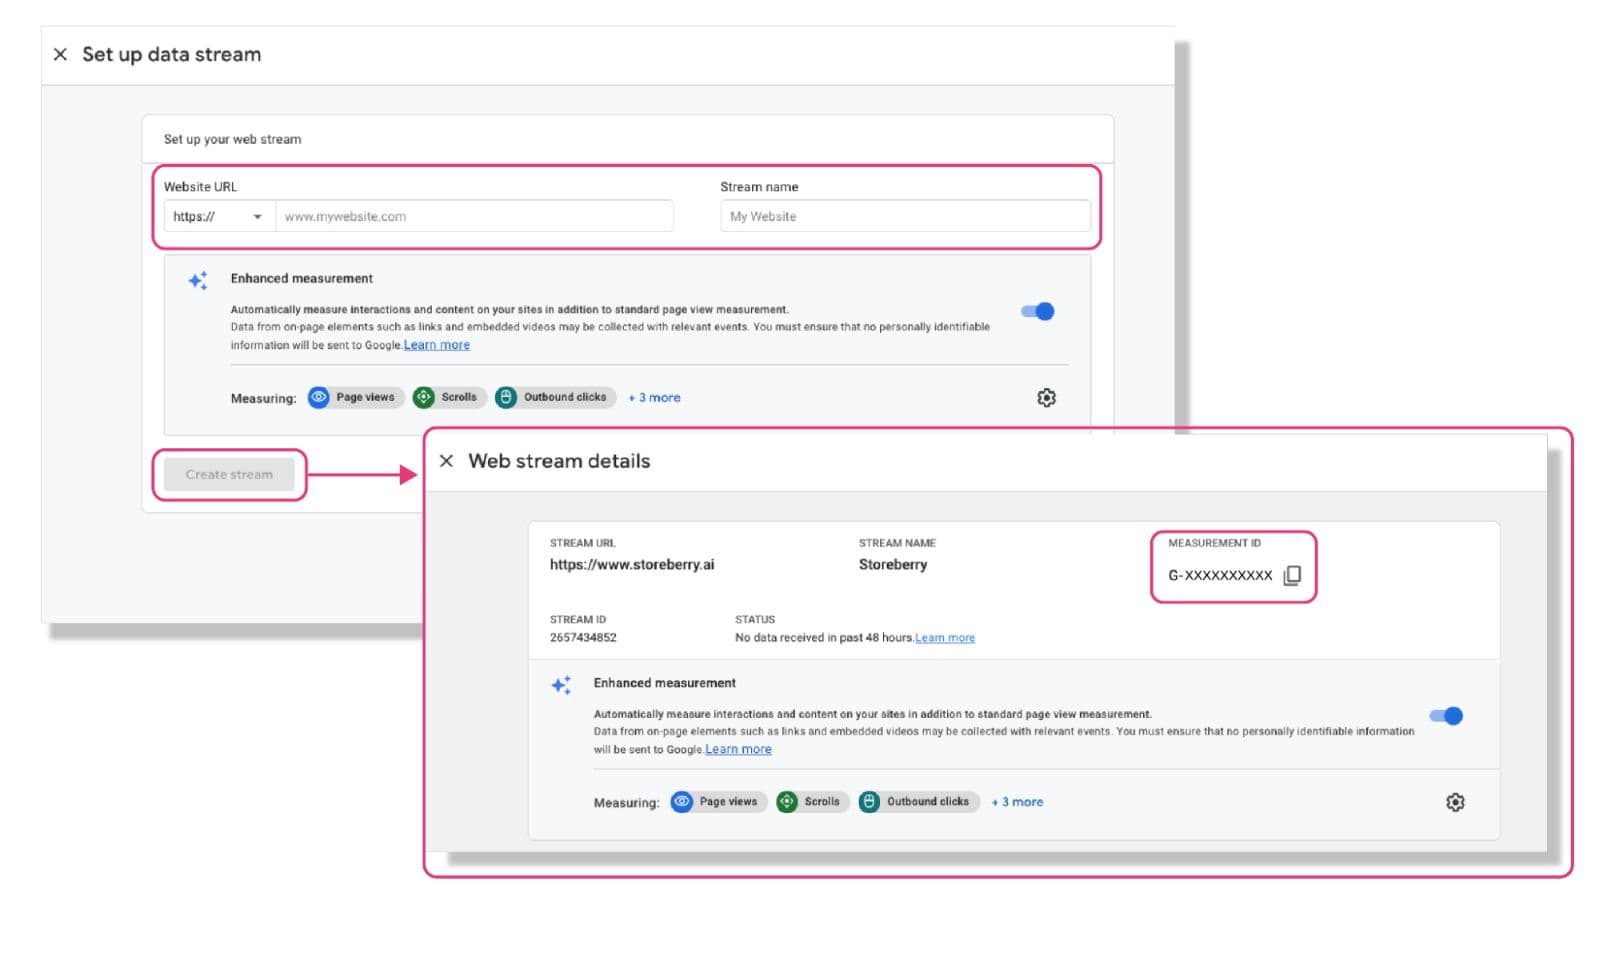
3)Enter the “Website URL” and “Stream Name” then click “Create Stream”. Your Tracking ID will be displayed on the page.
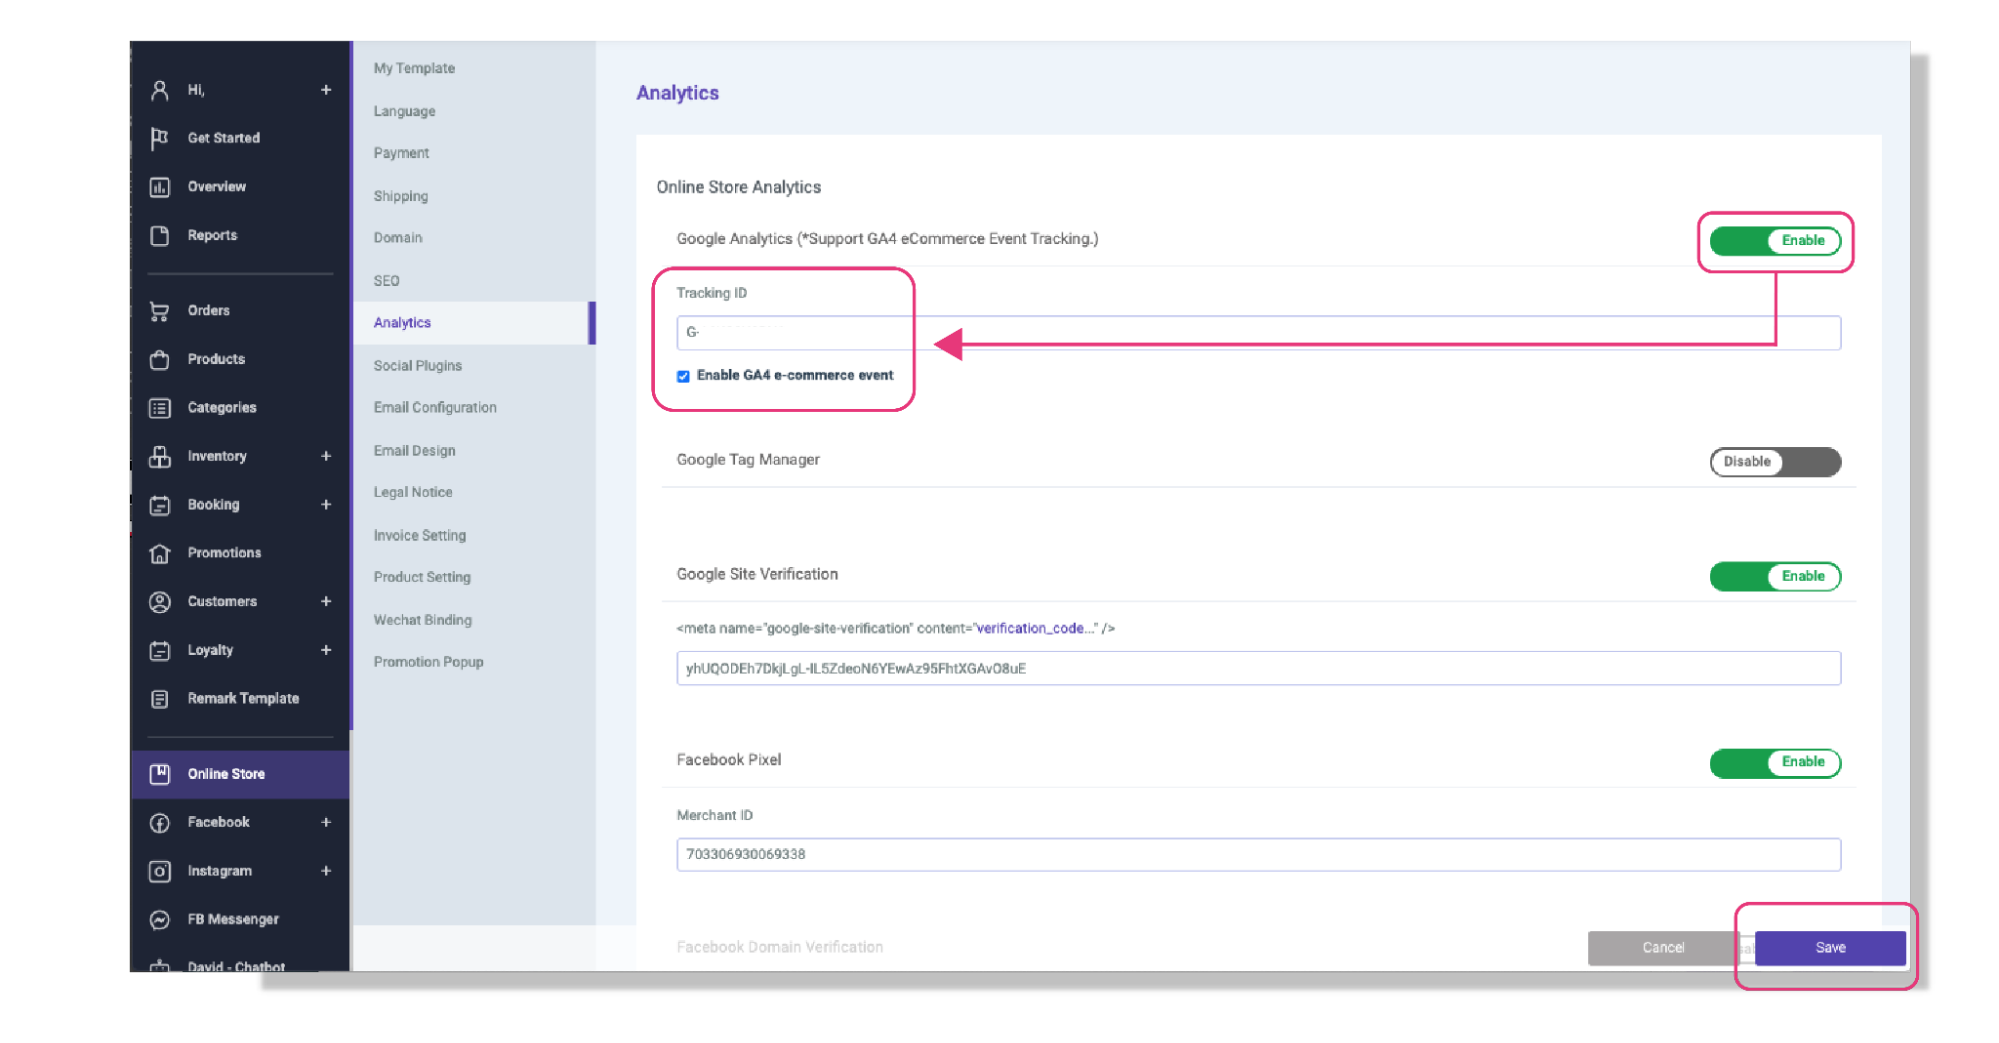
4)Go to the STOREBERRY Admin Panel 「Online Store」 「Analytics」 and tap the 「Enable」 button of the Google Analytics column. Then continue to enter your Tracking ID to connect it to your website.
STOREBERRY now supports "GA 4 E-commerce Event Tracking", if you need to use this feature to track the related data of your online store, you can click 「Enable GA4 E-commerce Event」 here (*Please make sure your online store has been successfully connected to Google Tag Manager). And then click 「Save」 to successfully connect.
Google Tag Manager
If this is your first time to set up Google Tag Manager, please log in to your Google account on Google Tag Manager , and then follow the steps below to get your GTM tracking ID:
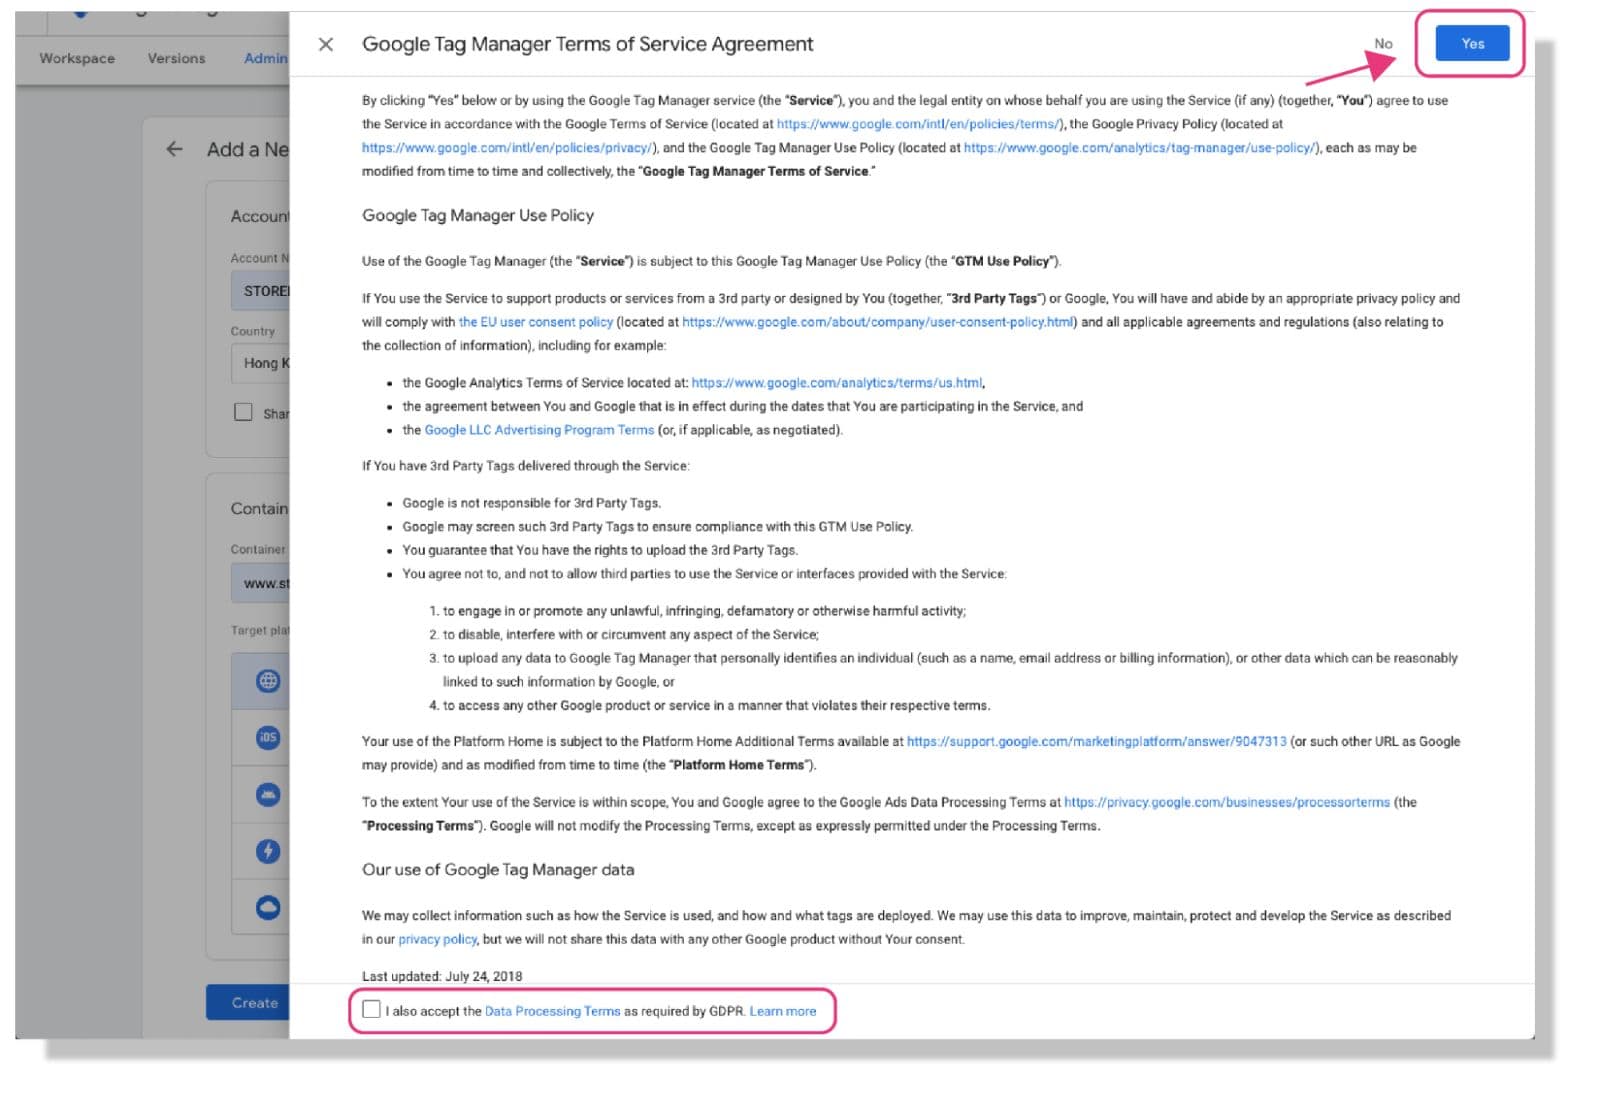
1)Click “Create Account” and enter the required information, including the account name (company name), country, container name (company URL) and target platform (Web), etc., then click “Create” to the next step.
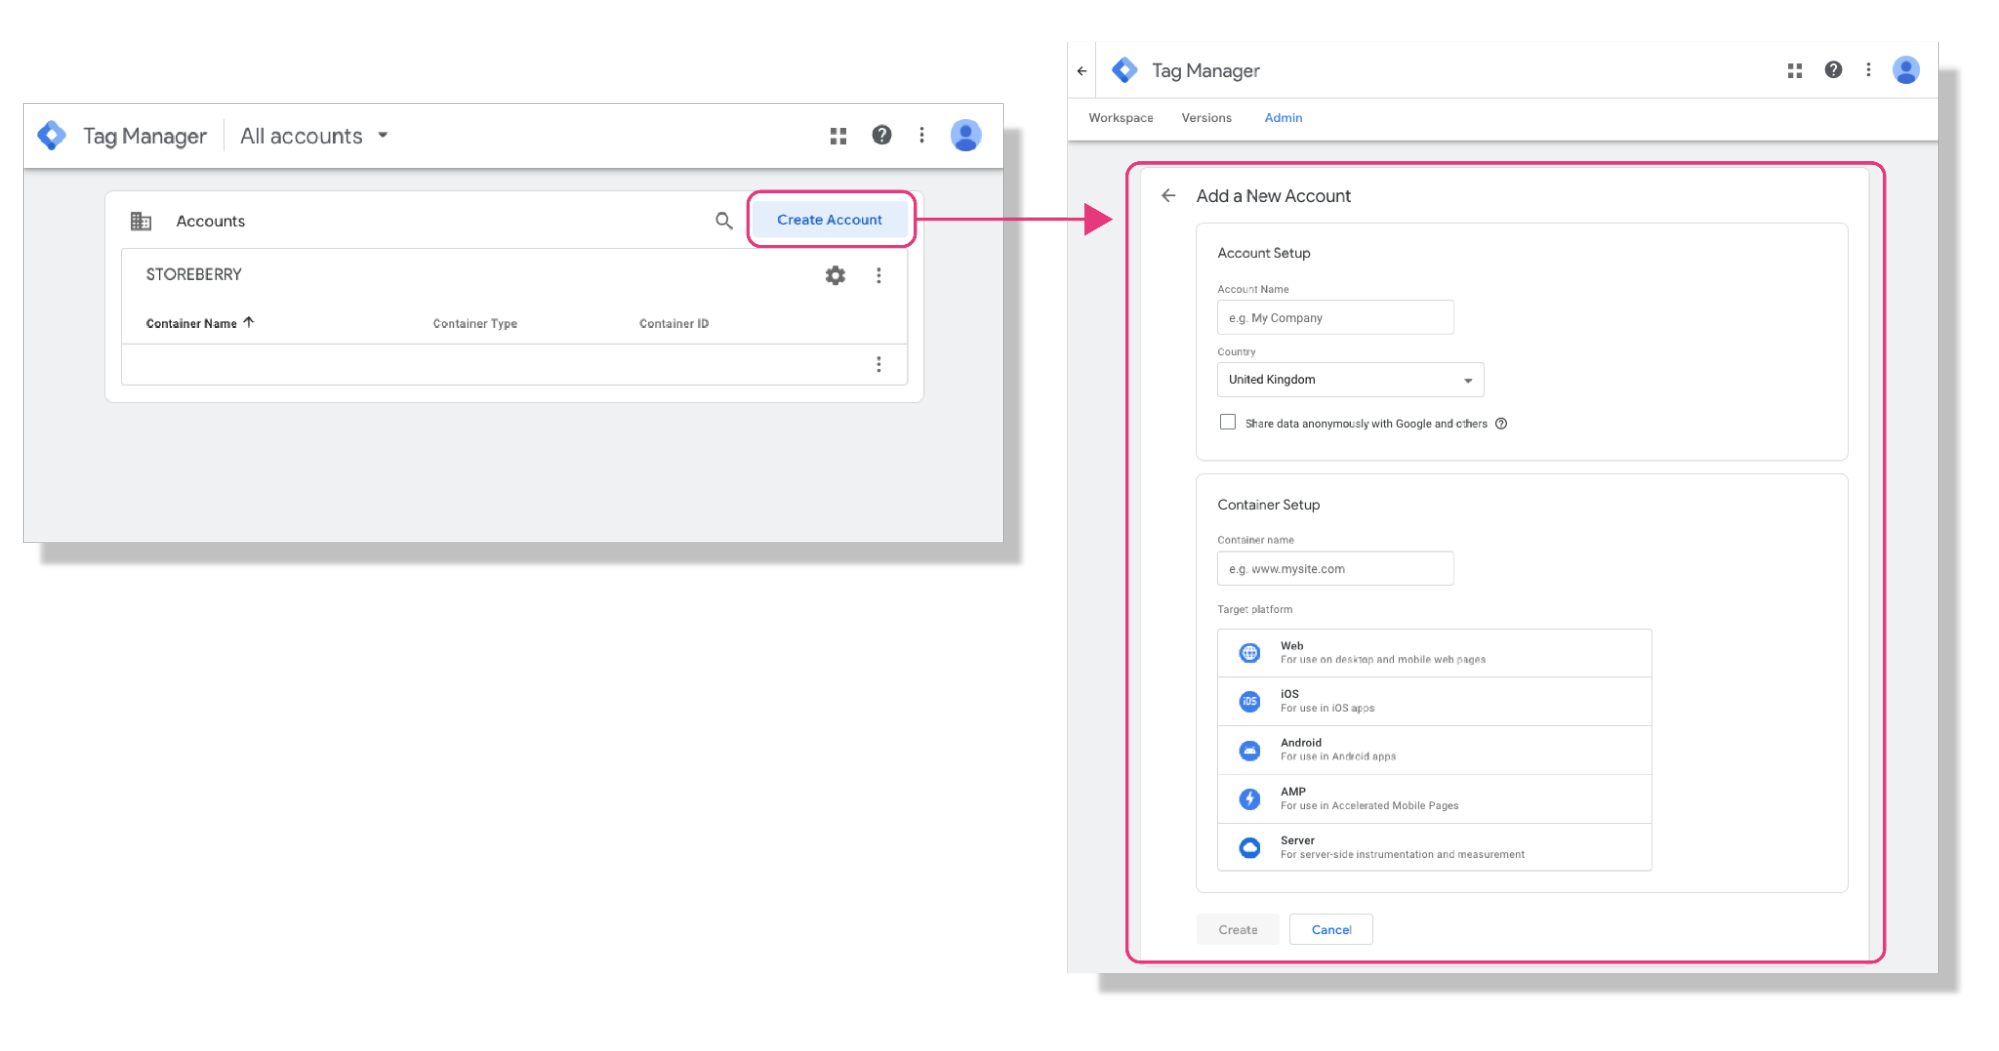
2)Click "Yes" to confirm the Google Tag Manager Terms of Service Aggrement and enter the GTM platform.
3)Close the pop-up window and then copy the GTM number on the upper right side.
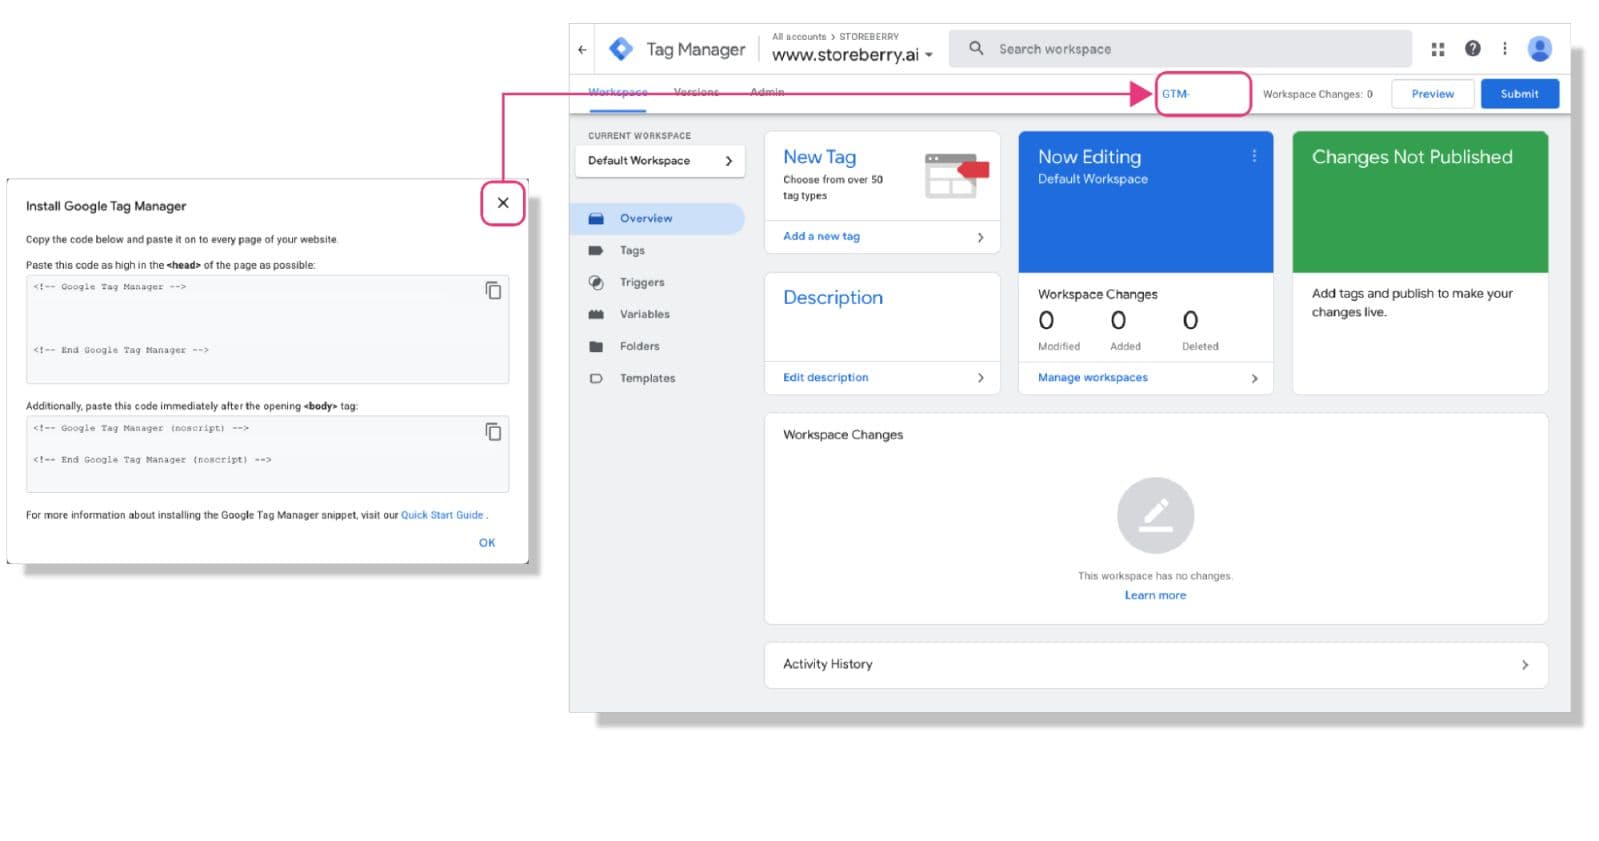
4)Go to the STOREBERRY Admin Panel 「Online Store」 「Analytics」 and tap the 「Enable」 button of the Google Tag Manager column. Then continue to enter your Tracking ID to connect it to your website.

Google Search Console Site Ownership Verification (HTML Tag)
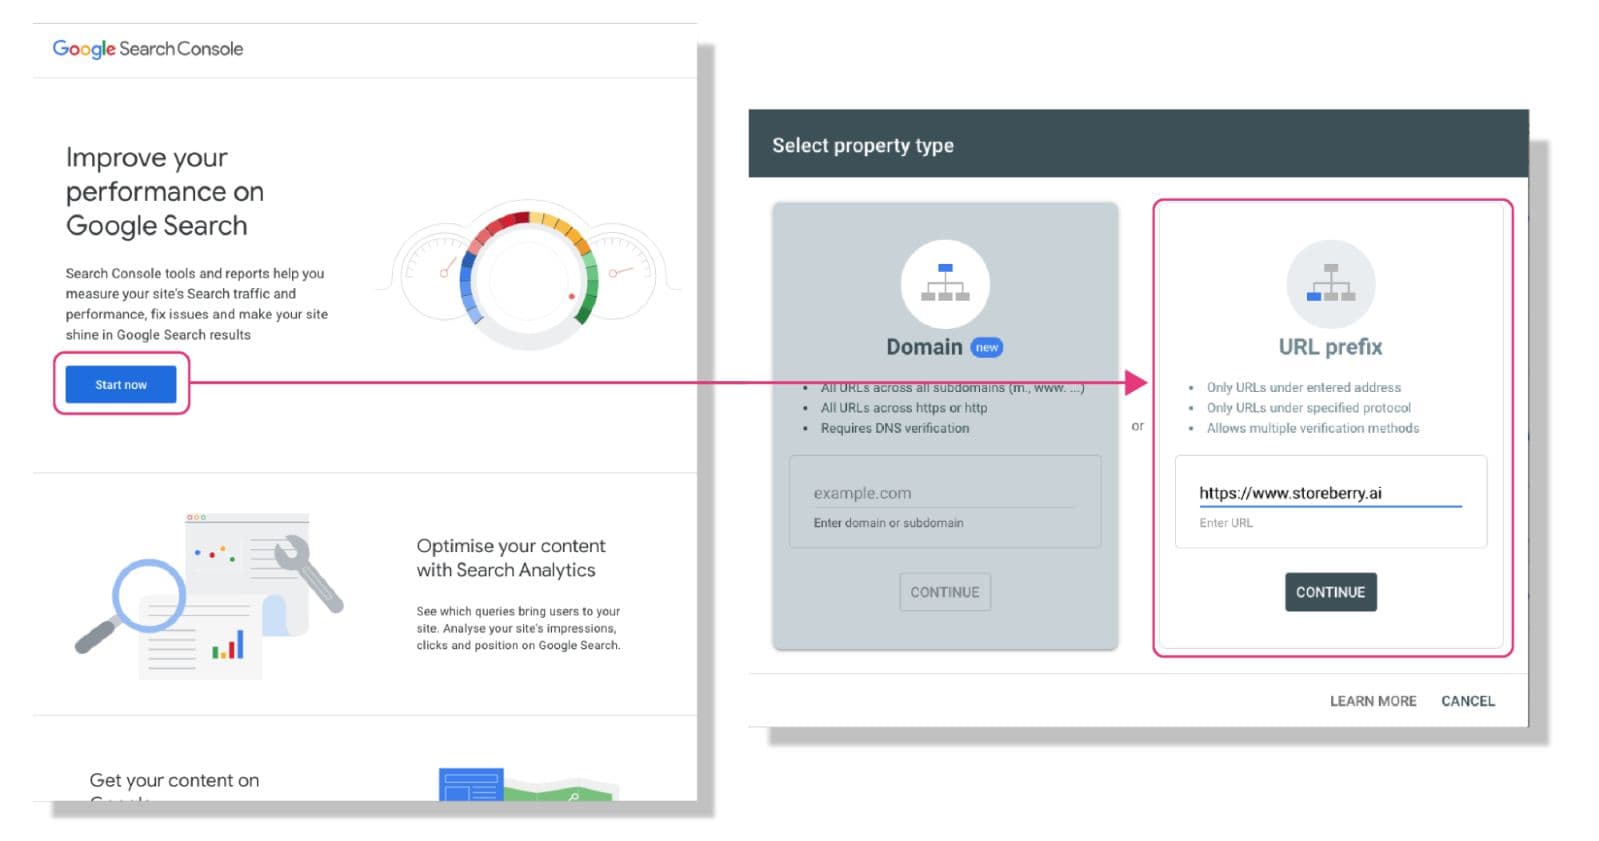
If this is your first time to set up Google Search Console Site Ownership , please log in to your Google account on Google Search Console , and then follow the steps below to get your HTML Tag:
1)Click “Start Now” and enter the URL in the “URL prefix” column, then press “Continue” to the next step.
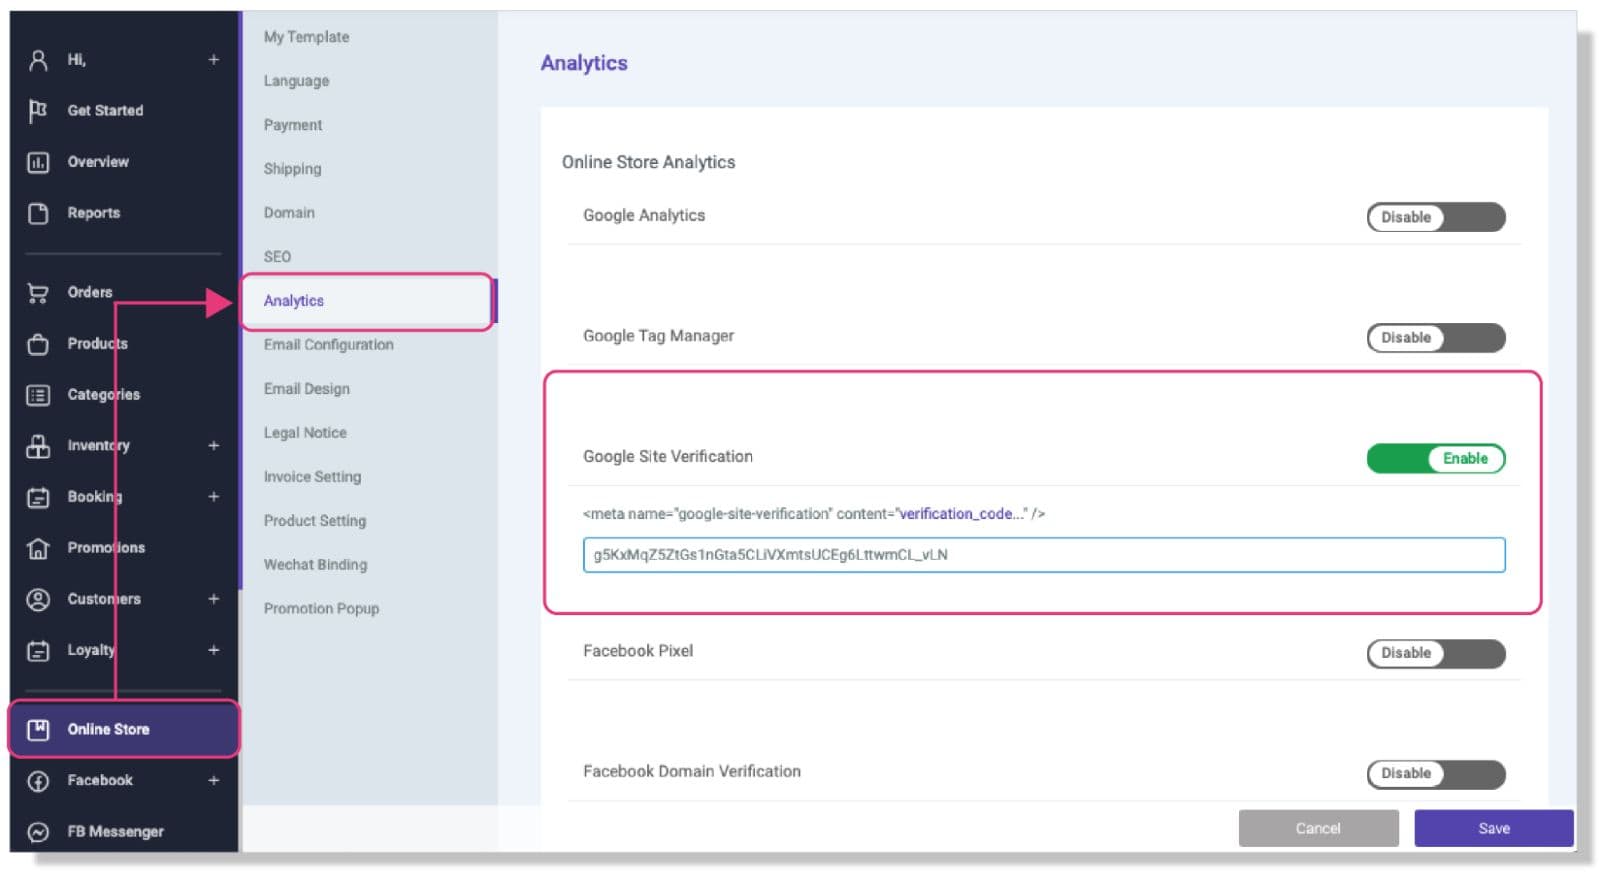
2)Choose the “HTML tag” in “Other Verification Methods” and copy the mixed code which is located in the middle of the meta tag (between 「 <meta name="google-site-verification" content="」. You can find the example (text with underscore) below for your reference::
Example:
 <meta name="google-site-verification" content="
                        g5KxMqZ5ZtGs1nGta5CLiVXmtsUCEg6LttwCL_vLN"/>
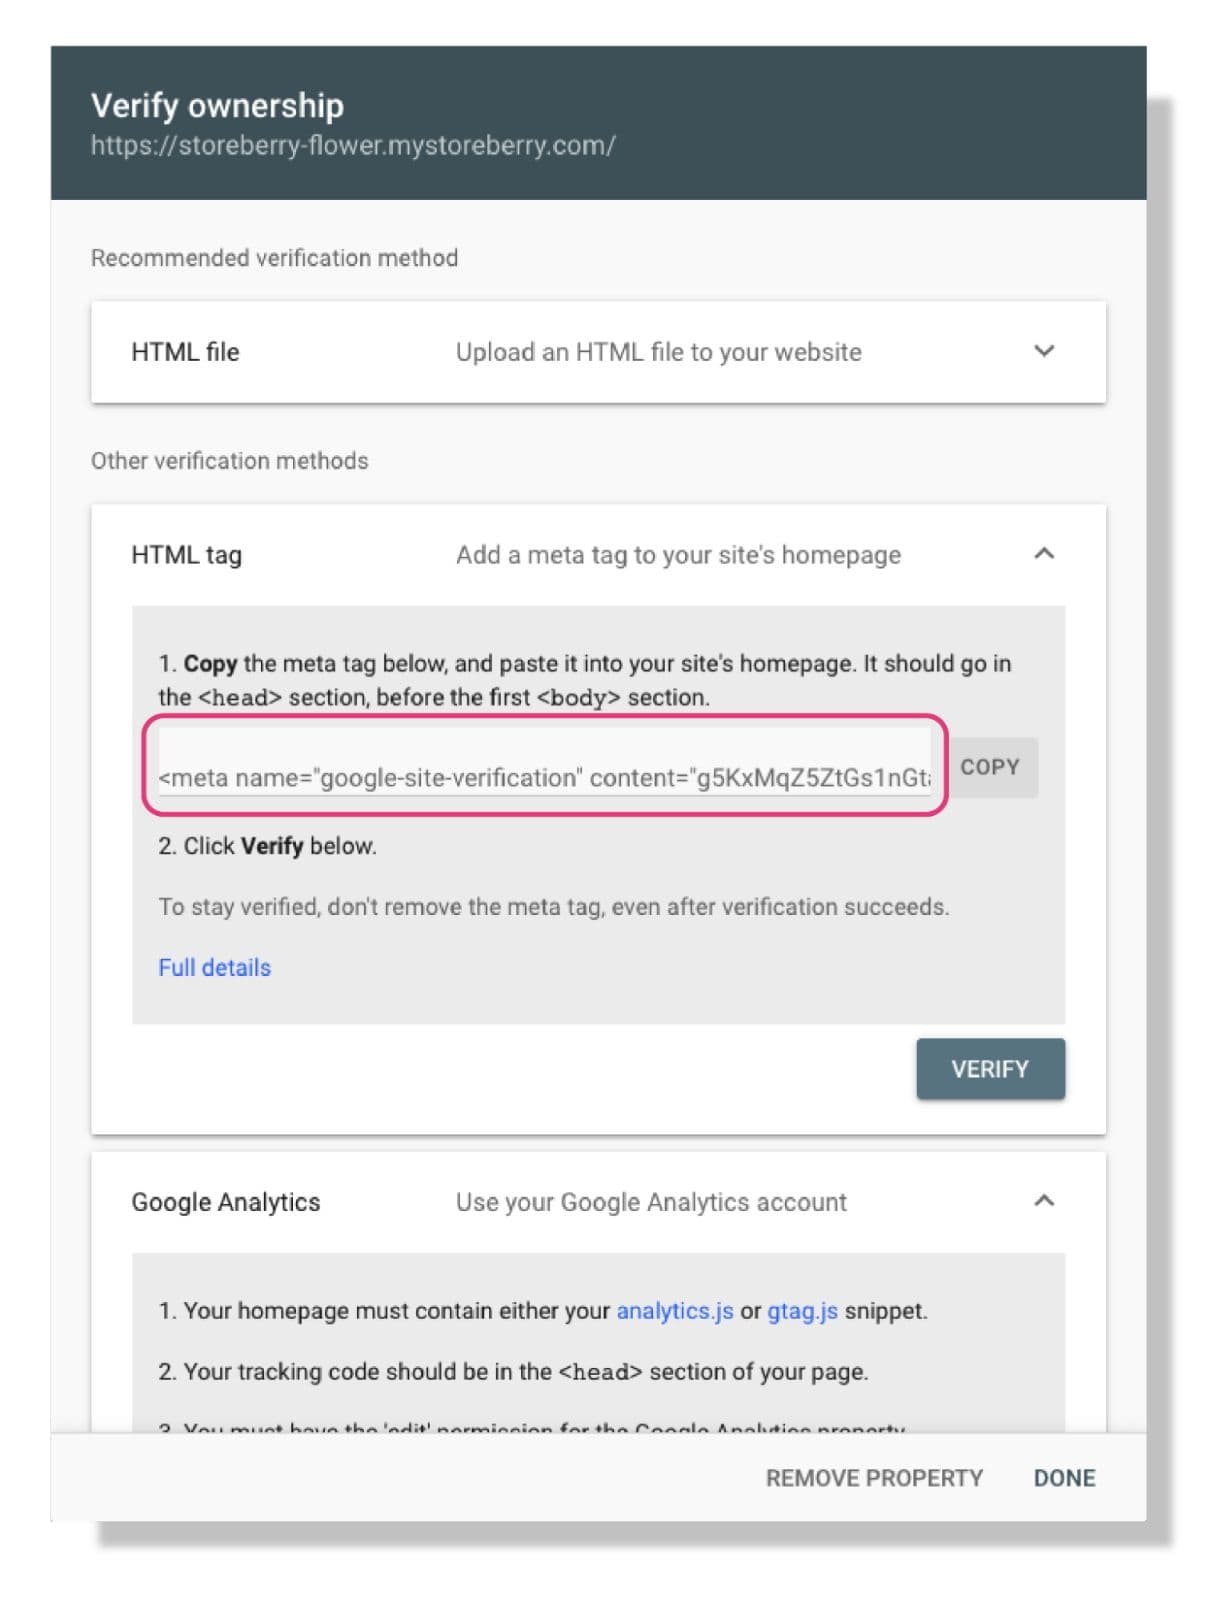
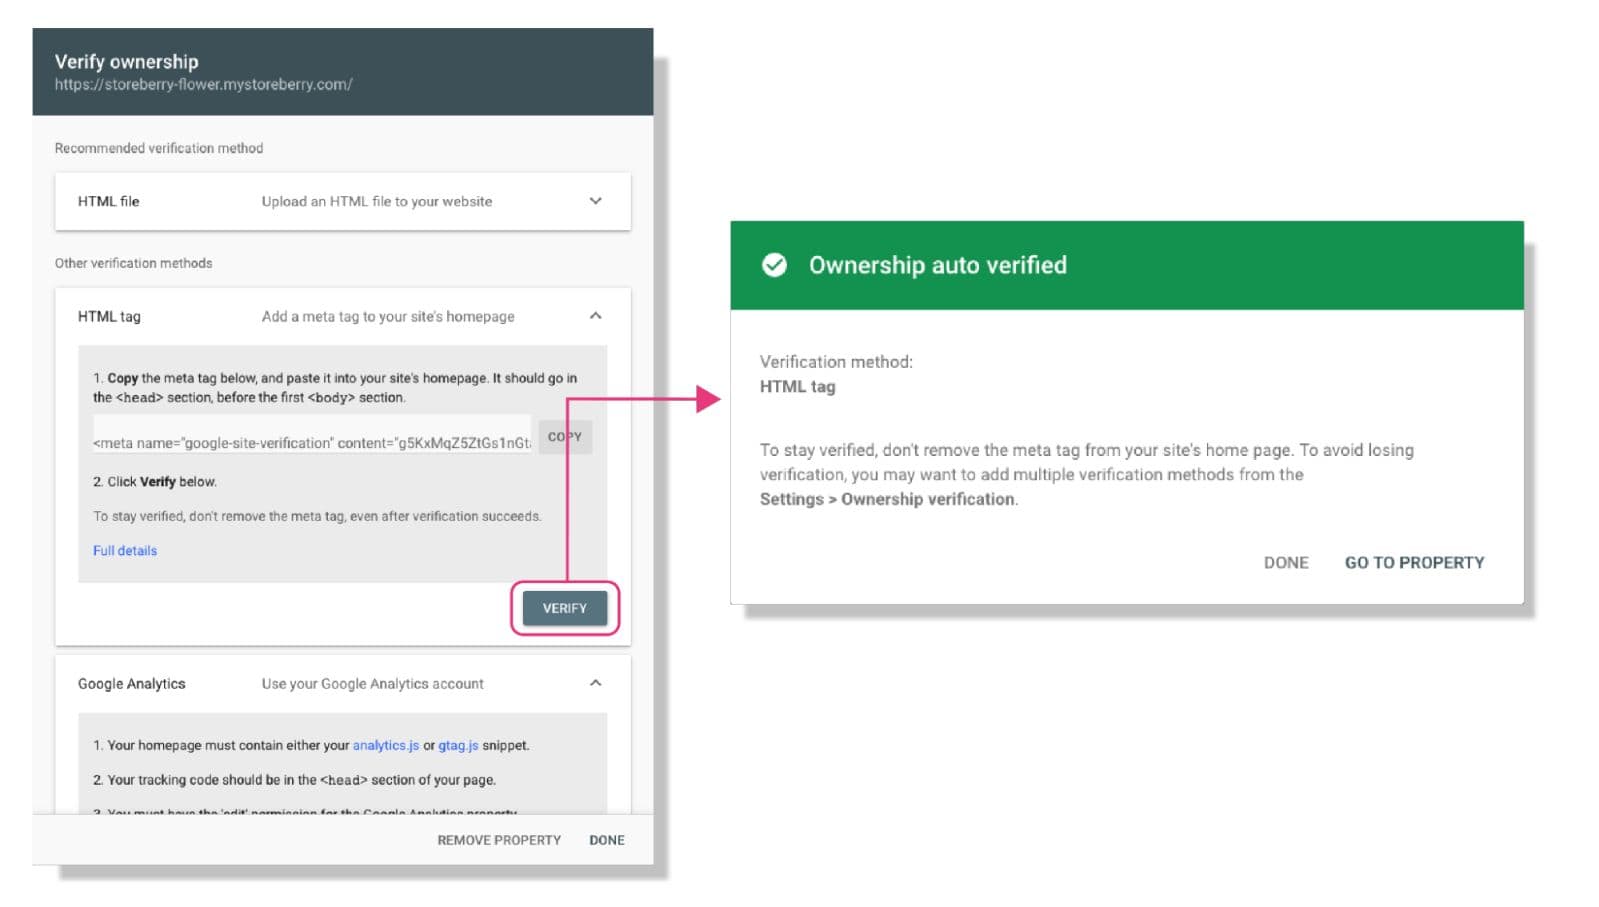
3)Go to the STOREBERRY Admin Panel 「Online Store」 「Analytics」 and tap the 「Enable」 button of the Google Site Verification column. Then continue to enter your HTML tag to connect it to your website.
4)Finally, return to the Google Search Console website and click the “Verify” button. Once the confirmation message appears, you have successfully completed the verification.
Facebook Pixel
If this is your first time to set up Facebook Pixel, you can log in to your Facebook account on the Facebook Events Manager page, and then follow the steps below to get your Merchant ID:
1) Go to the toolbar on the left and click “Connect a data source”, then select “Web” and "Facebook pixel”.
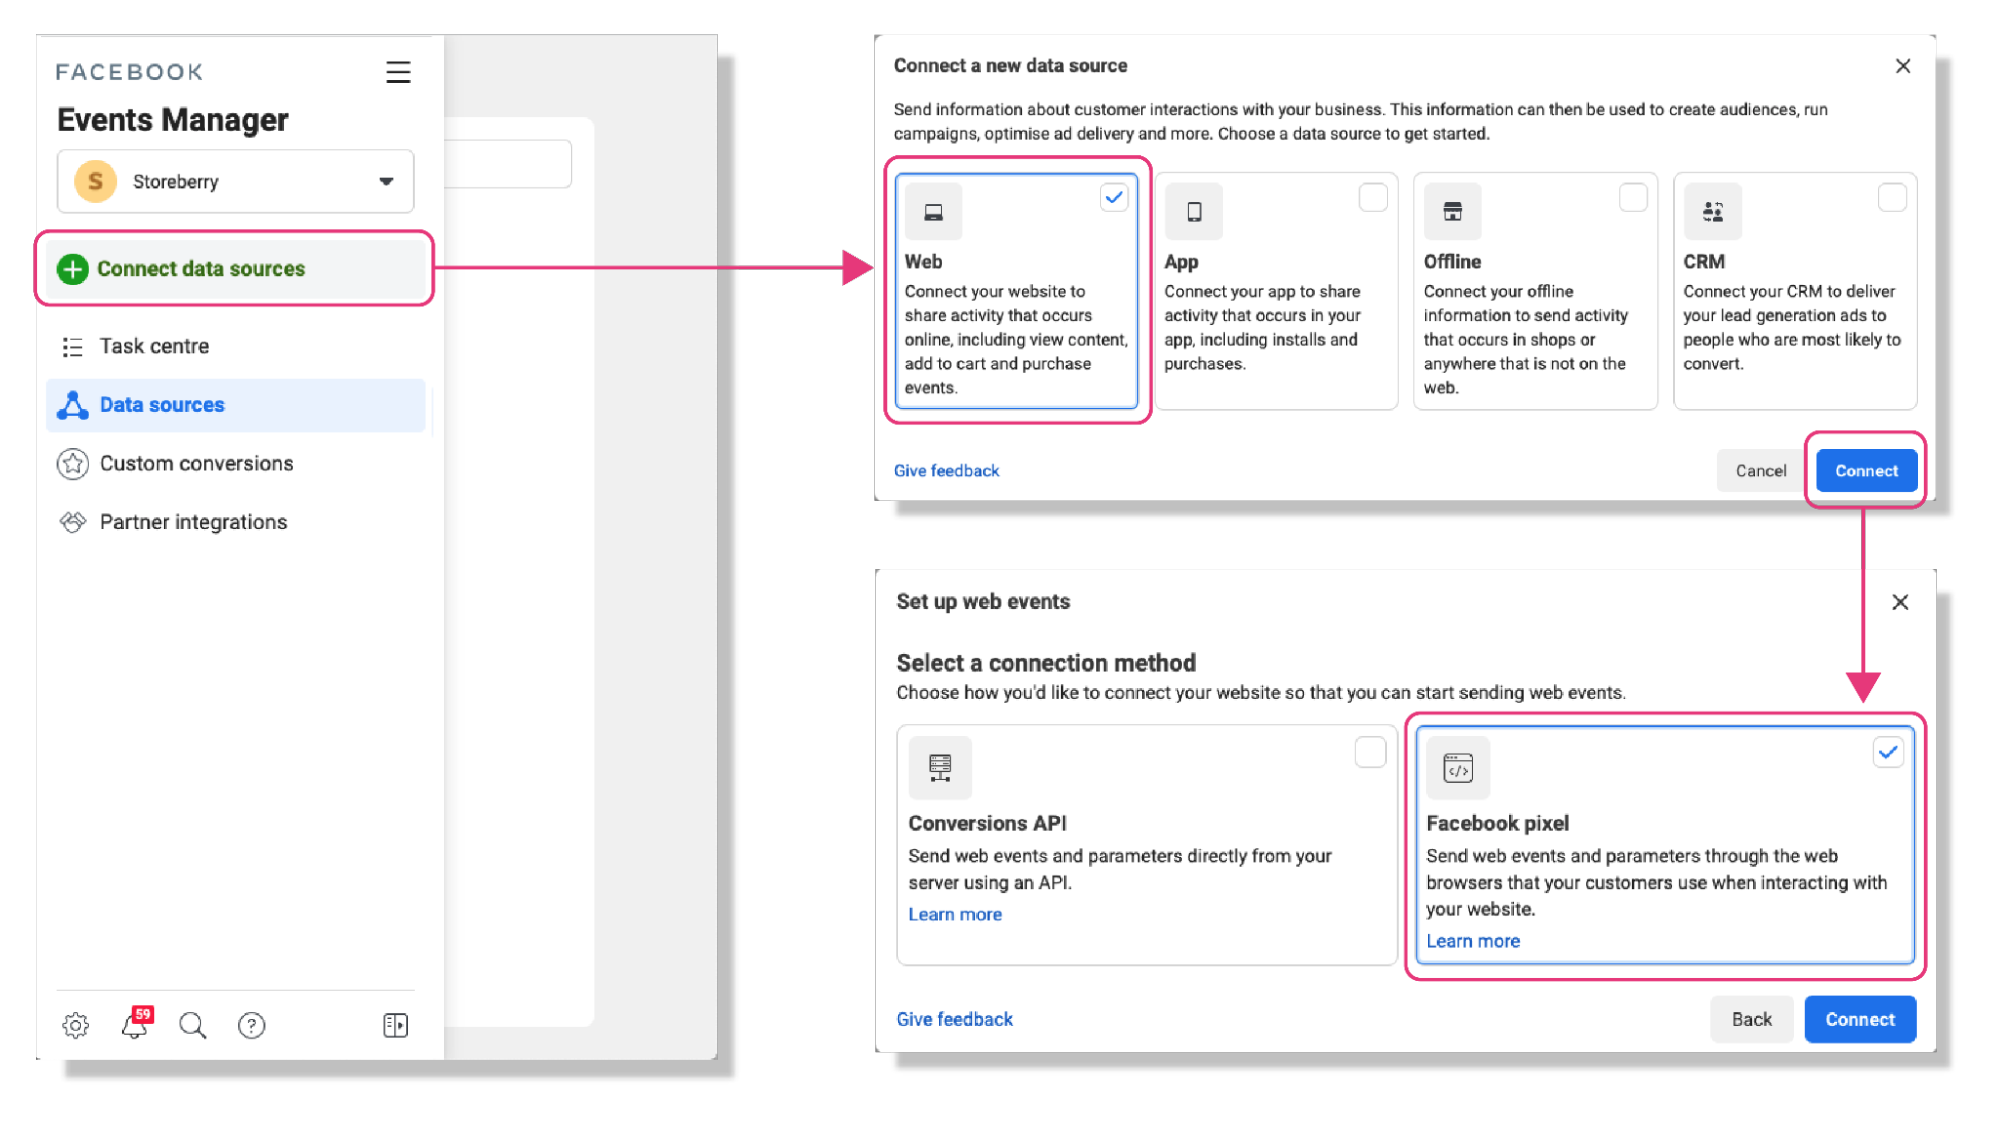
2)Click “Continue” and then enter your pixel name and the URL of your online store and click “Next”.
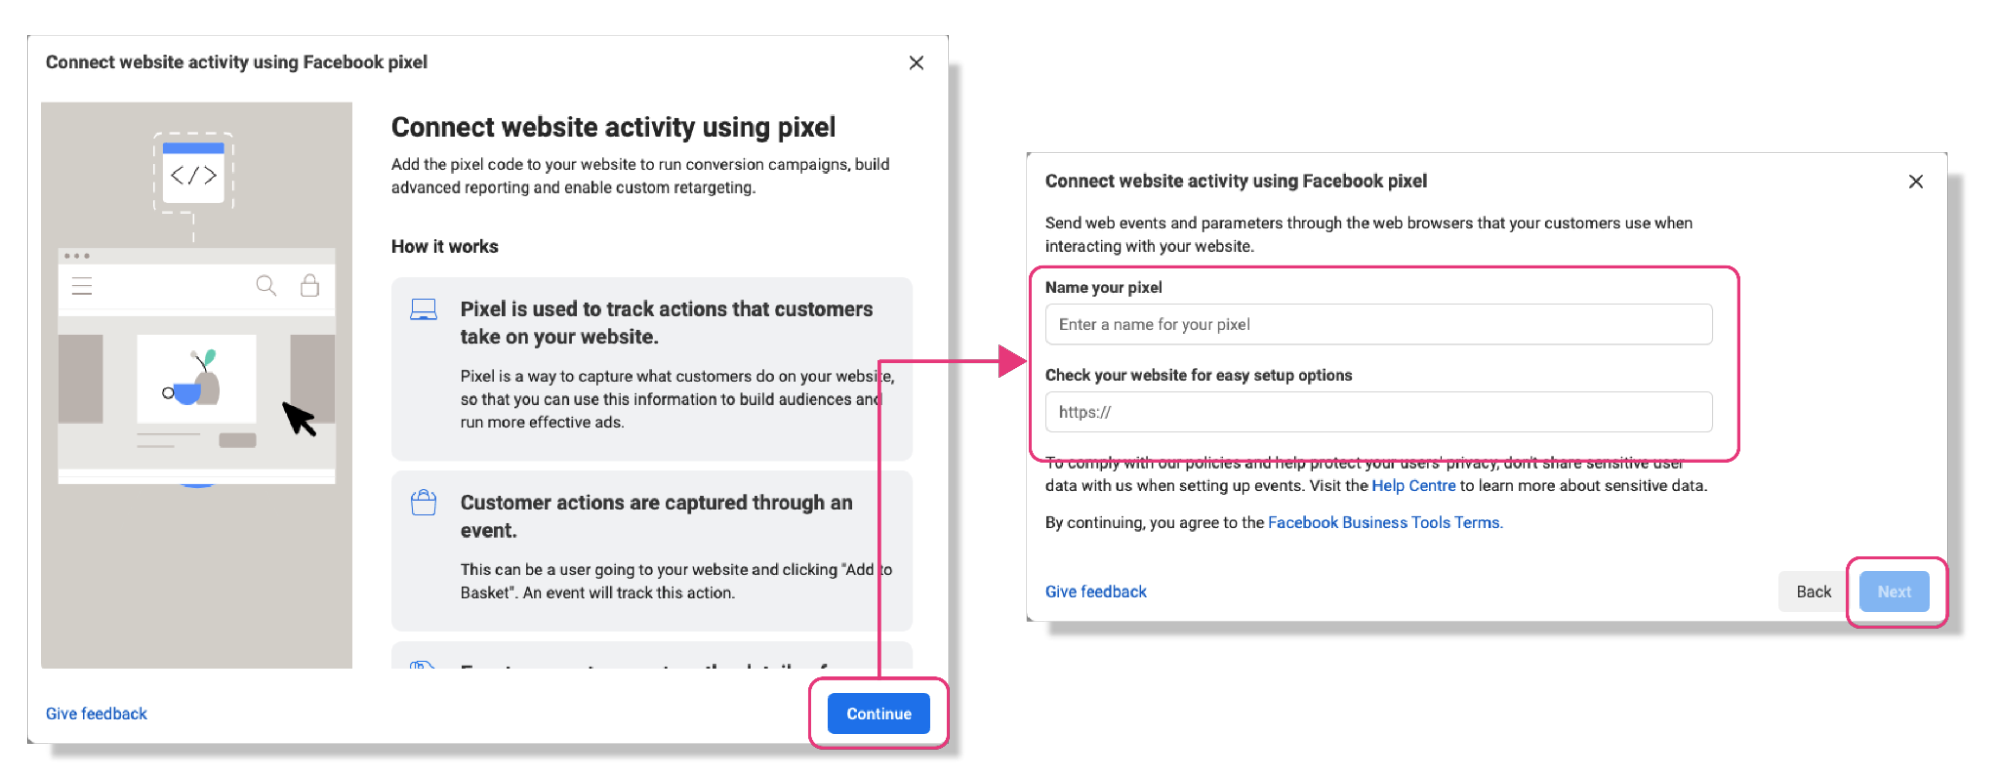
3)After successfully creating your Pixel account, please tap “Install Code Manually" and copy the code, and you will find your Merchant ID (16-digit number) inside the code.
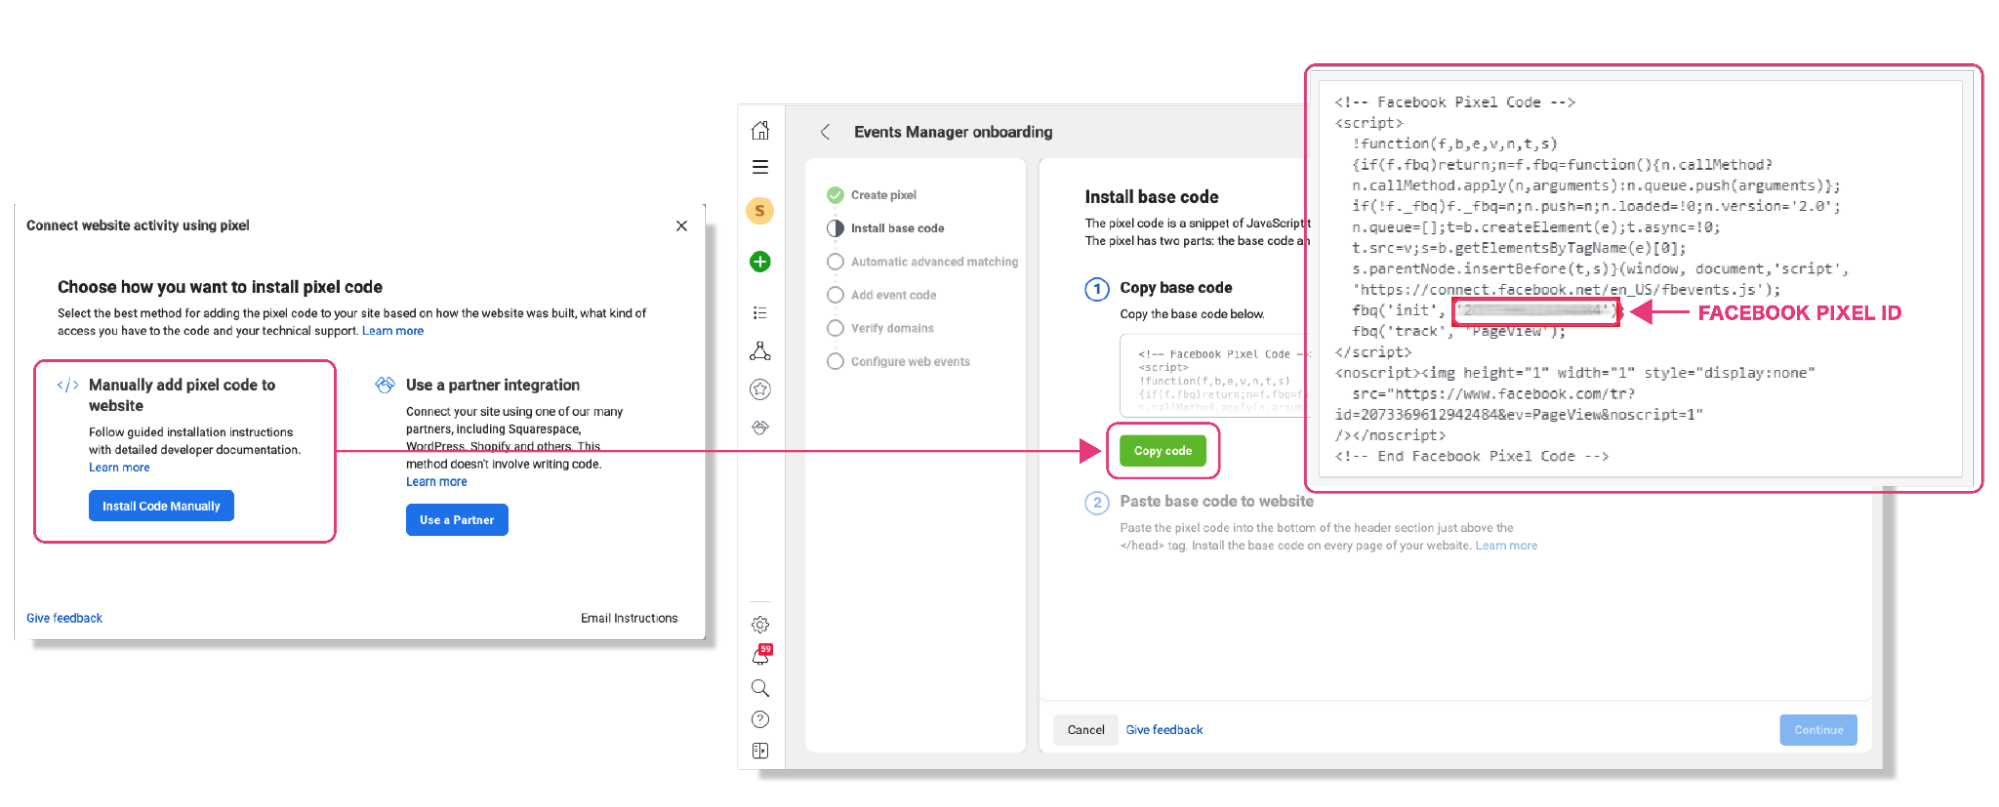
3)Go to the STOREBERRY Admin Panel 「Online Store」 「Analytics」 and tap the 「Enable」 button of the Facebook Pixel column. Then continue to enter your Merchant ID to connect it to your website.

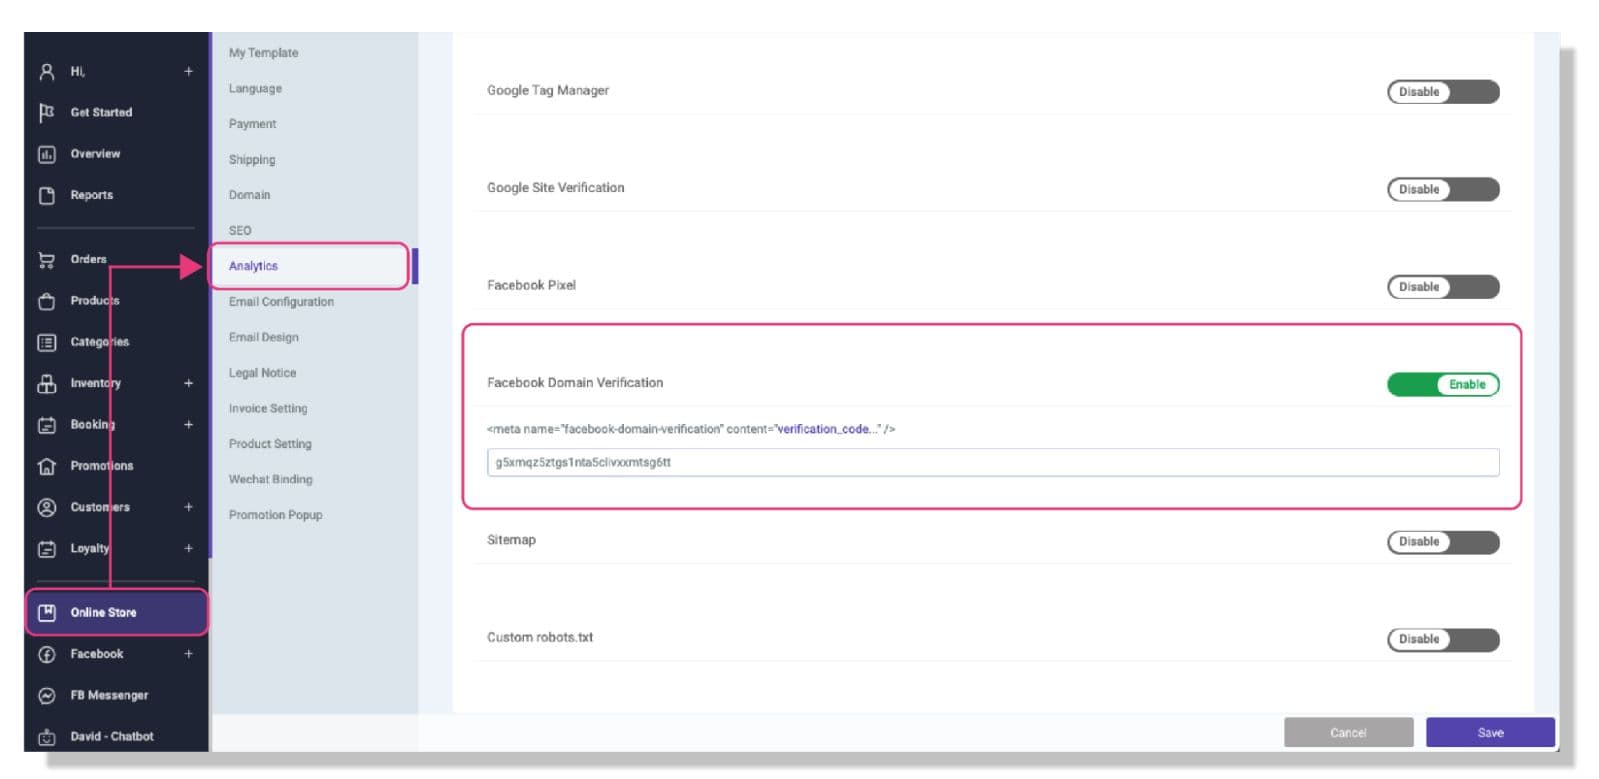
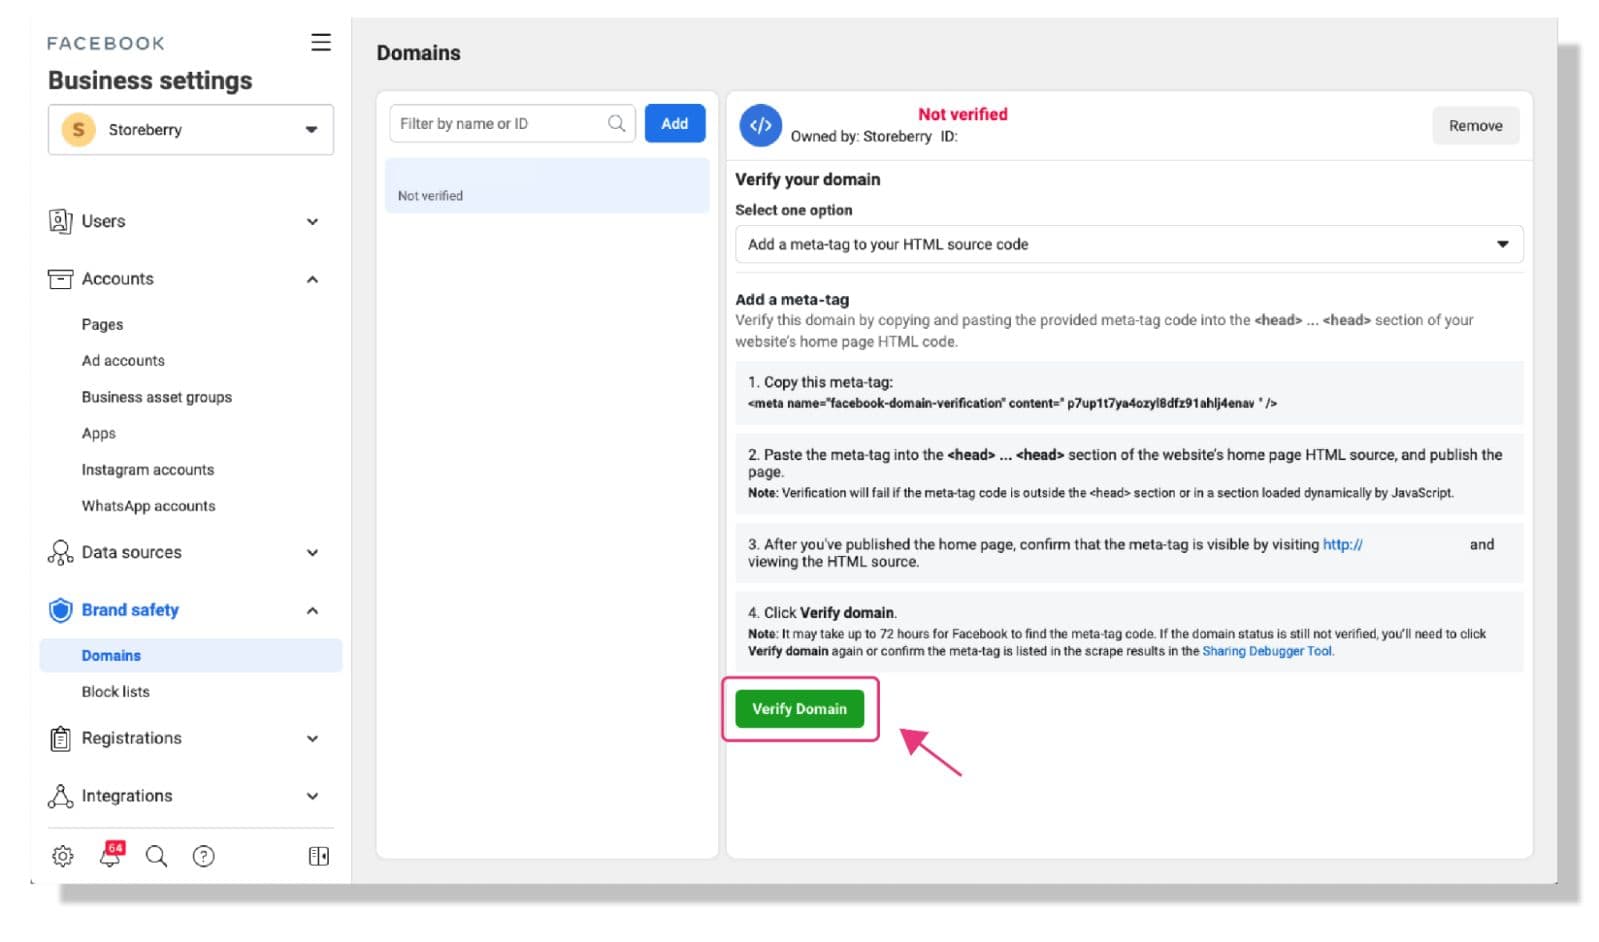
Facebook Domain Verification (Meta-tag)
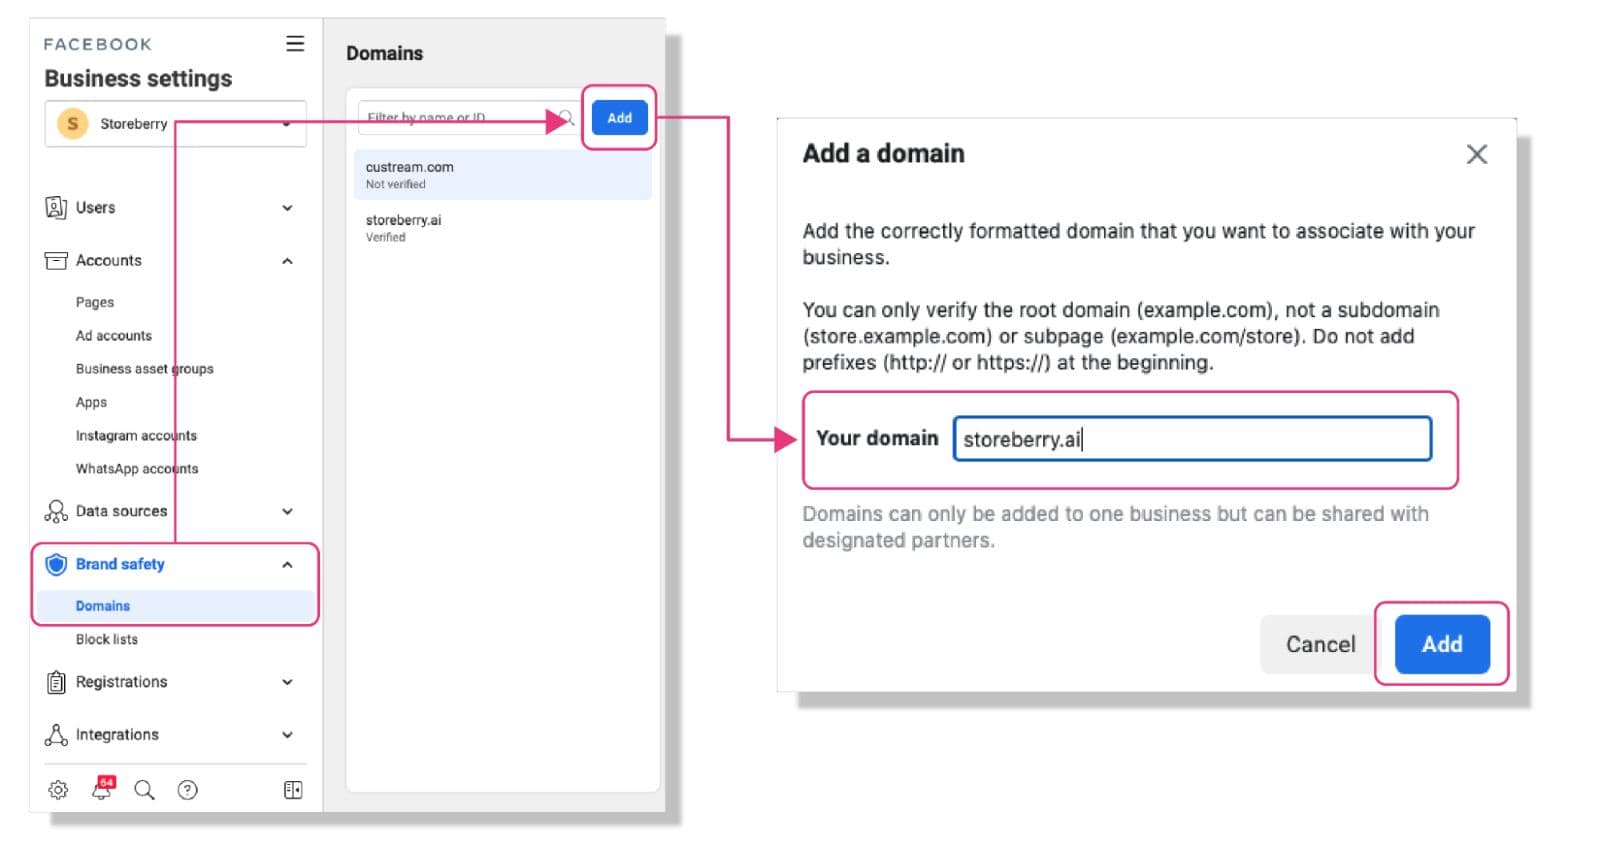
If this is your first time to set up Facebook Domain Verification, please log in to your Facebook account on Facebook Business Manager , and then follow the steps below to get your Meta-Tag:
1)Go to “Brand Safety” > “Domains”, then click "Add" and enter your domain in the pop-up window (The URL prefix (http:// or https://) is not included). Then click “Add” to submit your domain.
2)Copy the mixed code which is located in the middle of the meta-tag (between「 <meta name="google-site-verification" content="」, You can find the example (text with underscore) below for your reference:
Example:
 <meta name="google-site-verification" content="
                        g5KxMqZ5ZtGs1nGta5CLiVXmtsUCEg6LttwCL_vLN"/>
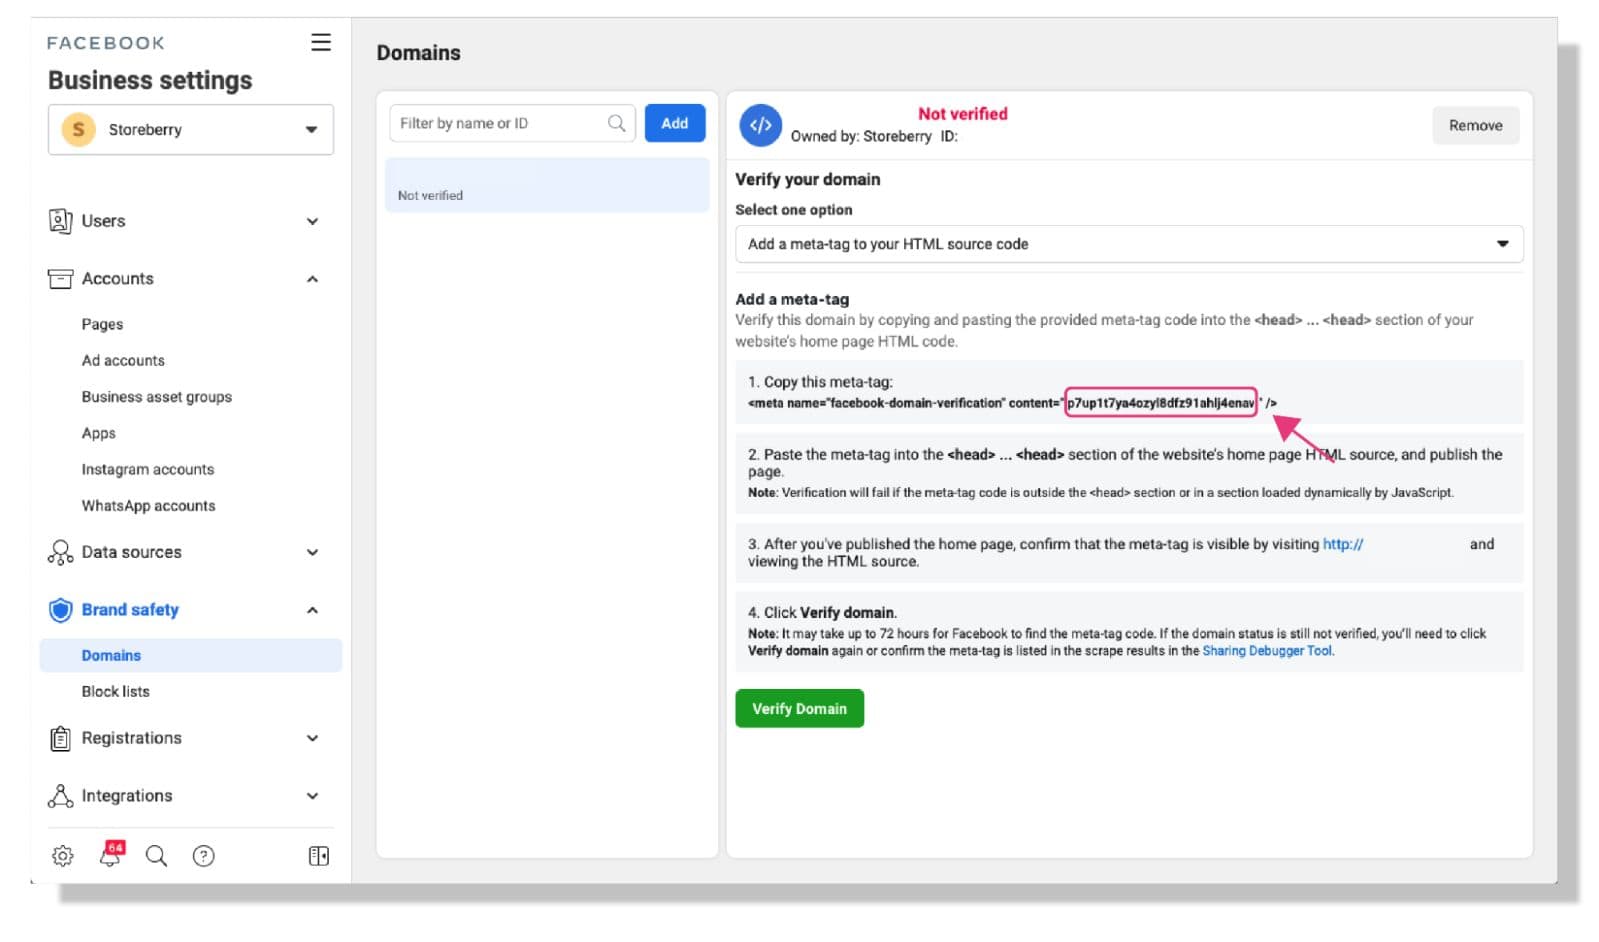
3)Go to the STOREBERRY Admin Panel 「Online Store」 「Analytics」 and tap the 「Enable」 button of the Facebook Domain Verification column. Then continue to enter your verification code to connect it to your website.
4)Finally, return to the Facebook Business Manager and click “Verify Domain”. The green "Verified" word will appear on the right of the domain name.
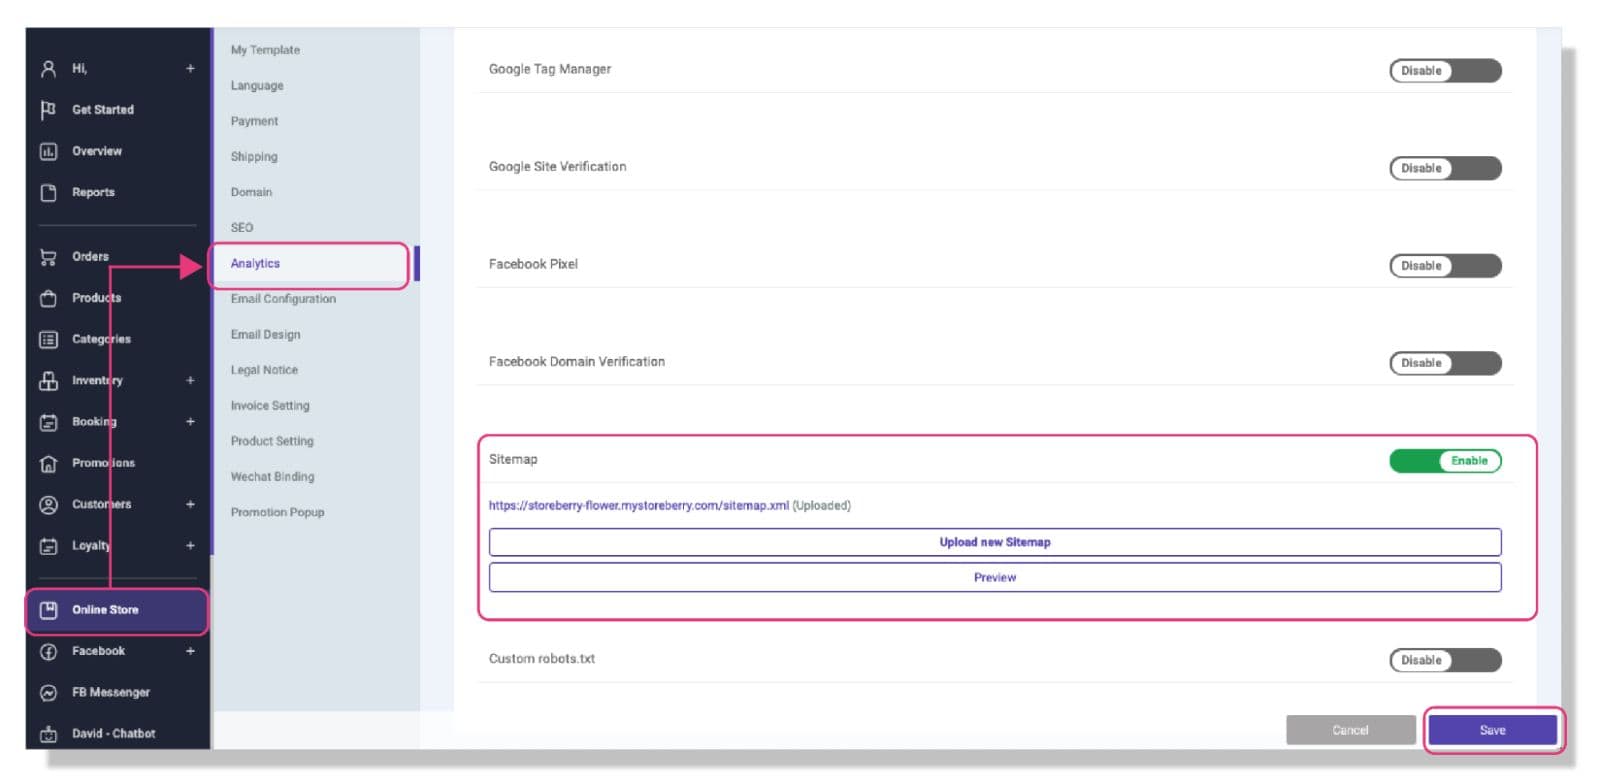
Submit Sitemap
A “Sitemap” is a file where you provide information about the pages, videos, and other files on your site, and the relationships between them. Submitting the Sitemap can help search engines like Google read this file to crawl your site more efficiently and tells them which pages and files you think are important in your site, and also provides valuable information about these files.
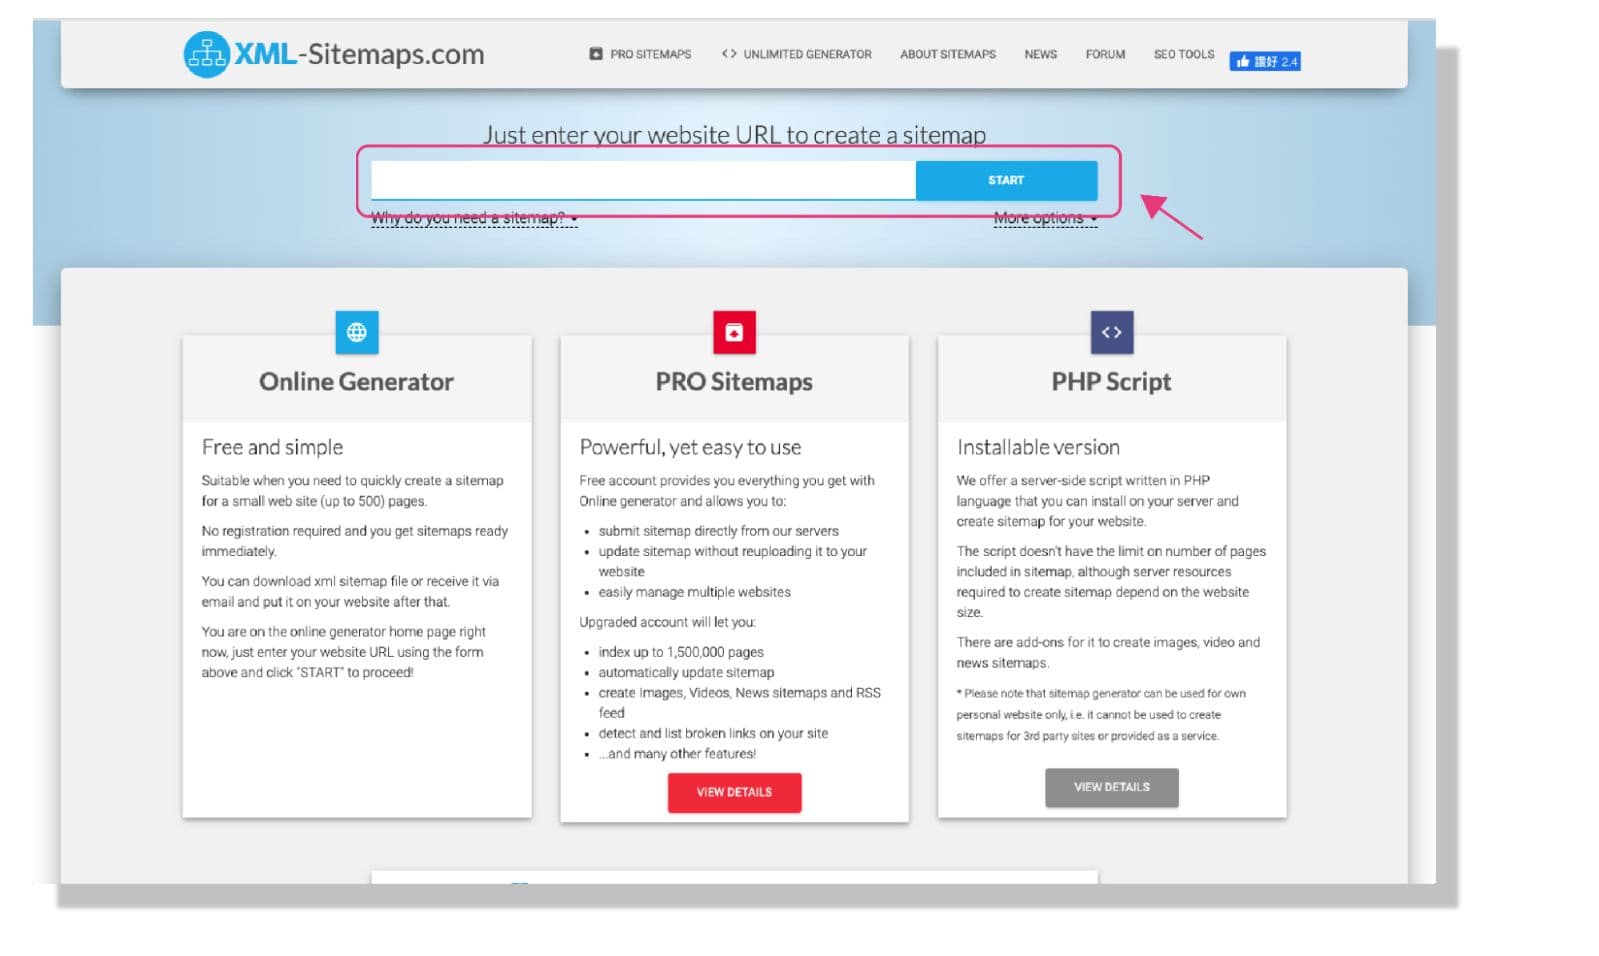
You can create a Sitemap for your website through the third-party Sitemap generators . Below we are going to use the free online Sitemap generator XML sitemap Generator as an example:
1)Enter your website URL and click “Start” to automatically generate a Sitemap (Max. 500 URLs).
2)After the Sitemap is created, you can click “View Sitemap details” to view the Sitemap and click “Download Your XML Sitemap File” to download your Sitemap file.
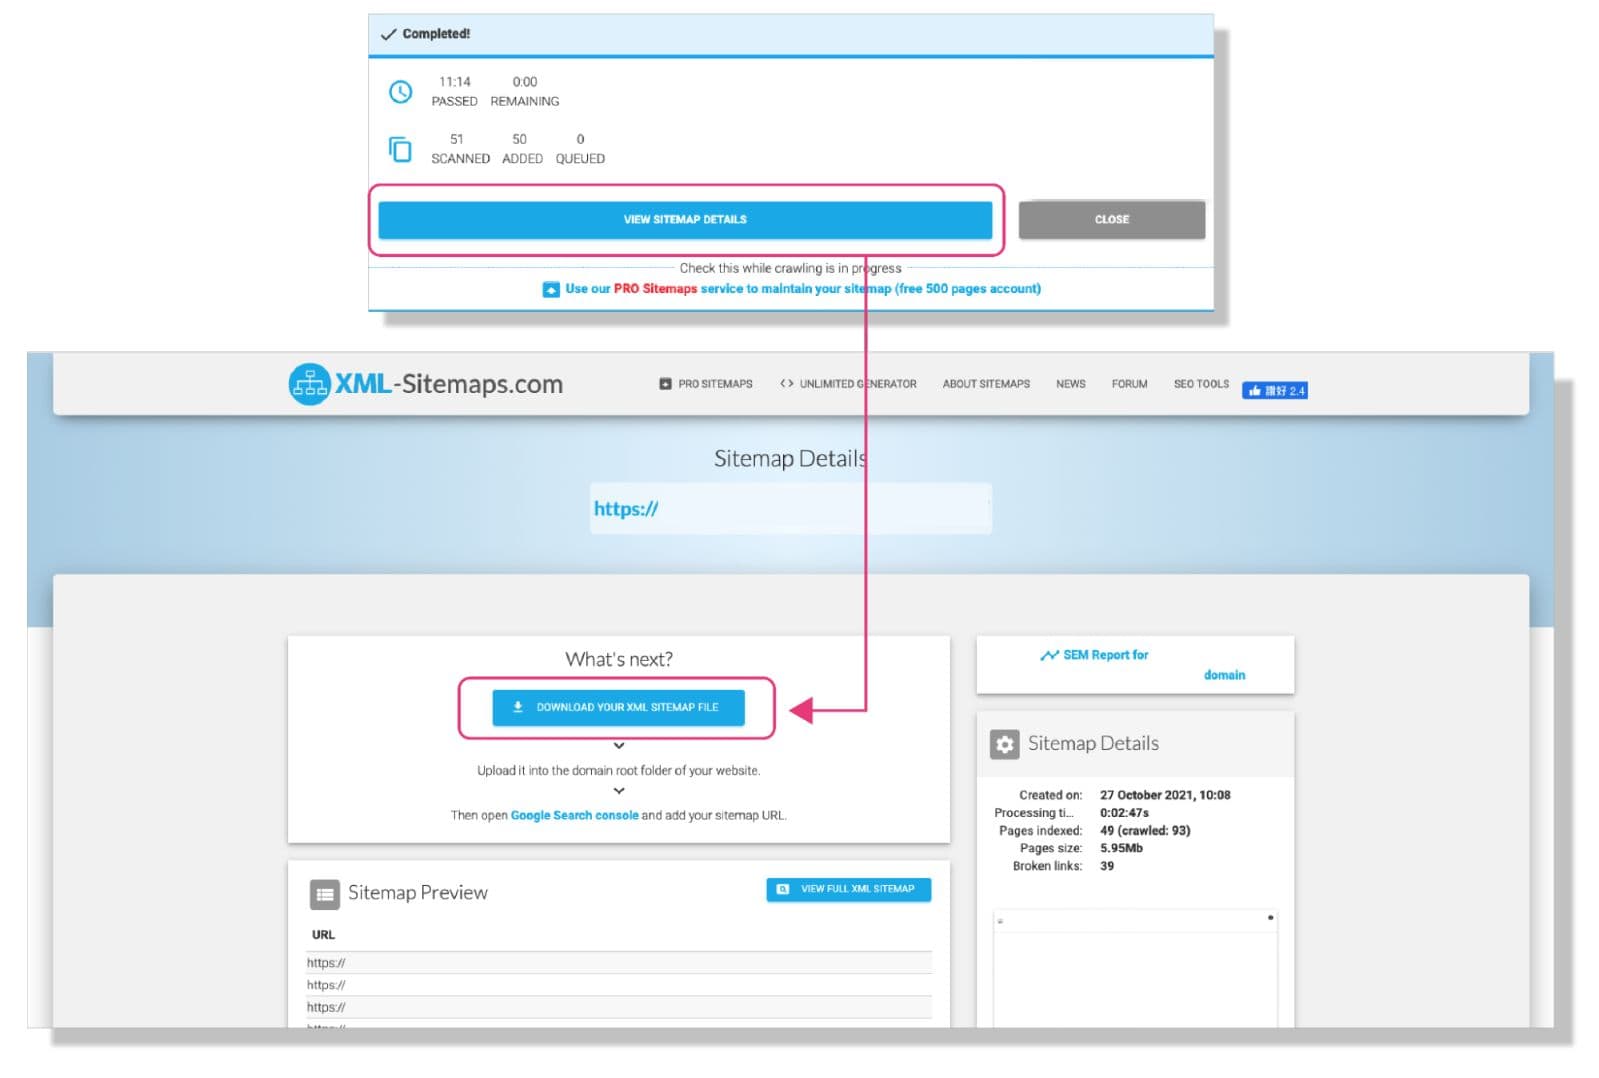
3)Go to the STOREBERRY Admin Panel 「Online Store」 「Analytics」 and tap the 「Enable」 button of the Sitemap column. Then click “Upload new Sitemap” to upload your Sitemap file and click 「Save」 .
4) Back to the Google Search Console page, click “Sitemaps” in the left toolbar, then enter your Sitemap URL under “Add a new sitemap” column and click “Submit”.
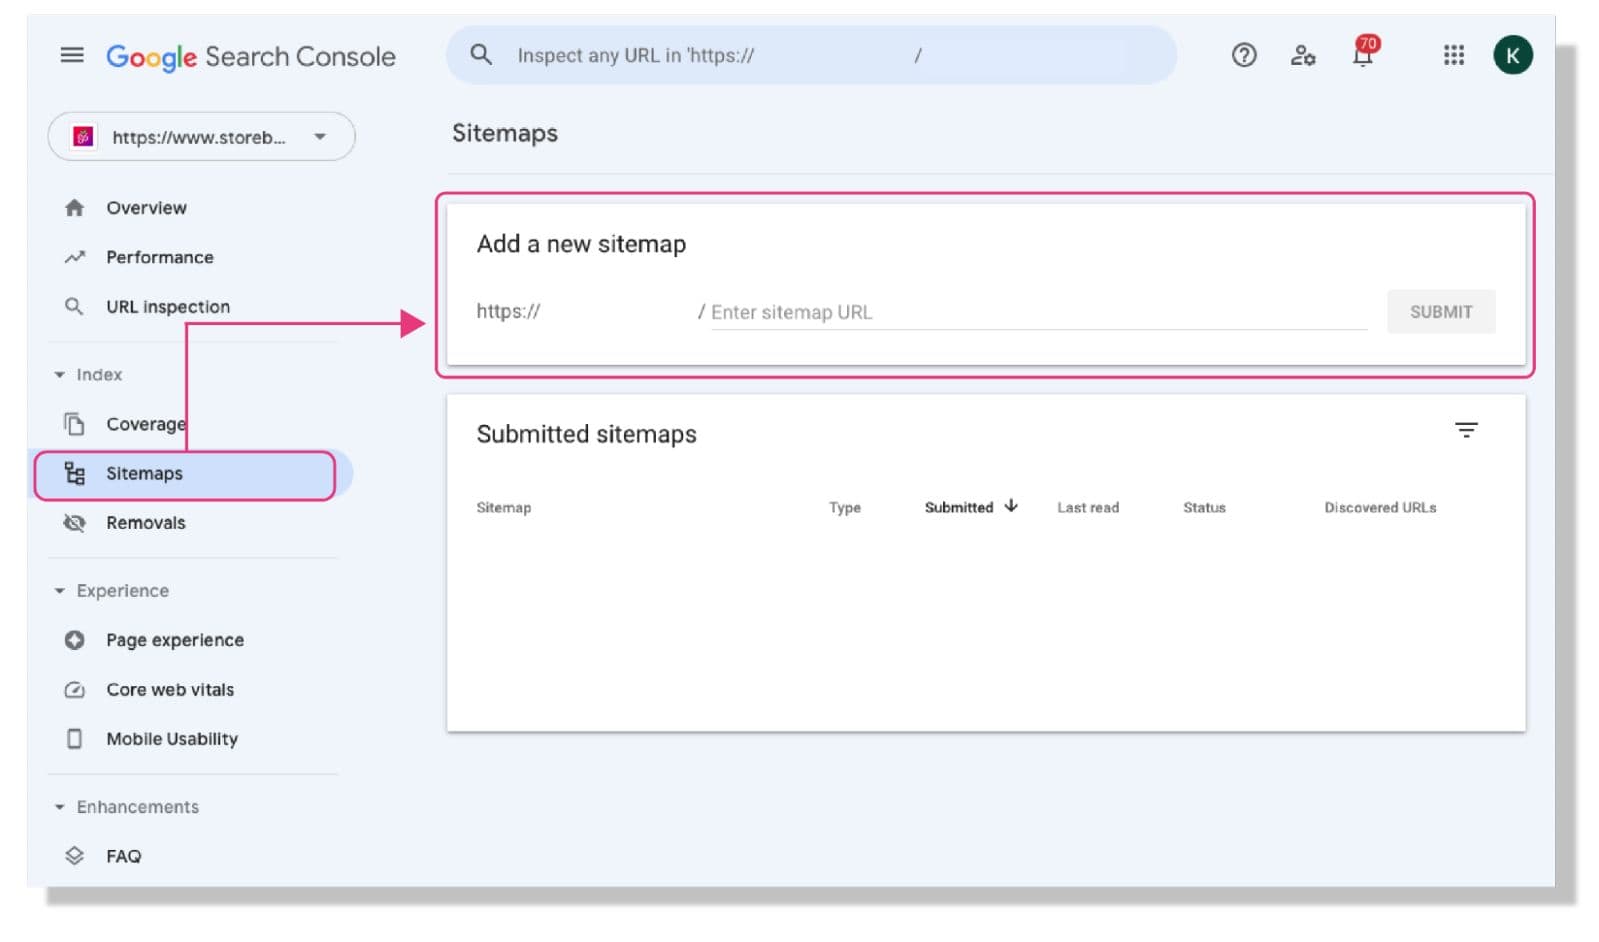
5)After successfully submitting the Sitemap URL, the status of the Sitemap URL will be displayed as “Success” in the “Submitted Sitemaps” column.

Build robots.txt File
Search engines like Google will constantly crawl the web to find new information for search results. A robots.txt file is used primarily to tell search engine crawlers which URLs the crawler can access on your site and mainly to avoid overloading your site with requests.
To create a robots.txt file, you can go to STOREBERRY Admin Panel 「Online Store」 「Analytics」 and enable “Custom robots.txt”. Then add the rules to the robots.txt file below and click 「Save」 . Your robots.txt file will be stored in the root directory of your site, such as: xxx.mystoreberry.com/robots.txt.
You can also use Google’s robots.txt testing tool to check whether your robots.txt file has successfully blocked Google’s web crawler.

(i) Custom Email Settings
Go to STOREBERRY Admin Panel 「Online Store」 and select 「Email Configuration」 at the side toolbar. You can choose whether to use “STOREBERRY” or “SMTP” as your email server here.
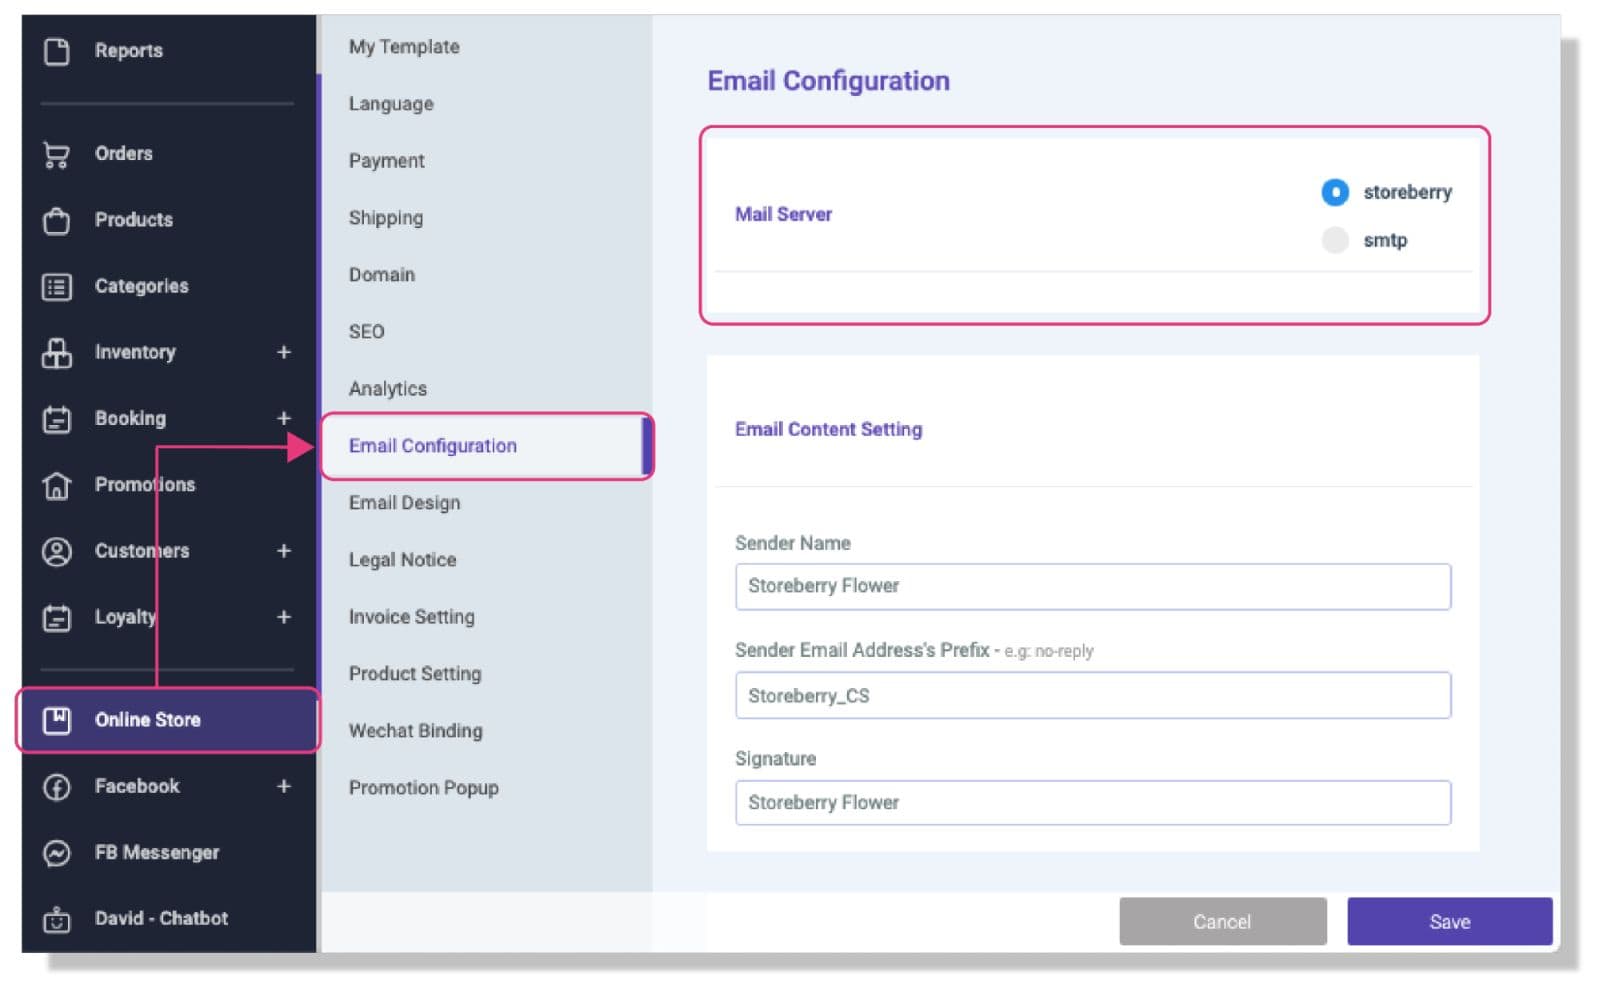
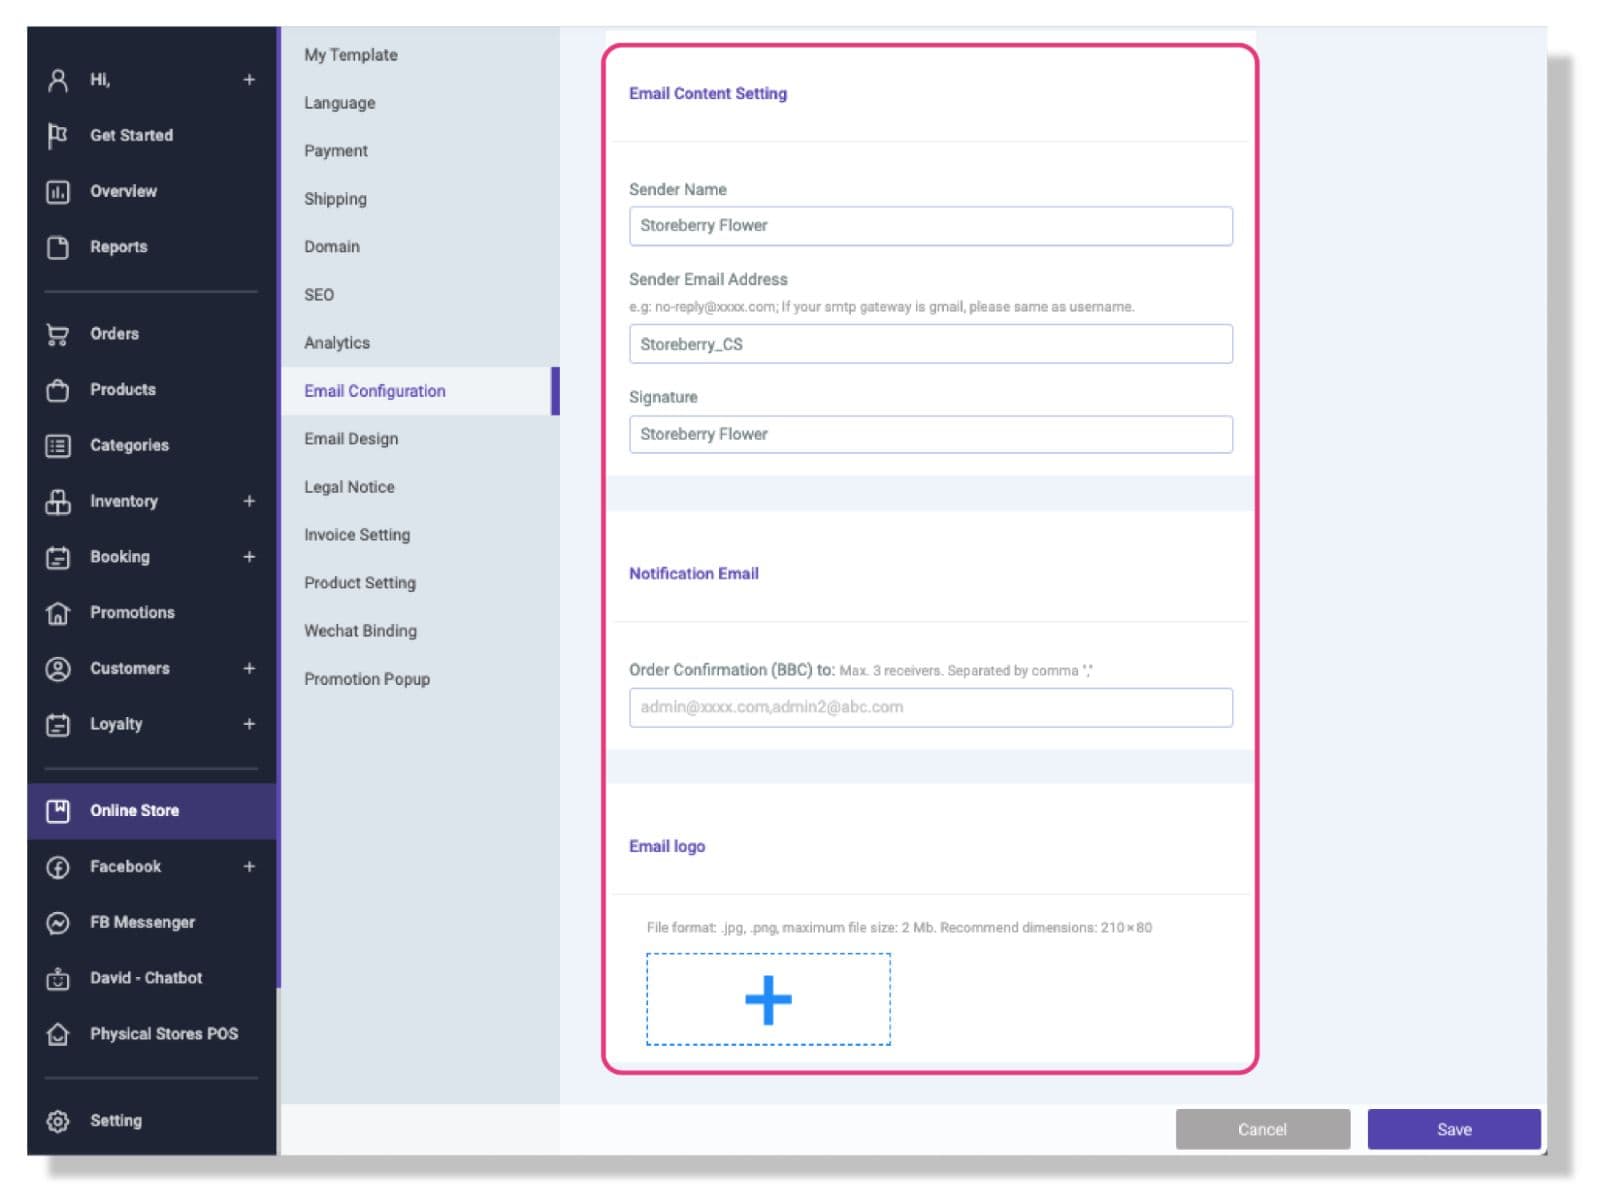
If you chose “STOREBERRY” as your mail server:
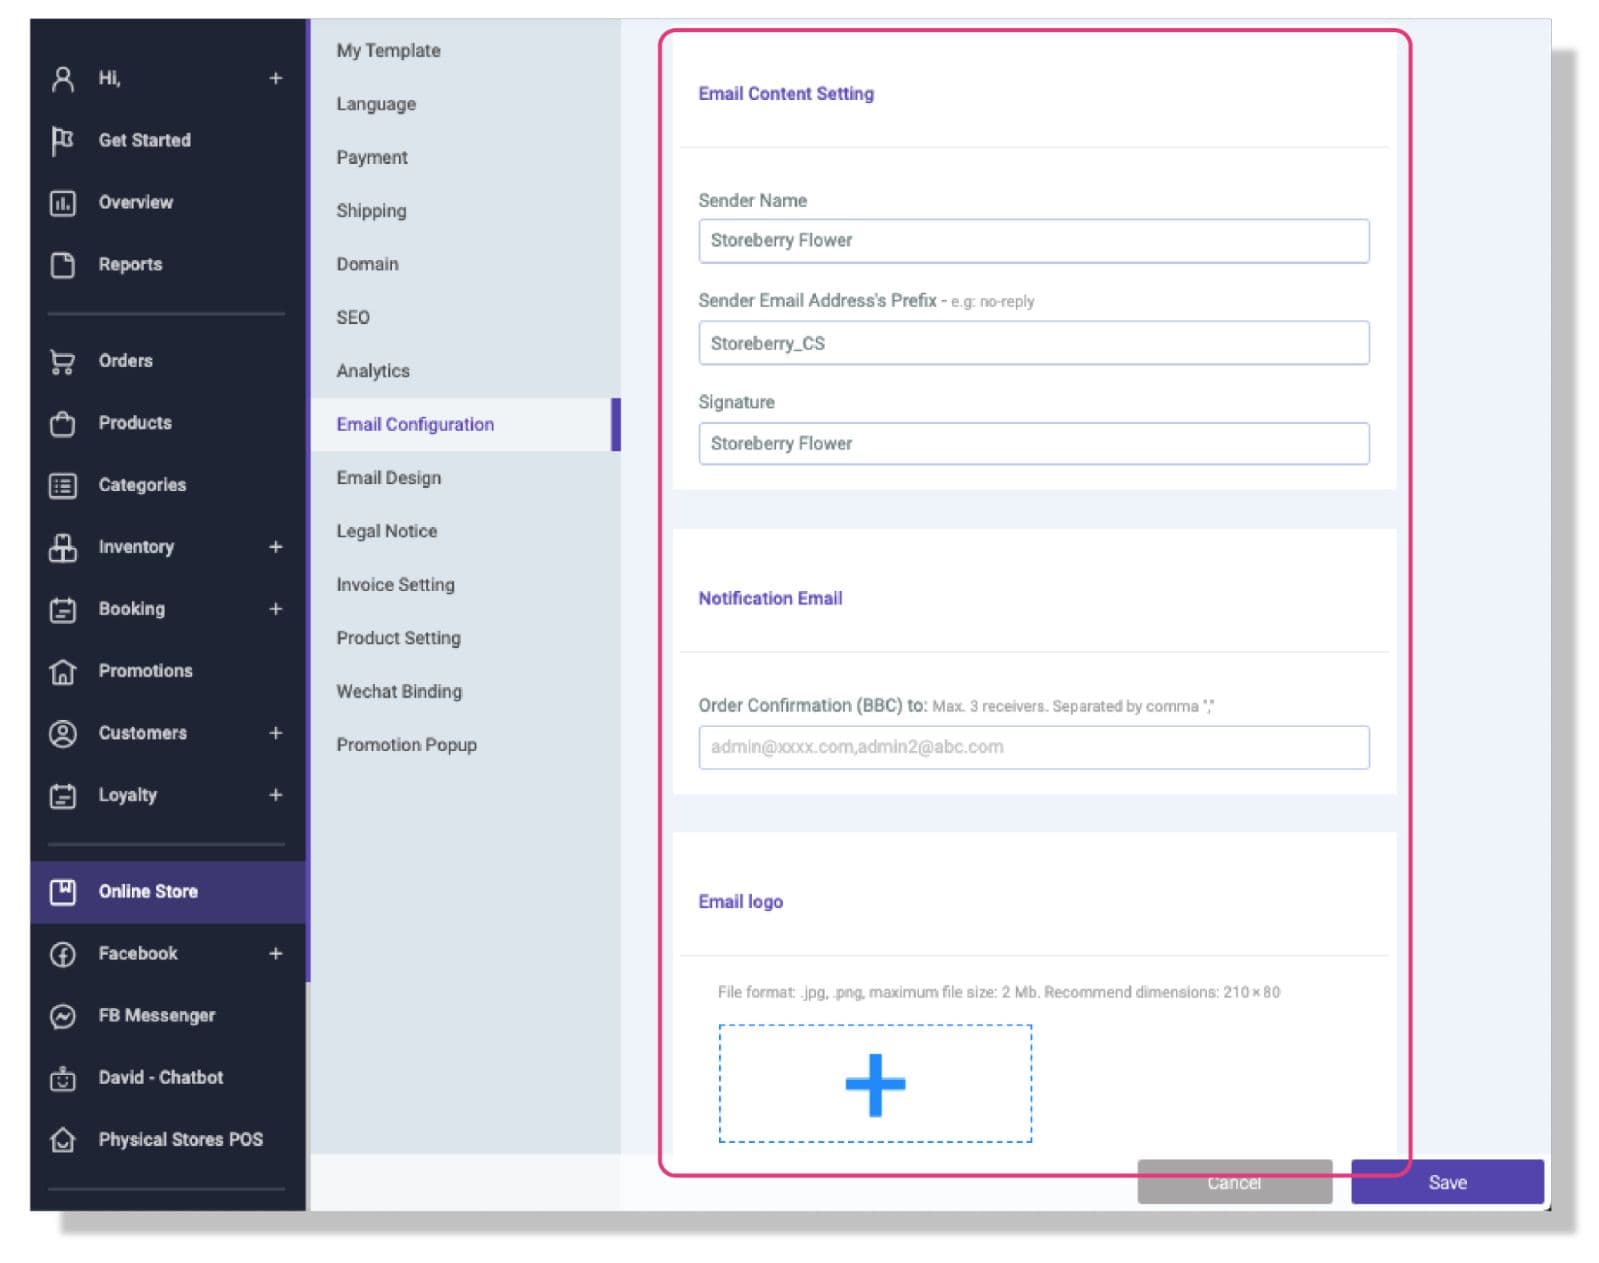
You only need to enter your sender name (E.g. your store name), the prefix of the sender email address (E.g. no-reply), and signature in the “Email Content Setting” column, and continue to enter the “Notification Email” (i.e. Order confirmation) below and upload the email logo to complete the setting.
If you chose “SMTP*” as your mail server:
(*Attention: This setting only applies to the personal version of Gmail, and personal Gmail SMTP is limited to 100 emails per day.)
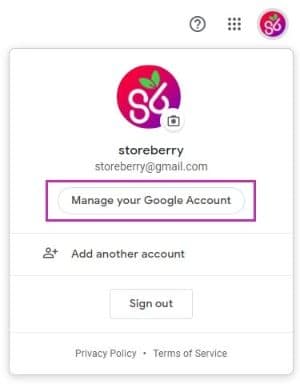
1. Please log in to your Google account, click your account icon, and select “Manage your Google account”.
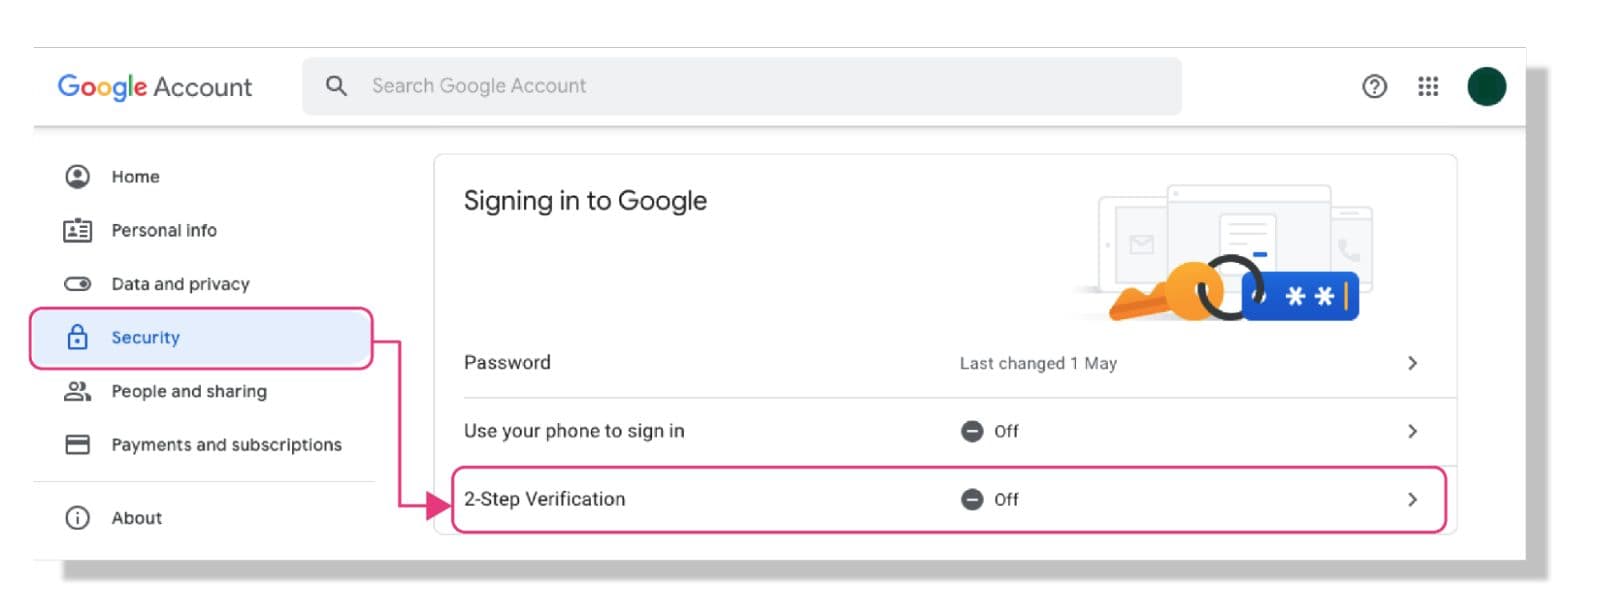
2. Tap “Security” from the side toolbar of Google, and click to turn on “Two-Step Verification” to increase the level of security. Please follow the instructions to select your verification method and complete the verification process.
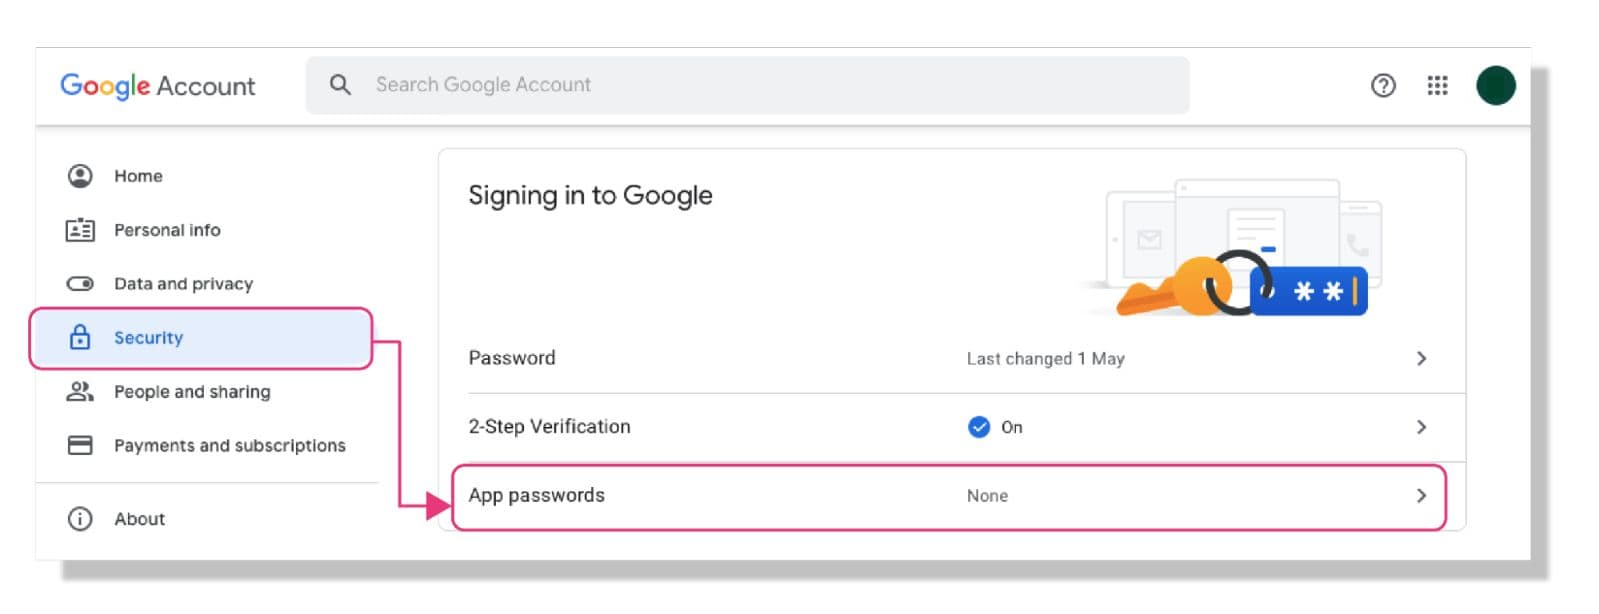
3. Then tap “Security” from the side toolbar again, and click “App passwords” to connect it to our SMTP service.
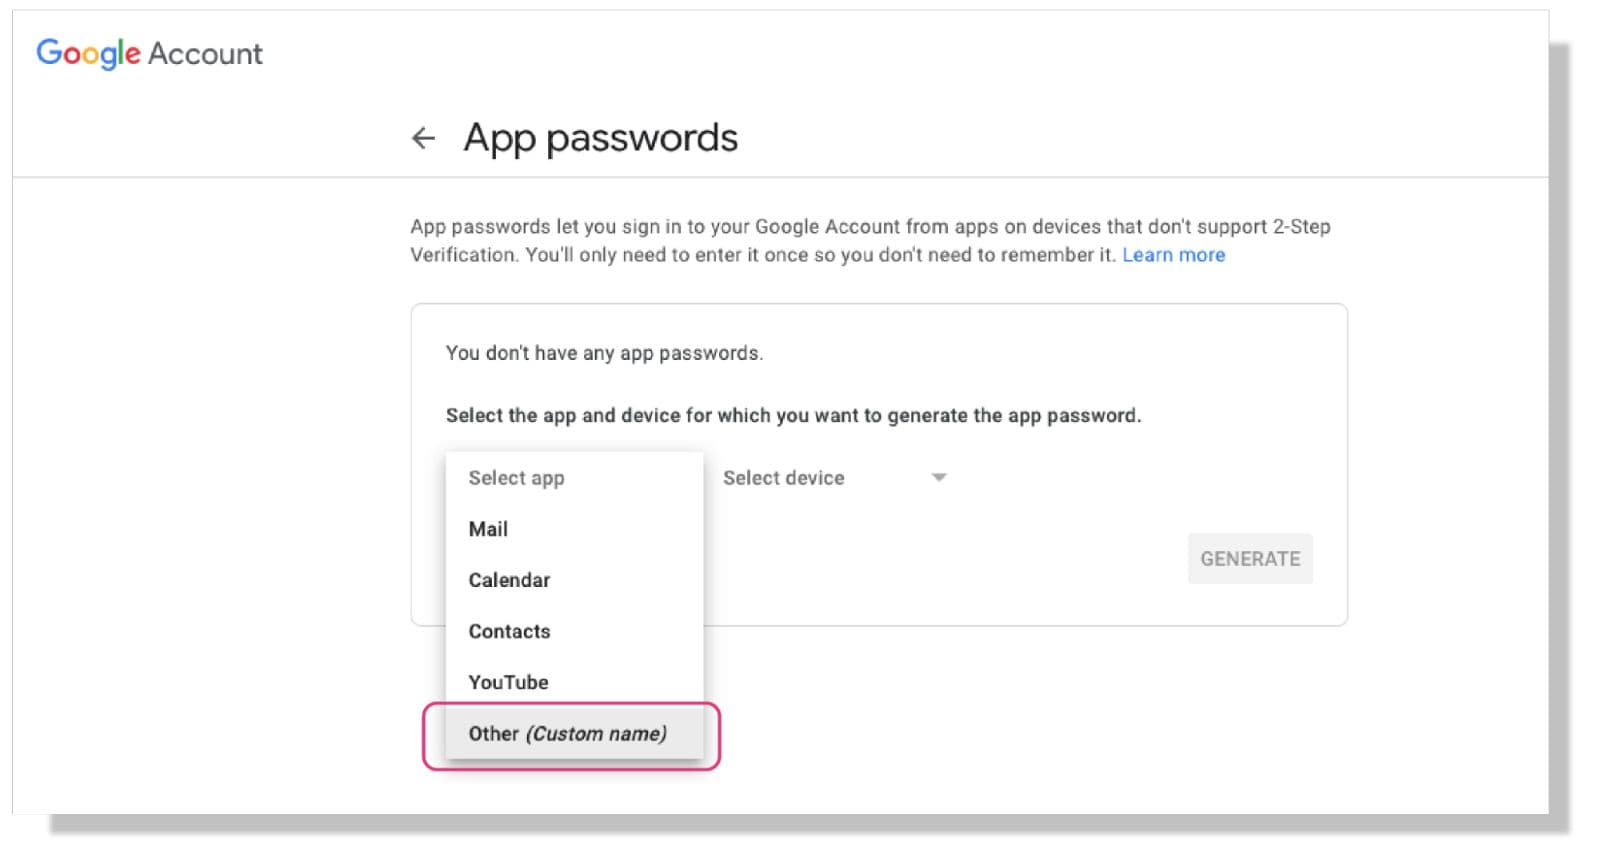
4. Select “Other (Custom name)” as the app and device for which you want to generate the app password, and name it “Business Email”. Click “Generate” and keep the app password for future use.
5. Go back to the STOREBERRY Admin Panel 「Online Store」 「Email Configuration」 at the side toolbar. Select “SMTP” in the Email Server column, and continue to enter the following information as below:
- Host: smtp.gmail.com
- Port: 587
- Username: (Please enter your personal Gmail email address)
- Password: (Please enter the "App Password" generated in Gmail)
- Encryption: TLS
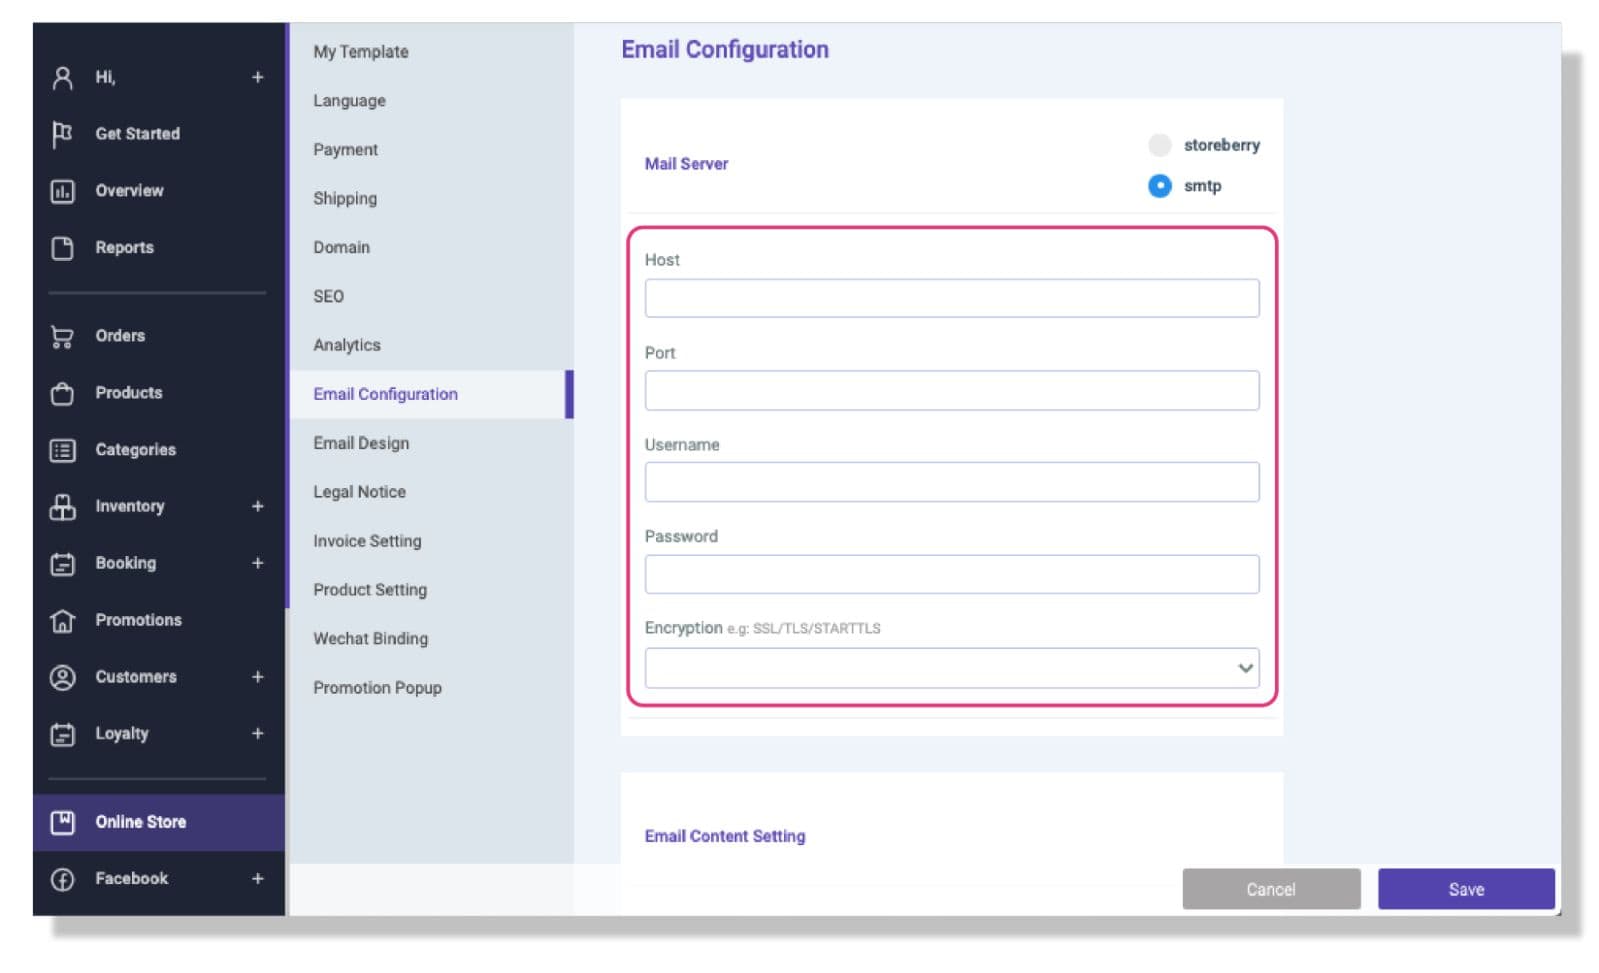
6. Click 「Save」 to update the changes. Then you can enter the email address for testing on the pop-up window “SMTP Connection Test”, and click 「Text & Save」 to send the test email. Your SMTP setup will be finished once you received the confirmation message and the test email.
7. Finally, please go back to the STOREBERRY Admin Panel 「Online Store」 「Email Configuration」 , and continue to enter the email content settings, notification email and upload the email logo to complete the email settings.
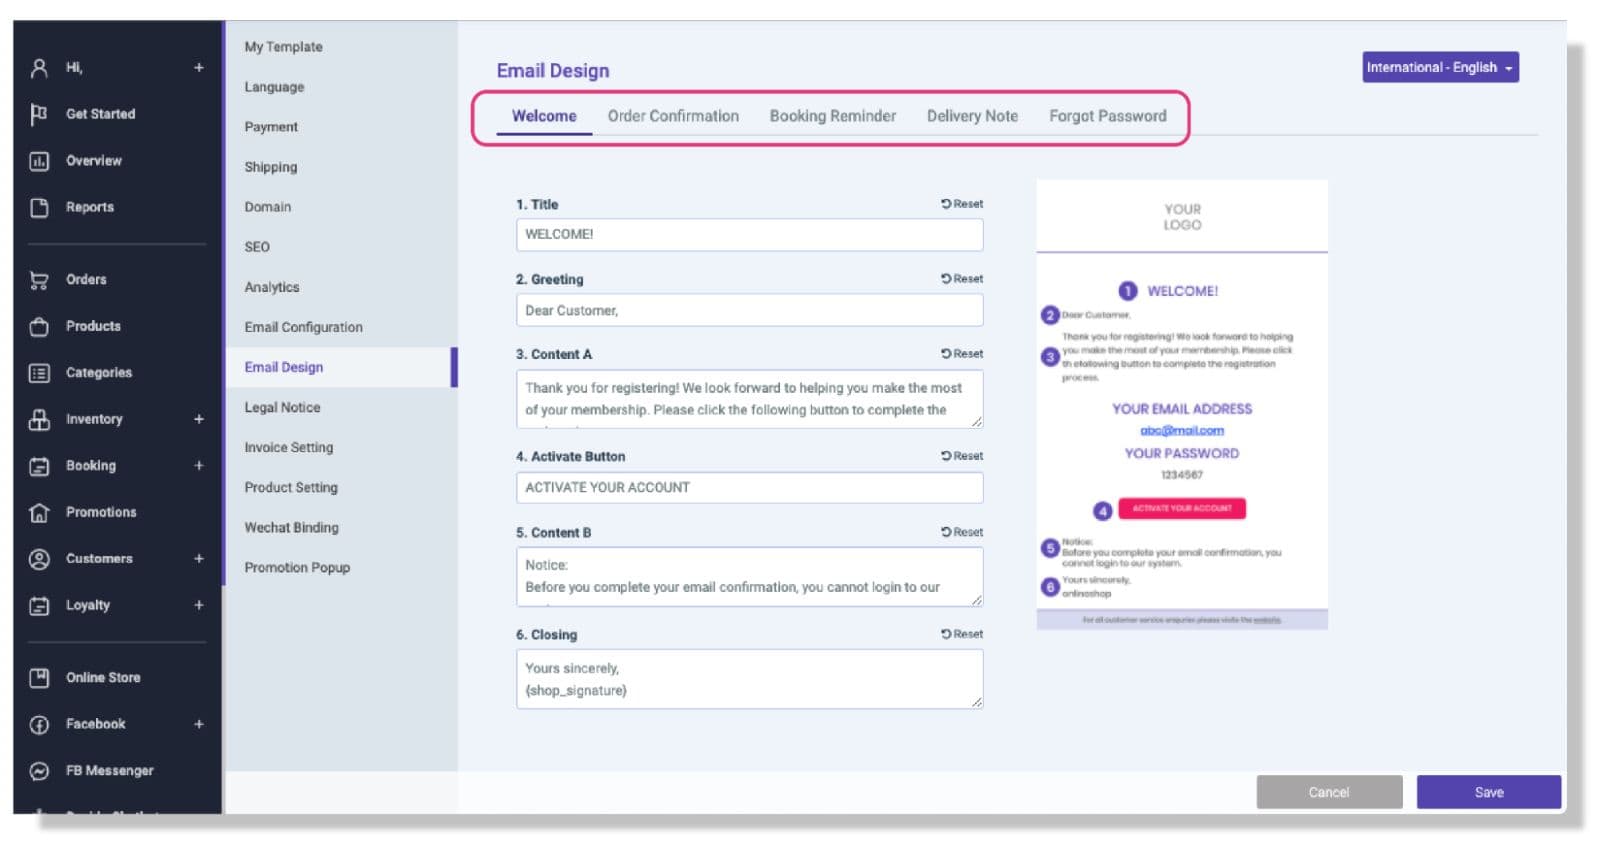
(ii) Custom Email Design
The complicated steps of opening a store making you feel annoyed? Let STOREBERRY simplify the online store setup process for you! We provide up to 5 preset email templates, including: Member Welcome Email, Order Confirmation, Booking Reminder, Delivery Note and Forgot Password, etc. to speed up your store setup process.
Want to make further changes? You can update the content of each email template through STOREBERRY Admin Panel 「Online Store」 「Email Design」 .
# 2.6 Legal Notice / Warning
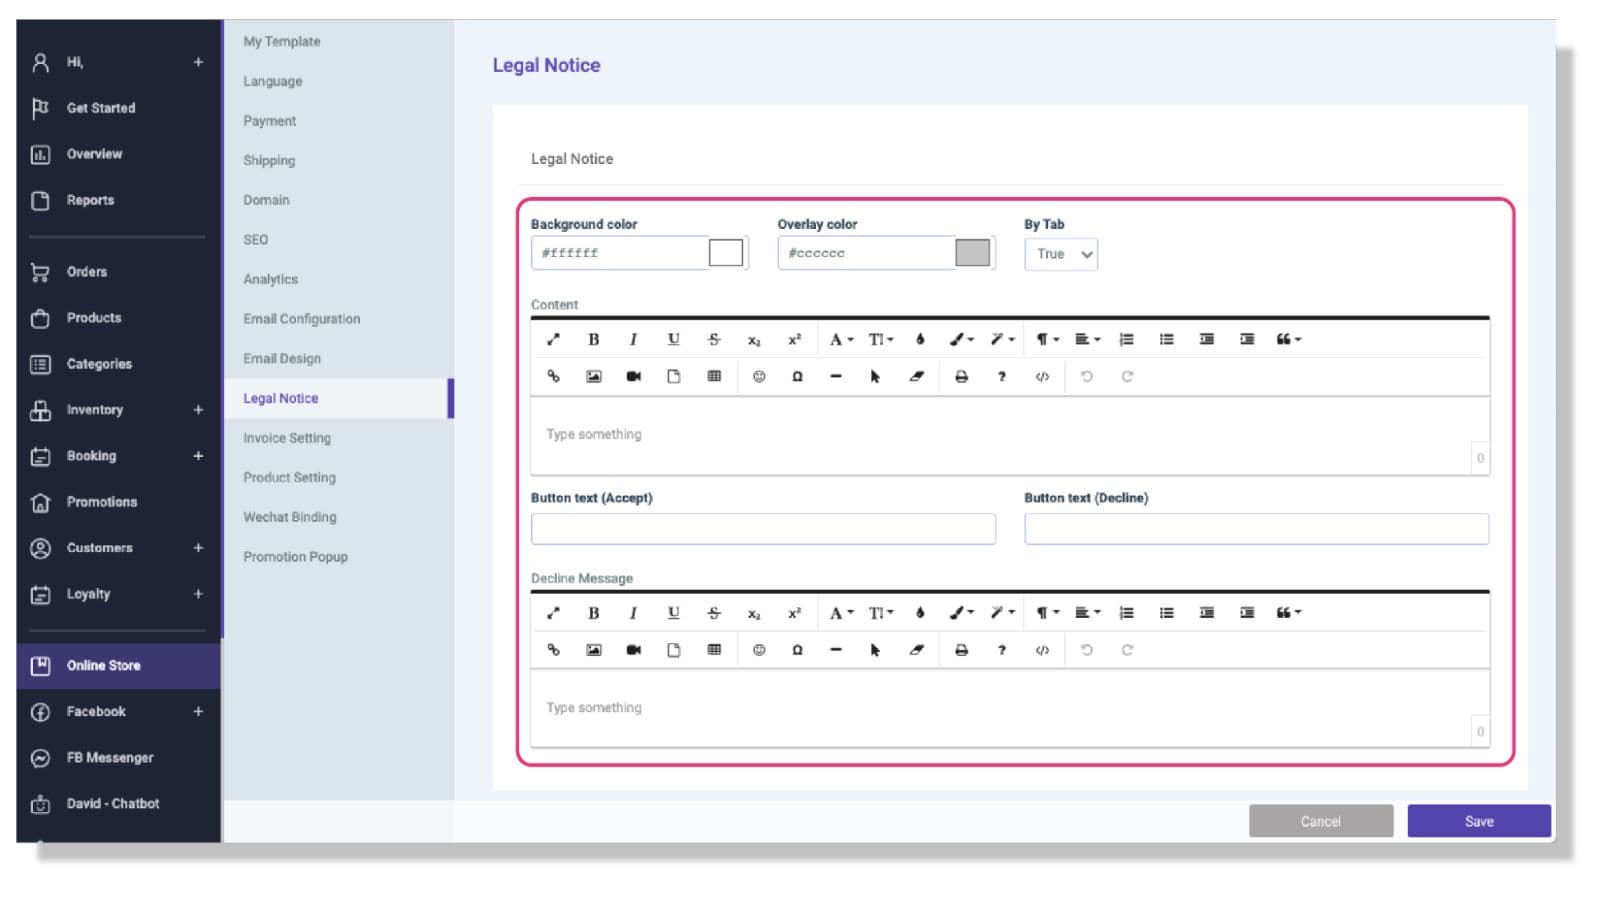
If you sell products related to tobacco and alcohol, you must follow the guidelines from the Tobacco and Alcohol Control Office of the Department of Health, and display the prescribed notice in a reasonably legible manner.
You can fill in the legal notices and rejection messages through STOREBERRY Admin Panel 「Online Store」 「Legal Notice」 to prevent customers who refuse to accept the declaration from entering the website.
Was this article helpful?
Can’t find the answers you’re looking for?
Contact now


